Scheduler/cron has been deprecated in favor of Tasks
Formerly configured schedulers have been automatically migrated to Tasks and should work as usual without any additional action.
Continue reading to learn about the differences and new possibilities that Tasks offer. If needed, you can still refer to the old documention for Schedulers.
Tasks#
Tasks are a evolution of Schedulers/cron feature, offering a wider range of uses. They act as an entrypoint for workflows that were not initiated by git provider automation. The following are the key differences between Schedulers and Tasks:
- Schedulers require the provision of a cron-based schedule. In contrast, Tasks have two modes: scheduled (which overlaps Schedulers) and unscheduled (periodic execution is disabled).
- Due to technical limitations, Schedulers required customers to run at least one workflow before their use. Tasks use a new data flow to overcome that difficulty, so you can run them on any branch (as long as it exists in the repository).
- Schedulers allowed you to run a workflow on demand (by clicking the button) with set branch and pipeline files. Tasks allow for the overriding of branch and pipeline files before each execution.
- Schedulers did not accept parameters for a workflow. Tasks allow you to pass arguments as environment variables to both scheduled (as default values) and manual (provided by hand) runs.
Use cases#
Scheduling workflow runs daily, hourly, or even every other minute might be handful in many use cases, such as:
- Periodically performing long or resource-intensive tests that should not be triggered on every push.
- If your application delivery process requires periodic builds.
- When you have an inactive project but would like to be sure that the code still works with its dependencies.
- An easy way to periodically execute arbitrary code, track results, and receive notifications.
Manually-triggered workflow runs complement the mentioned range to give a full control over the execution of CI/CD workflows. Here are some example cases:
- repeated jobs performed under specific circumstances (for instance, database maintenance)
- quality control of your CI/CD environment performed on demand
- provisioning and setting up resources with your cloud provider
- exceptional corrective actions (e.g. pruning the cache)
Setting up a new task#
Web UI#
-
Open the project page.
-
Select the Tasks tab on the top menu pane.
-
Click the New Task button.

-
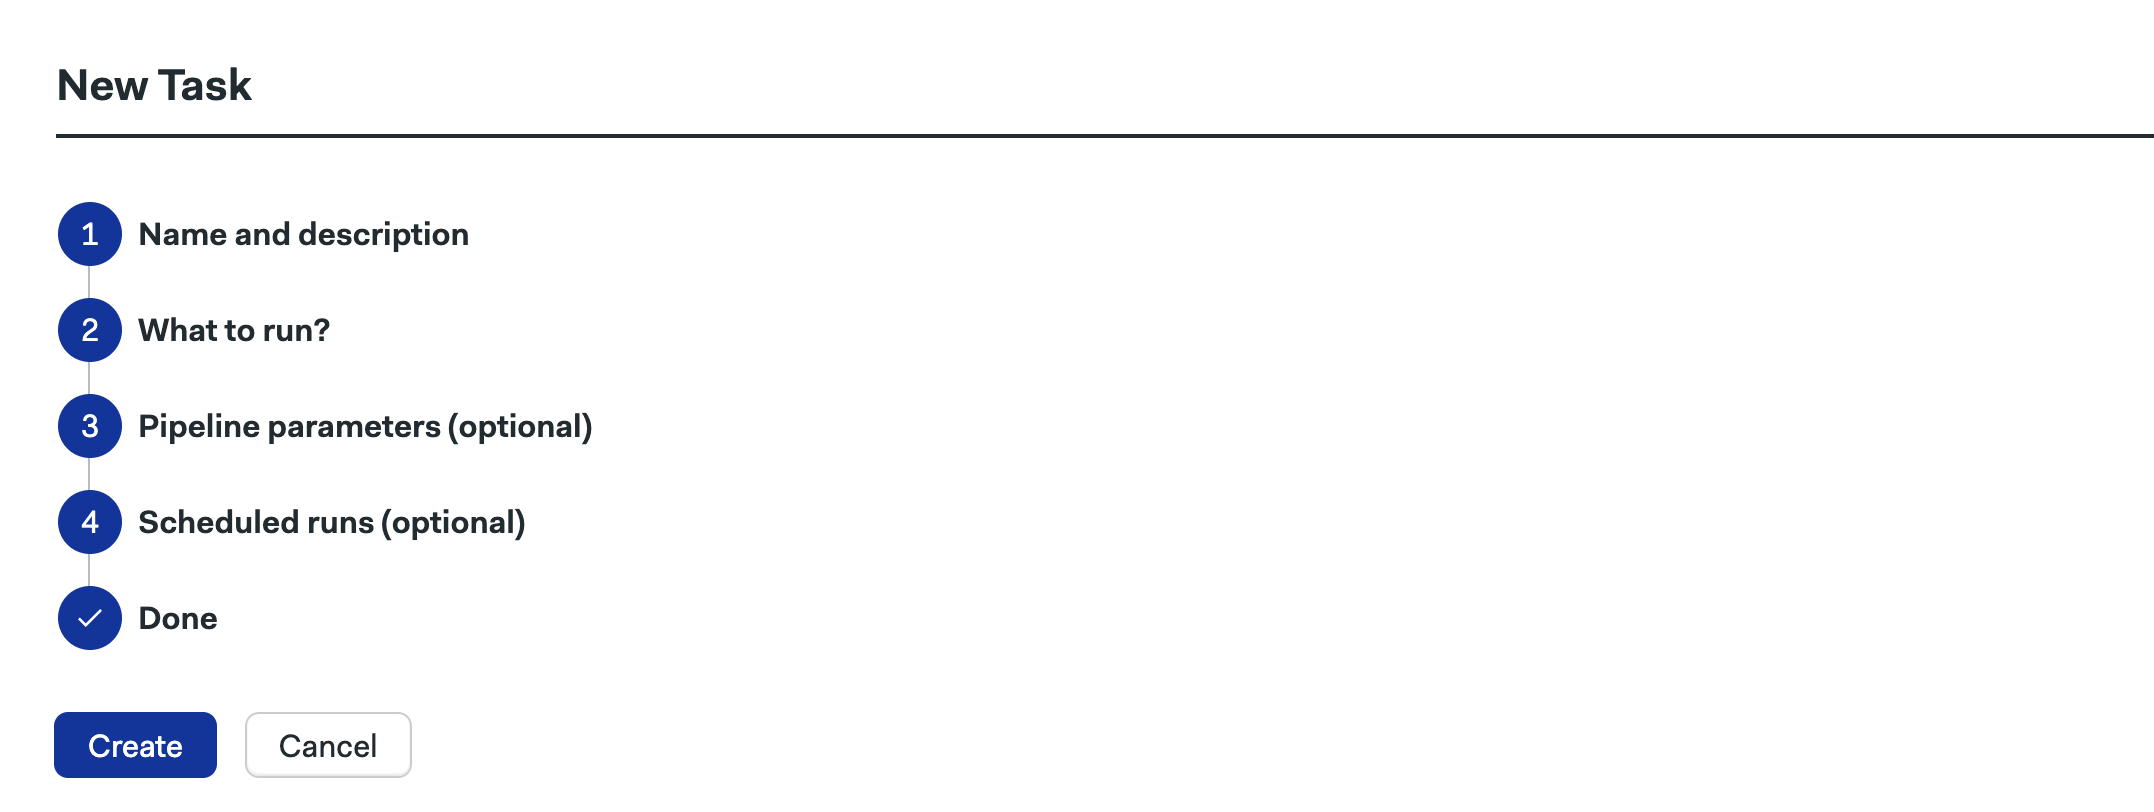
The task creation wizard page will open and prompt you to enter the task details.
-
Enter the name and a description (optional) for the task. The name needs to be unique within the project.
-
Choose branch name and pipeline file that will be used to check out the repository and run the CI/CD workflow. Those values will be used as defaults for scheduled and manual runs. Before creating the task, please ensure that the branch exists in the repository.
-
Configure parameters passed to the workflow as environment variables. Apart from name and description, you can choose various options, set default value, or mark it as required. Parameter names must comply with the bash environment variable naming convention.
-
Optionally, you can configure the task to be scheduled. To do so, select the Scheduled option and provide a crontab that will describe when to trigger the workflow. Otherwise, choose the Unscheduled option.
-
-
Click the Create button to confirm your changes.
CLI#
Note: Be sure to use the latest version of Semaphore CLI
Use the sem edit project command to open the project YAML definition in your preferred editor, it should look similar to this:
apiVersion: v1alpha
kind: Project
metadata:
  name: Your project
  id: abcd-12345
  description: Description of your project
spec:
  visibility: private
  repository:
    ...
  tasks: []
Here you can add the definition of th etasks that will be configured for the project, as shown below:
apiVersion: v1alpha
kind: Project
metadata:
  name: Your project
  id: abcd-12345
  description: Description of your project
spec:
  visibility: private
  repository:
    ...
  tasks:
  - name: nightly-deploys
    branch: master
    scheduled: true
    at: "15 12 * * *"
    pipeline_file: .semaphore/nightly-deploys.yml
  - name: canary-setup
    branch: develop
    scheduled: false
    pipeline_file: .semaphore/nightly-deploys.yml
    parameters:
    - name: CANARY_VERSION
      required: true
      default_value: "1.0.0"
More details about the fields within the tasks can be found here.
Save the changes and close the editor. Your tasks will be set up.
Editing and deleting tasks#
Web UI#
-
Open the project page.
-
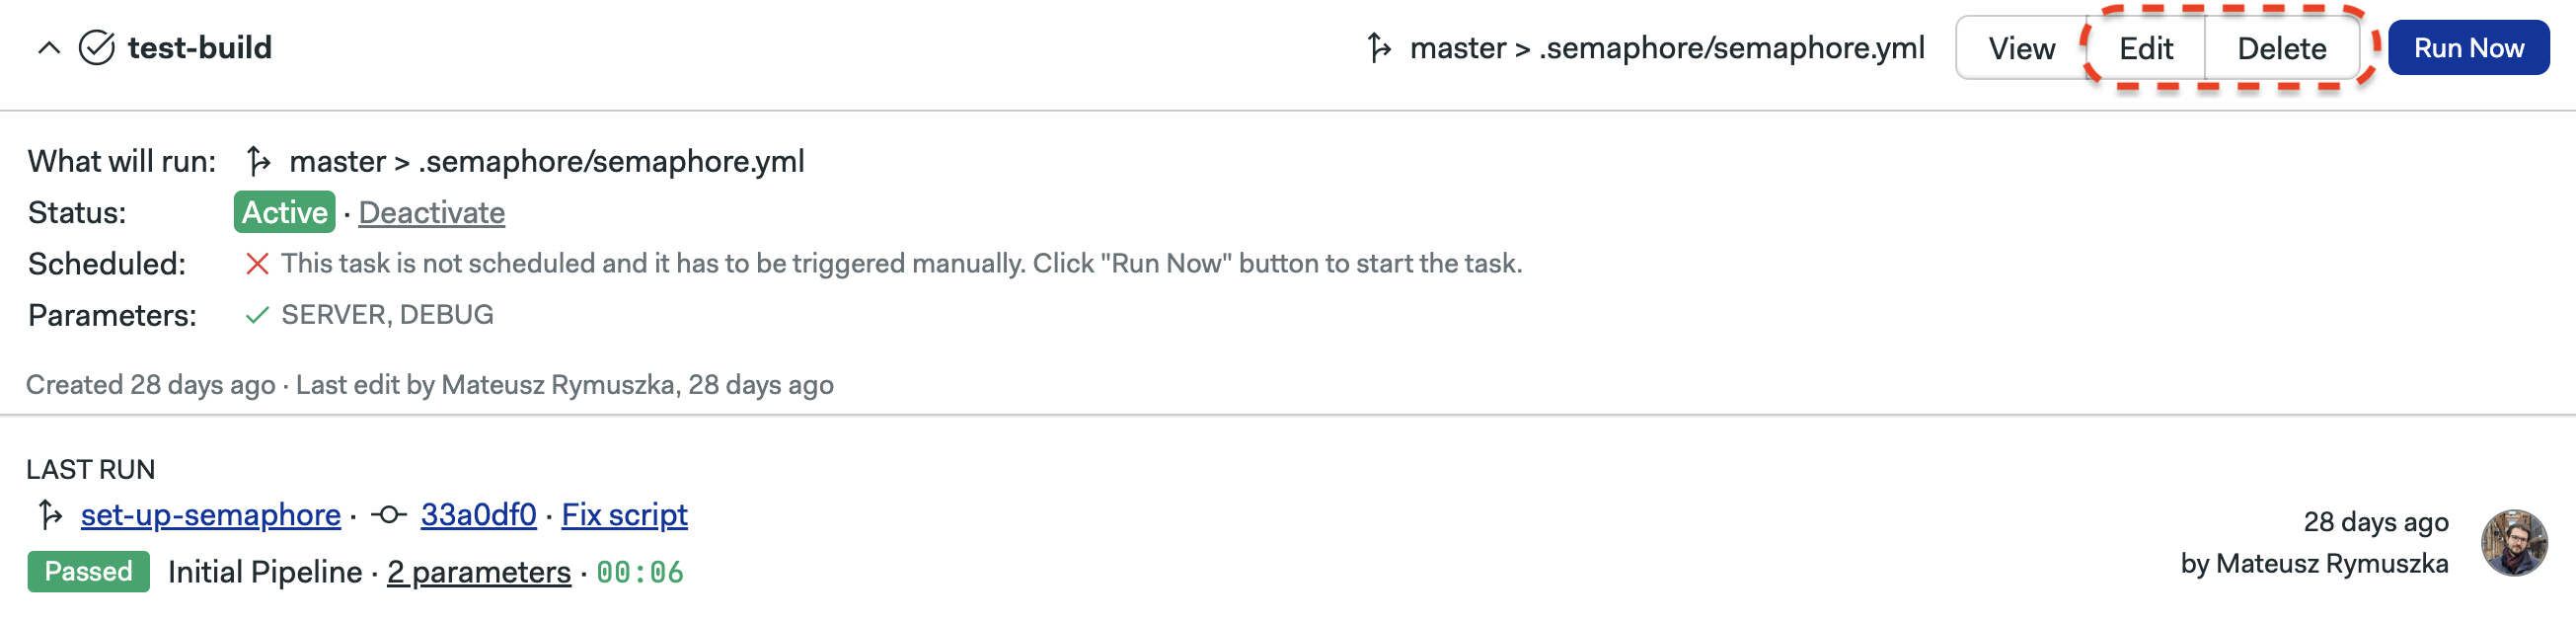
Select the Tasks tab in the top menu pane. You will see a list of Tasks for the project.
-
Click the Edit button on the task you want to edit. You will be moved to the Task edit page, resembling the Task creation wizard. Make appropriate changes and click the Confirm button.
-
If you want to remove a task, click the Delete button. Confirm this action in the dialog box that follows.
CLI#
Note: Be sure to use the latest version of Semaphore CLI
Use the sem edit project command to open the project YAML definition in your preferred editor, it should look similar to this:
apiVersion: v1alpha
kind: Project
metadata:
  name: Your project
  id: abcd-12345
  description: Description of your project
spec:
  visibility: private
  repository:
    ...
  tasks:
  - name: nightly-deploys
    scheduled: true
    branch: master
    at: "15 12 * * *"
    pipeline_file: .semaphore/nightly-deploys.yml
If you want to edit the task, simply change the values of the fields you want to modify to the desired ones. Make sure the changes you enter are valid.
If you want to remove the task, simply remove the definition of that particular task from tasks,
save the changes, and close the editor.
Deactivating scheduled tasks#
If you want temporarily stop scheduled task from triggering periodic workflows,
you can deactivate it in the Web UI by clicking the Deactivate button
or putting a status: INACTIVE attribute in the CLI definition.

To resume using the scheduler for the task, simply click the Activate button
or put a status: ACTIVE attribute in the CLI definition.
Deactivating a task will not affect the ability to manually run the workflow via the task, regardless of whether the task is scheduled or not.
Running a workflow manually#
You can trigger a workflow in the Web UI with the following steps:
-
Open the project page.
-
Select the Tasks tab on the top menu pane.
-
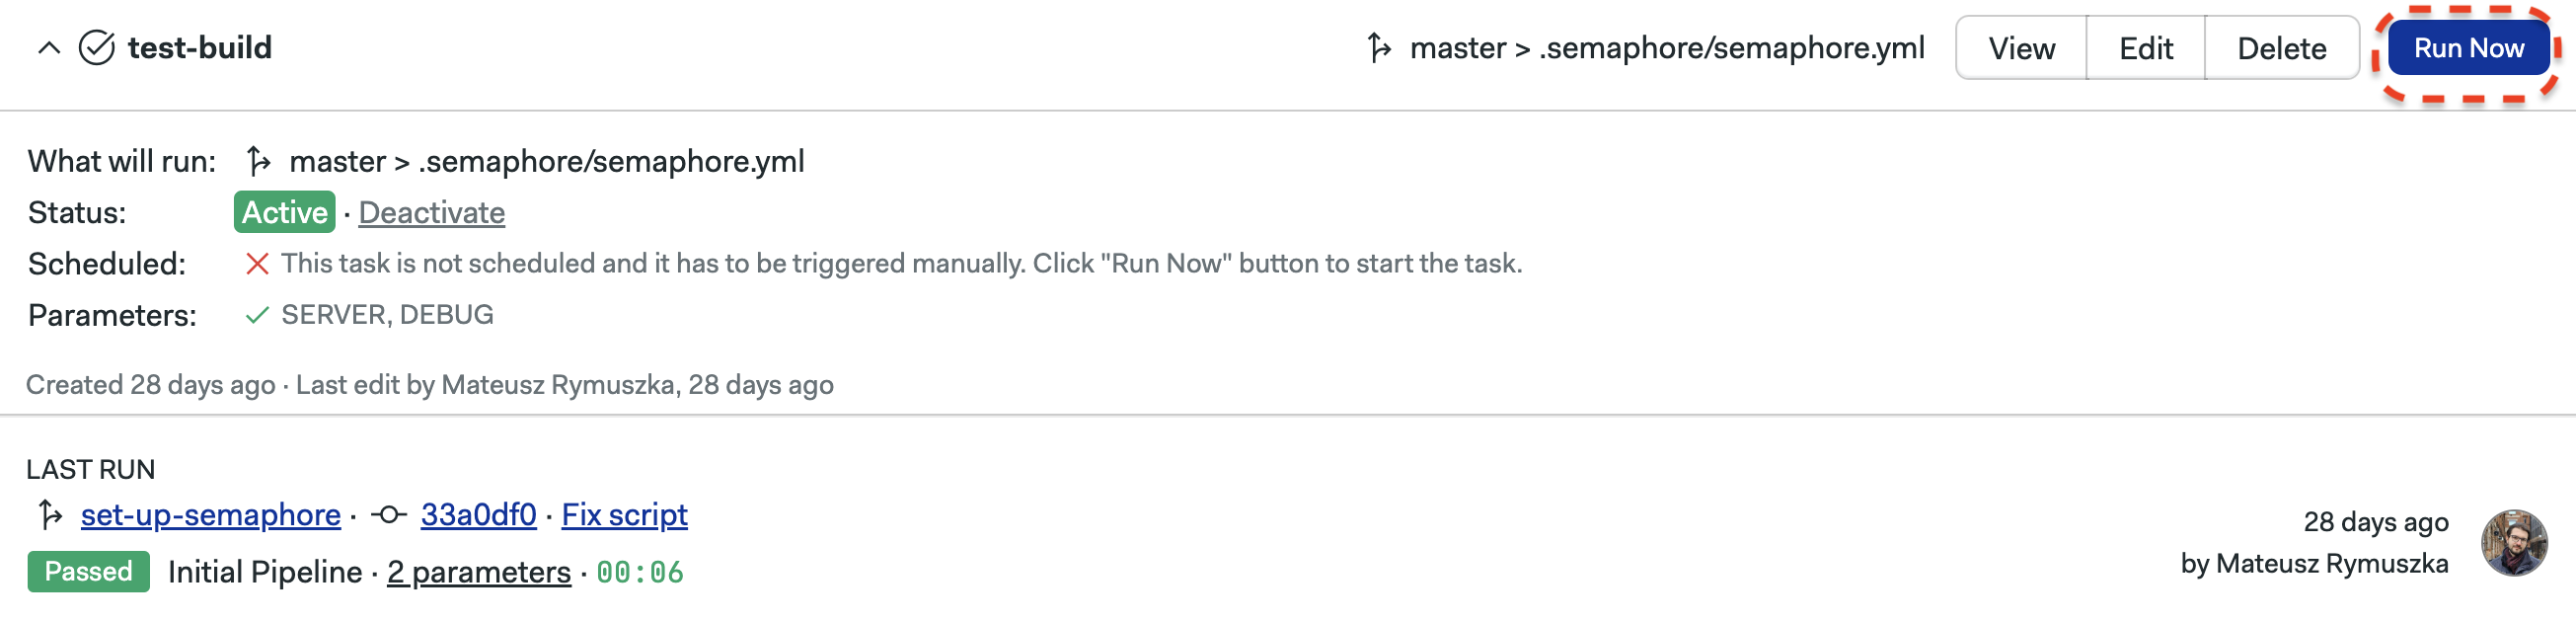
Find the desired task and click the Run Now button.
-
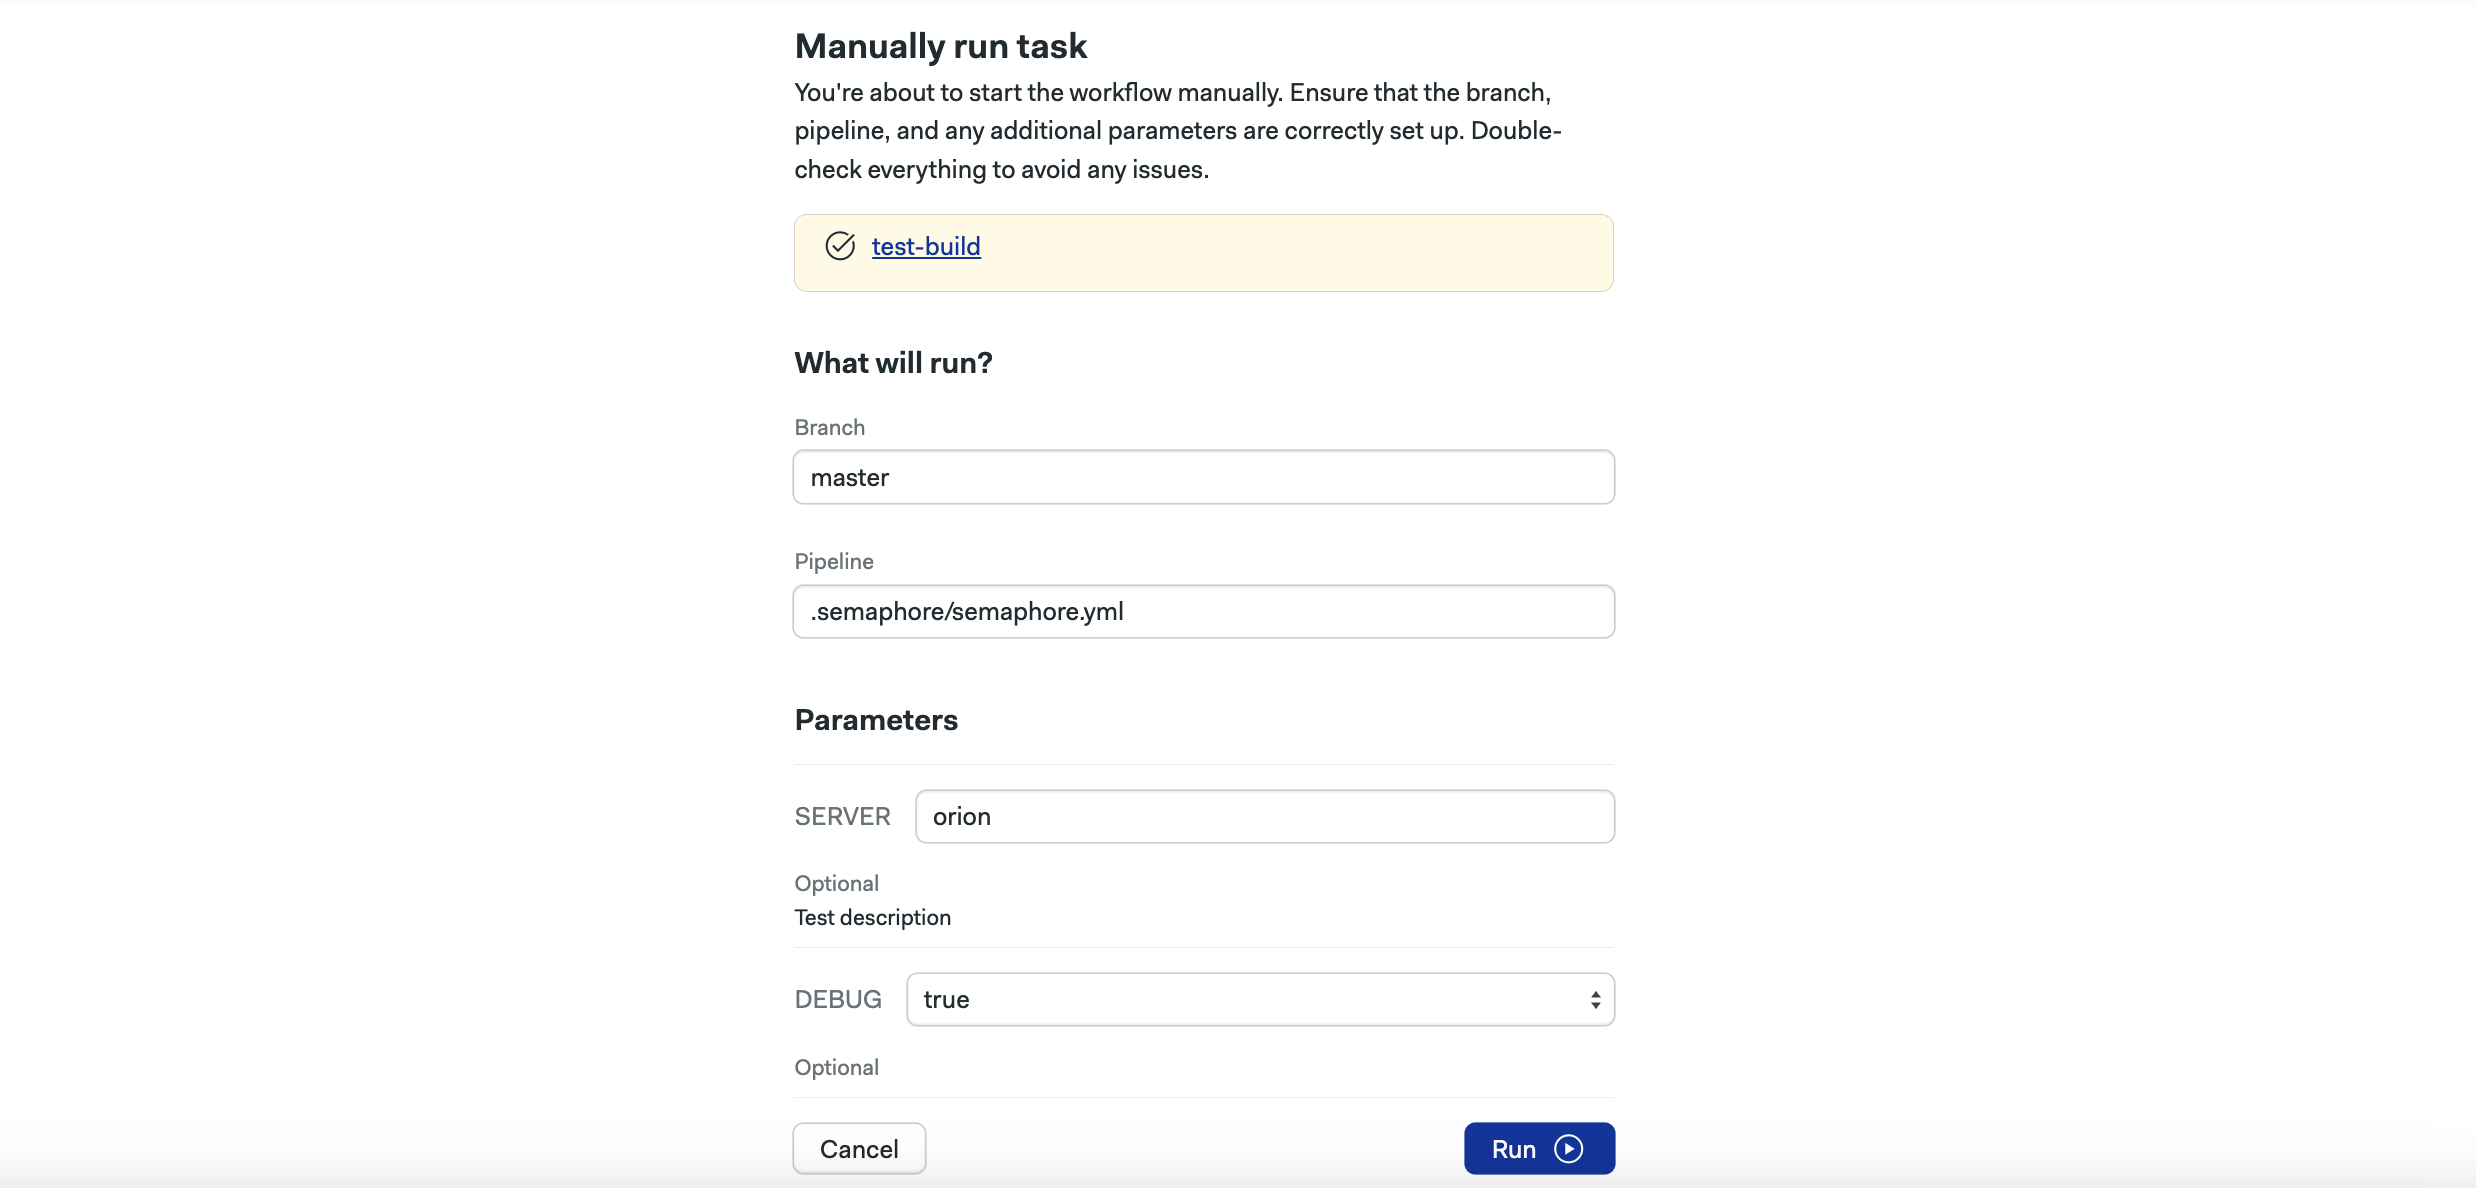
You will be moved to the workflow run page. Before triggering the workflow, you can override the branch and pipeline files used to run the workflow. You can also modify parameter values passed to the workflow.
-
Click the Run button.
This will trigger a new workflow based on the configuration from the file configured in the task definition. The workflow will use code revision of the latest commit from the branch that is configured in the definition. Additionally, parameters passed to the workflow are accessible as environment variables in every job of the initial pipeline.
Browsing task execution history#
Another useful addition to the feature is the ability to browse past executions of a particular task:
-
Open the project page.
-
Select the Tasks tab from the top menu pane.
-
Find the desired task and click the View button.
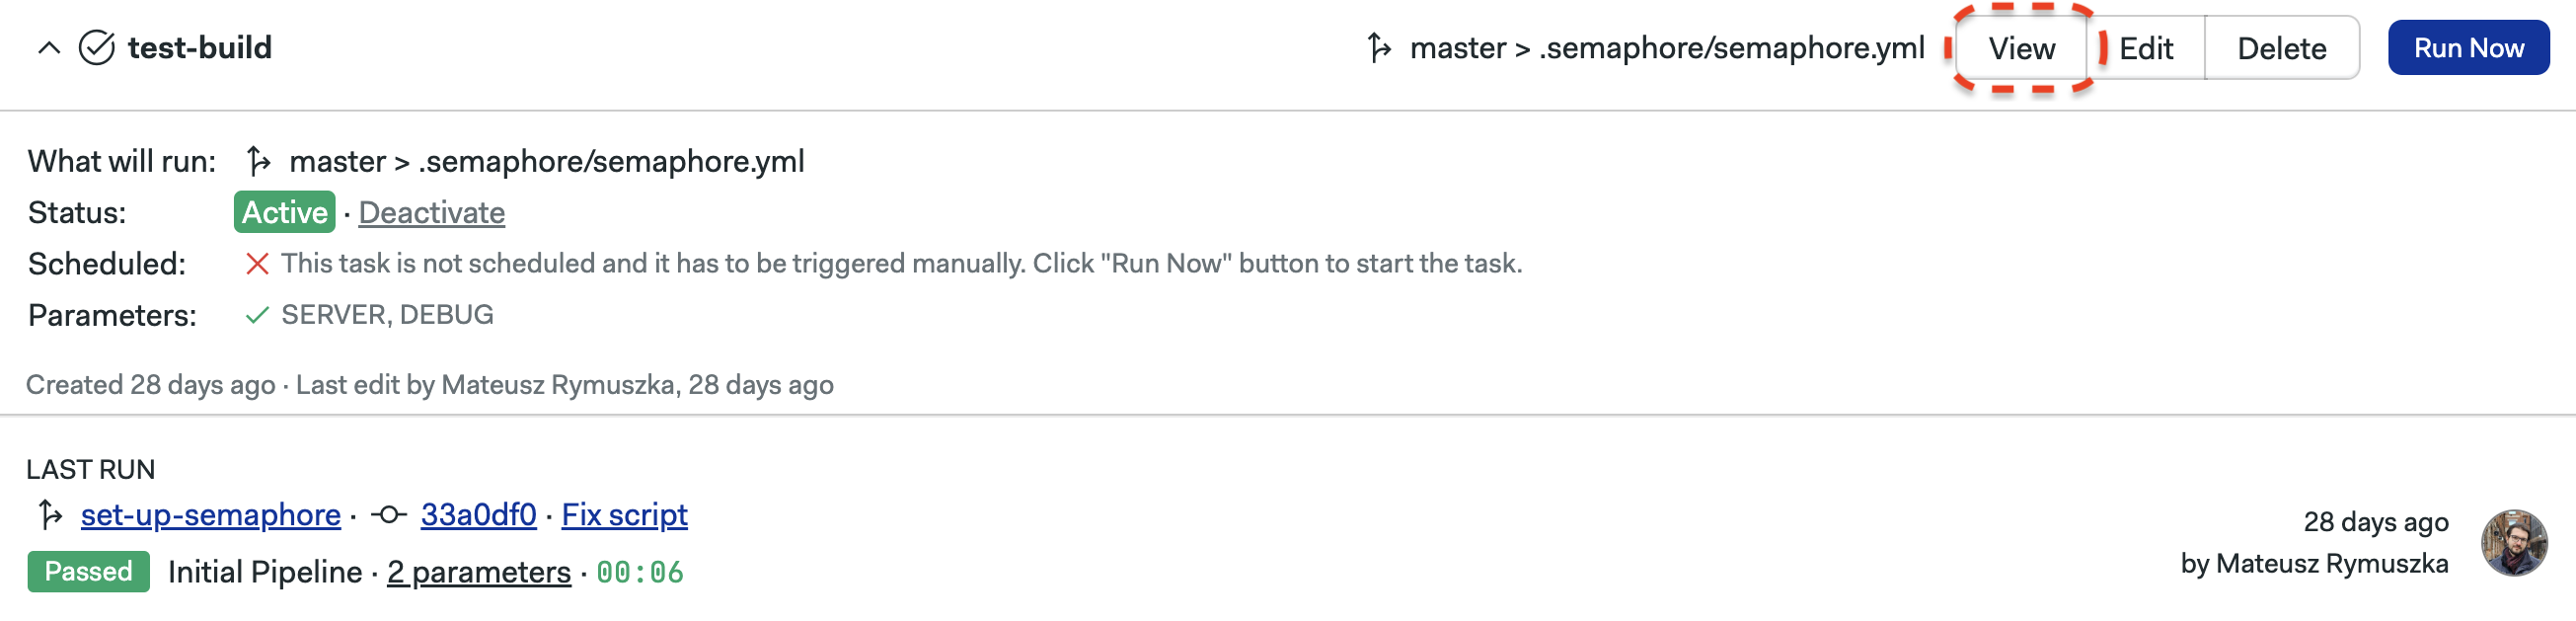
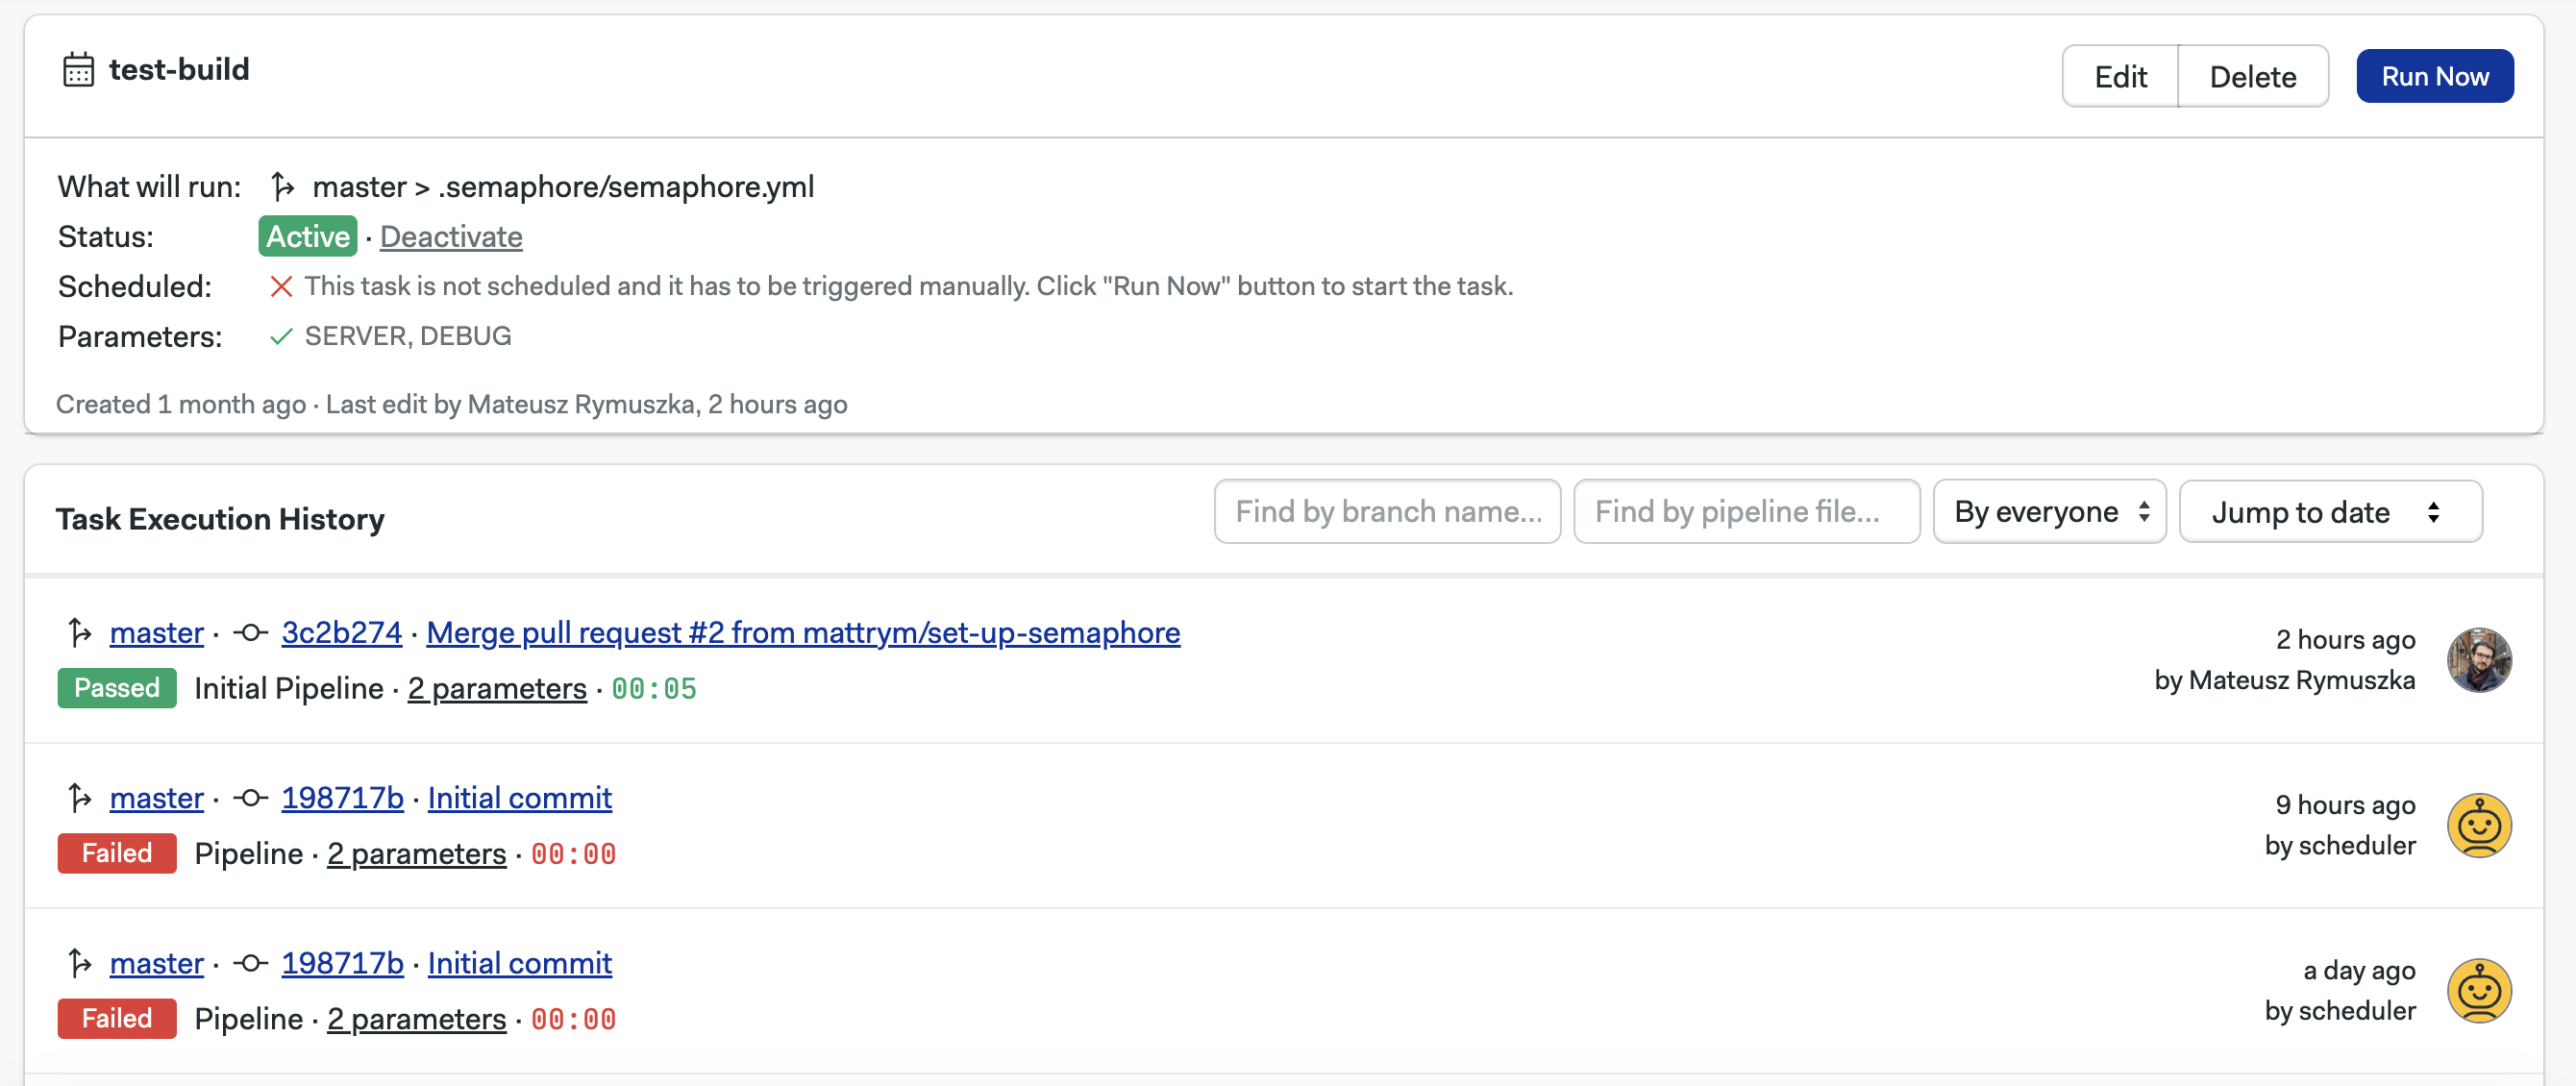
You will be moved to the task history page. Apart from detailed information about the task, you will see a list of the latest executions of tasks in reverse chronological order. You can apply various filters such as branch name, pipeline file and triggerer, navigate between pages, or jump to a specific point in time.
Limitations#
-
In order to disperse the load, the workflows will be run at a random second of the selected minute. This means that even though some versions of Crontab format support seconds in expressions, Semaphore 2.0 will ignore them.
-
Scheduled workflow runs will not be started in the first 60 seconds (this can span across two differently numbered minutes) after the task is created, to avoid inconsistencies due to minute precision of Crontab expressions.
-
In rare cases when there is an issue with scheduling workflows the Semaphore will retry to initiate the workflow every ten seconds for the following 15 minutes.