Autoscaling with AWS
Semaphore provides the open-source AWS agent stack to help you deploy an autoscaling fleet of self-hosted agents in AWS.
Overview
The AWS agent stack lets you autoscale EC2 instances on demand. Running cloud instances only when they are needed can help you gracefully manage bursts of activity and save costs when there is no work being done.
The AWS agent stack provides the following features:
- run self-hosted agents for Linux, macOS, and Windows
- scale up and down the number of agents based on demand
- manage multiple stacks of agents using different agent types
- access agents EC2 instances with SSH or using AWS Session Manager
- use S3 buckets to provide cache storage
- fine-grained control for the size of your agent instances and your agent pool
Prerequisites
The AWS agent stack requires the following:
How to deploy AWS agents
Follow these steps to deploy self-hosted agents in AWS.
-
Install the latest AWS stack and dependencies
Installing AWS stack and dependenciescurl -sL https://github.com/renderedtext/agent-aws-stack/archive/refs/tags/v0.3.6.tar.gz -o agent-aws-stack.tar.gz
tar -xf agent-aws-stack.tar.gz
cd agent-aws-stack-0.3.6
npm install -
Build the AMI images
Build the container images using Packer.io. You can build Linux, Windows, and macOS images
Images are built by default for the "us-east-1" region. To change regions add
AWS_REGIONto the Packer command. For example:Changing AWS regionmake packer.build AWS_REGION=us-west-1Linux AMI
Build Ubuntu-based Docker imagemake packer.init
make packer.buildWindows AMI
Build Windows Server-based imagemake packer.init
make packer.build PACKER_OS=windowsmacOS AMI
Build macOS imagemake packer.init
# To build an AMD AMI (EC2 mac1 family)
make packer.build PACKER_OS=macos AMI_ARCH=x86_64 AMI_INSTANCE_TYPE=mac1.metal
# To build an ARM AMI (EC2 mac2 family)
make packer.build PACKER_OS=macos AMI_ARCH=arm64 AMI_INSTANCE_TYPE=mac2.metal -
Encrypt your registration token
The registration token created when registering the agent must be encrypted on AWS using SSM
To create an SSM secret, run the following command:
Creating an SSM secretaws ssm put-parameter \
--name <ssm-parameter-name> \
--value "<token>" \
--type SecureStringReplace:
<ssm-parameter-name>with the name for the secret, e.g.semaphore-registration-token<token>with the registration token obtained during agent registration
-
Create an execution policy for Cloudformation
Run the following command to create
execution-policy.json. This instructs CDK to list the Cloudformation permissions it needs to deploy the self-hosted agentsObtaining the Cloudformation policyaws iam create-policy \
--policy-name agent-aws-stack-cfn-execution-policy \
--policy-document file://$(pwd)/execution-policy.json \
--description "Cloudformation policy to deploy the agent-aws-stack" -
Configure the stack
Create configuration files for all the image types you plan to use. These files are used by the self-hosted agent to access your Semaphore organization
Replace:
<stack-name>with the name of the stack, e.g.my-aws-agents-linux<ssm-parameter-name>with the name of the secret created on Step 3<organization-url>.semaphoreci.comwith your organization URL, e.g.my-org.semaphoreci.com<license-configuration>the license information from Apple (only for macOS)
Linux
config.json for Linux{
"SEMAPHORE_AGENT_STACK_NAME": "<stack-name>",
"SEMAPHORE_AGENT_TOKEN_PARAMETER_NAME": "<ssm-parameter-name>",
"SEMAPHORE_AGENT_TOKEN_KMS_KEY": "<ssm-parameter-name>",
"SEMAPHORE_ENDPOINT": "<organization-url>.semaphoreci.com"
}Windows
config.json for Windows{
"SEMAPHORE_AGENT_STACK_NAME": "<stack-name>",
"SEMAPHORE_AGENT_TOKEN_PARAMETER_NAME": "<ssm-parameter-name>",
"SEMAPHORE_AGENT_TOKEN_KMS_KEY": "<ssm-parameter-name>",
"SEMAPHORE_ENDPOINT": "<organization-url>.semaphoreci.com",
"SEMAPHORE_AGENT_OS": "windows"
}macOS
config.json for macOS{
"SEMAPHORE_AGENT_STACK_NAME": "<stack-name>",
"SEMAPHORE_AGENT_TOKEN_PARAMETER_NAME": "<ssm-parameter-name>",
"SEMAPHORE_AGENT_TOKEN_KMS_KEY": "<ssm-parameter-name>",
"SEMAPHORE_ENDPOINT": "<organization-url>.semaphoreci.com",
"SEMAPHORE_AGENT_OS": "macos",
"SEMAPHORE_AGENT_DISCONNECT_AFTER_IDLE_TIMEOUT": "86400",
"SEMAPHORE_AGENT_MAC_FAMILY": "mac1",
"SEMAPHORE_AGENT_INSTANCE_TYPE": "mac1.metal",
"SEMAPHORE_AGENT_AZS": "us-east-1a,us-east-1b,us-east-1d",
"SEMAPHORE_AGENT_LICENSE_CONFIGURATION_ARN": "arn:aws:license-manager:<region>:<accountId>:license-configuration:<license-configuration>"
}infoWhen a macOS instance is terminated it may take a long time for new one to start in its place. This may affect the time to rotate agents.
macOS dedicated hosts are allocated for a minimum of 24 hours. It is recommended to set
SEMAPHORE_AGENT_DISCONNECT_AFTER_IDLE_TIMEOUTto at least 24 hours for macOS-based agents. This means that new instances started up due to a burst of demand may continue running idle for a long time before being shutdown.See Amazon EC2 Mac instances for more information.
-
Bootstrap the CDK application
Open the file
execution-policy.jsoncreated in Step 4 and copy the ARN value.Bootstrapping the CDK applicationSEMAPHORE_AGENT_STACK_CONFIG=config.json \
npm run bootstrap -- aws://<AWS_ACCOUNT_ID>/<AWS_REGION> \
--cloudformation-execution-policies <Arn>Replace:
<Arn>with the value from the policy file<AWS_ACCOUNT_ID>your AWS account id<AWS_REGION>your AWS region
If you omit the option
--cloudformation-execution-policiesthe stack will be deployed using full AdministratorAccess policies -
Deploy the stack
To deploy the stack, execute the following command
Deploy the stackSEMAPHORE_AGENT_STACK_CONFIG=config.json npm run deploy
How to upgrade self-hosted agents
Changing a configuration settings or any of the deployed images requires an in-place upgrade. The CDK application will compute the Cloudformation changes required.
You can see what changed by running:
npm run diff
Update the stack with:
npm run deploy
After the update, you must restart all the running agents.
How to delete AWS agents
To delete the AWS agents stack, run the following command:
SEMAPHORE_AGENT_STACK_CONFIG=config.json npm run destroy
After deleting a macOS stack you need to manually delete the host resource group the hosts where attached to. You must also manually release the dedicated hosts associated to that resource group.
Configuration settings
See the AWS stack parameters reference for all the available parameters.
Cache
See setting up S3 cache to learn how to configure cache with AWS S3 buckets.
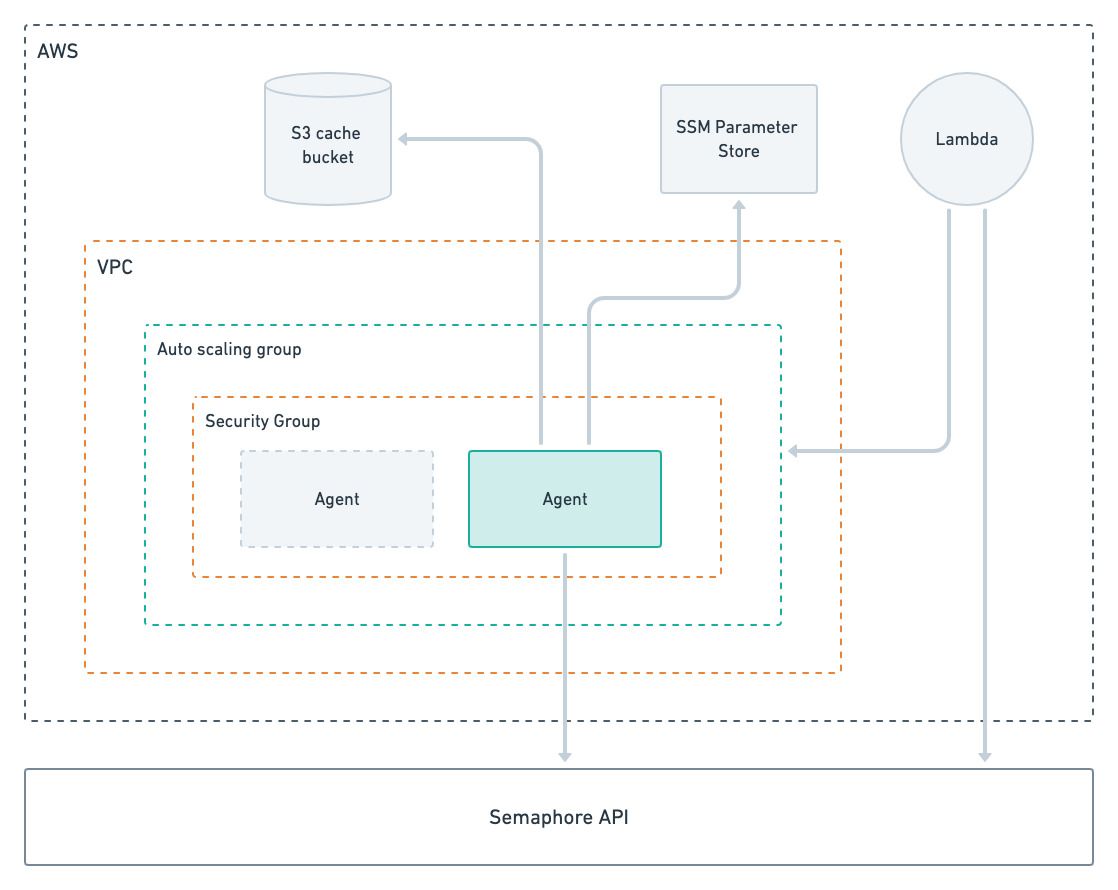
Autoscaling
The self-hosted AWS stack dynamically scales agents based on the job demand. A Lambda function periodically polls the Semaphore API to determine the number of pending jobs for a given agent type. When the function determines more agents are needed, it will update the autoscaling group, resulting in new EC2 instances being launched.
When there are more running agents than jobs over a period of time, the function will decrease the capacity of the autoscaling group, effectively shutting down idle agents. When all agents are idle the autoscaling capacity is decreased to zero.
You con control the autoscaling behavior using the following parameters in config.json:
SEMAPHORE_AGENT_DISCONNECT_AFTER_IDLE_TIMEOUTtime in minutes allowed for the agent to idle before being shutdown. Default is 5 minutes. Setting this value to 0 prevents the agent from ever shutting downSEMAPHORE_AGENT_ASG_MAX_SIZEthis is the upper limit for the autoscaling group for a given agent type. The Lambda function will never spin up more than this number of machinesSEMAPHORE_AGENT_ASG_MIN_SIZEthis is the lower limit for the autoscaling group for a given agent type. When set to a value greater than 0 the Lambda function will leave this number of agents idling without shutting them downSEMAPHORE_AGENT_USE_DYNAMIC_SCALINGwhen set to false, the autoscaling is disabled. In this scenario, the stack consists of a static number of agents always running
Multiple agent types
You need to create an AWS stack for every agent type you run self-hosted. For example, if you wish to run Linux and Windows machines, you need two stacks.
To create multiple stacks, follow the deploy steps and:
- Use a different
SEMAPHORE_AGENT_STACK_NAMEfor every agent type - Create an SSM encrypted parameter for each agent registration token
- Set
SEMAPHORE_AGENT_TOKEN_PARAMETER_NAMEto point to the respective SSM encrypted parameter
Job isolation
AWS stacks give you full job isolation out of the box since the agent will shutdown after executing a job. A new agent will be launched for the following job.
Rotating EC2 instances in this way can be slow. You can opt for not shutting down the agent after a job by setting the SEMAPHORE_AGENT_DISCONNECT_AFTER_JOB parameter.
Network VPC
Self-hosted agents in AWS connect to your default AWS VPC. All agents have public and private IPv4 addresses and run on a public subnet.
You can change this behavior by creating a new VPC and subnets and configuring the parameters SEMAPHORE_AGENT_VPC_ID and SEMAPHORE_AGENT_SUBNETS during setup.
Troubleshooting tips
This section explains how to troubleshoot, view logs, and access the EC2 instances.
Agent logs
Agents use CloudWatch to push logs to CloudWatch.
You can find the logs in these locations:
- Agent logs: agent log belong to the
semaphore/agentlog group- Linux logs: located at
/tmp/agent_log - Windows logs: located at
/tmp/agent_log
- Linux logs: located at
- Linux cloud init logs: pushed to the
/semaphore/cloud-initand/semaphore/cloud-init/outputlog groups - Windows cloud init logs: pushed to the
/semaphore/EC2Launch/UserdataExecutionlog group - System logs: pushed to the
/semaphore/systemlog group
Agent logs, cloud init logs and systems logs are pushed from the EC2 instance to CloudWatch using the CloudWatch agent:
Agent logs are pushed to the semaphore/agent log group. In Linux instances, the agent logs are located at /tmp/agent_log. In Windows instances, the agent logs are located at C:\semaphore-agent\agent.log. In Linux instances, the cloud init logs are pushed to the /semaphore/cloud-init and /semaphore/cloud-init/output log groups. In Windows instances, the cloud init logs are pushed to the /semaphore/EC2Launch/UserdataExecution log group. System logs are pushed to the /semaphore/system log group
SSH access
You can access your EC2 machines in two ways:
- SSH: only works for instances with public IPs. The default security group does not allow inbound access so to allow SSH access you have to create a security group and use the
SEMAPHORE_AGENT_SECURITY_GROUP_IDto instruct the stack to use it - AWS Session Manager: AWS Systems Manager Session Manager allows access to instances using private IPs. This is the only way to access machines in private subnets
Invalid agent registration
If you experience agent registration errors, follow these steps to troubleshoot:
- Go to the CloudWatch console
- Select Log Groups
- Select the
semaphore/agentlog group - Select the EC2 instance id for the instance running your agent
- Verify that the agent is running. If not, check for messages about failed registration requests