Pipelines
A pipeline is a group of connected blocks. This page explains what pipelines are, how they organize workflow execution order, and what settings are available.
Overview
Pipelines are groups of blocks that can be connected via dependencies to define their execution order.
Pipelines are also the unit of configuration. Each pipeline is encoded as separate a YAML file in the .semaphore folder.
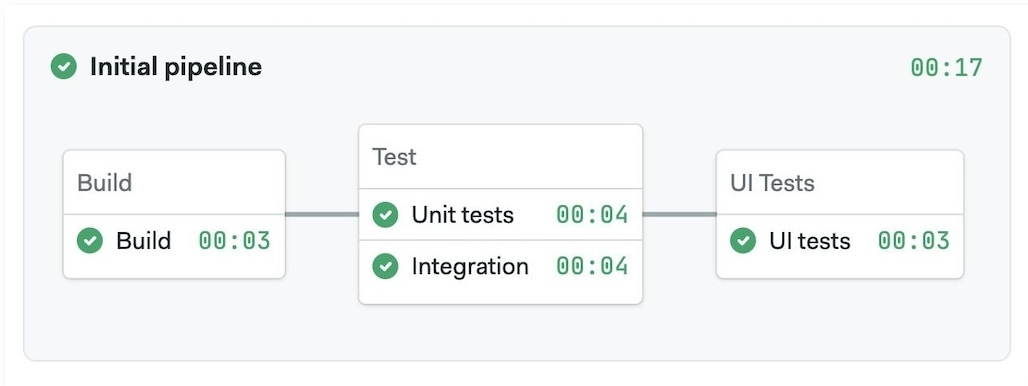
For reference, here is an example pipeline with its respective YAML.
- Example pipeline
- YAML
version: v1.0
name: Initial Pipeline
agent:
  machine:
    type: e1-standard-2
    os_image: ubuntu2004
blocks:
  - name: Build
    task:
      jobs:
        - name: Build
          commands:
            - checkout
            - echo "build commands here"
  - name: Test
    dependencies:
      - Build
    task:
      jobs:
        - name: Unit tests
          commands:
            - checkout
            - echo "unit tests commands here"
        - name: Integration tests
          commands:
            - checkout
            - echo "integration tests commands here"
  - name: UI Tests
    dependencies:
      - Test
    task:
      jobs:
        - name: UI Test
          commands:
            - checkout
            - echo "UI tests commands here"
Block execution order
In the same way that a block is a group of jobs, a pipeline is a group of blocks. Blocks can be connected using dependencies, which Semaphore uses to determine the execution order.
Take the following example:
- Blocks B and C depend on Block A
- Block D depends on both Blocks B and C
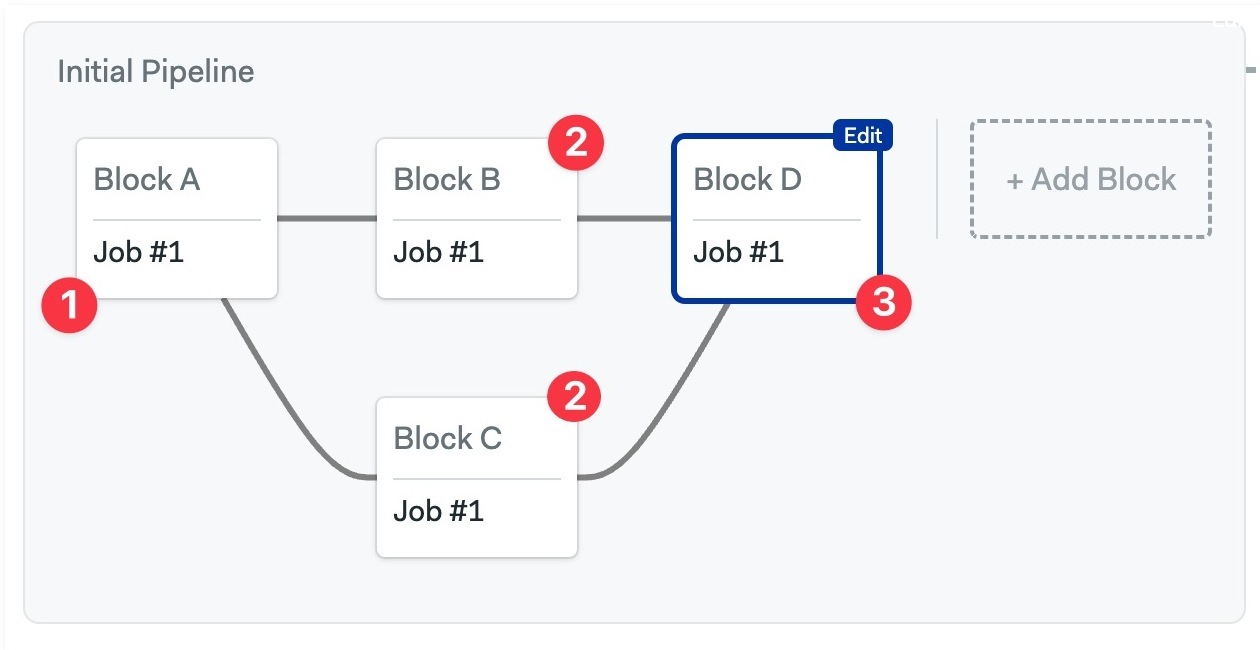
In this scenario, Block B and C wait until Block A is done. Block D in turn, waits for Blocks B and C to be finished.
You can reorder blocks by changing their dependencies using the visual editor.
Video Tutorial: How to reorder blocks
What if we removed all dependencies?
If a block fails, the subsequent blocks that depend on it will not execute.
Pipeline initialization
Before Semaphore can start running the jobs in the pipeline, the pipeline YAML file needs to be retrieved from the repository. As a first step, Semaphore request the file via the GitHub or BitBucket API and inspects its contents.
There are two types of pipelines:
- Static: they don't require runtime evaluations and can be used as-is
- Dynamic: contain elements that must be evaluated at runtime
Dynamic pipelines contain at least one of these elements:
- Change detection (monorepos)
- Job matrices
- Parameterized promotions
- Organization pre-flight checks
- Project pre-flight checks
Dynamic pipelines are evaluated in the initialization job.
Initialization job
The initialization job only takes place for dynamic pipelines. It runs in a dedicated initialization agent and performs the following steps:
- Clones the repository using Git
- Parses and evaluates conditions in the input YAML file using Semaphore Pipeline Compiler (spc)
- Executes organization pre-flight checks, if any
- Executes project pre-flight checks, if any
- Saves the job output log
The Semaphore Pipeline Compiler (spc) is an open-source component. You can find the code in the spc repository
How to change the agent for init jobs
You can change the agent that runs the initialization job in two ways:
- For the organization: affects all projects in the organization. See organization init agent to learn how to change this setting
- For the project: changes the agent running initialization for a single project. See project pre-flight checks to learn how to change this setting
How to access init logs
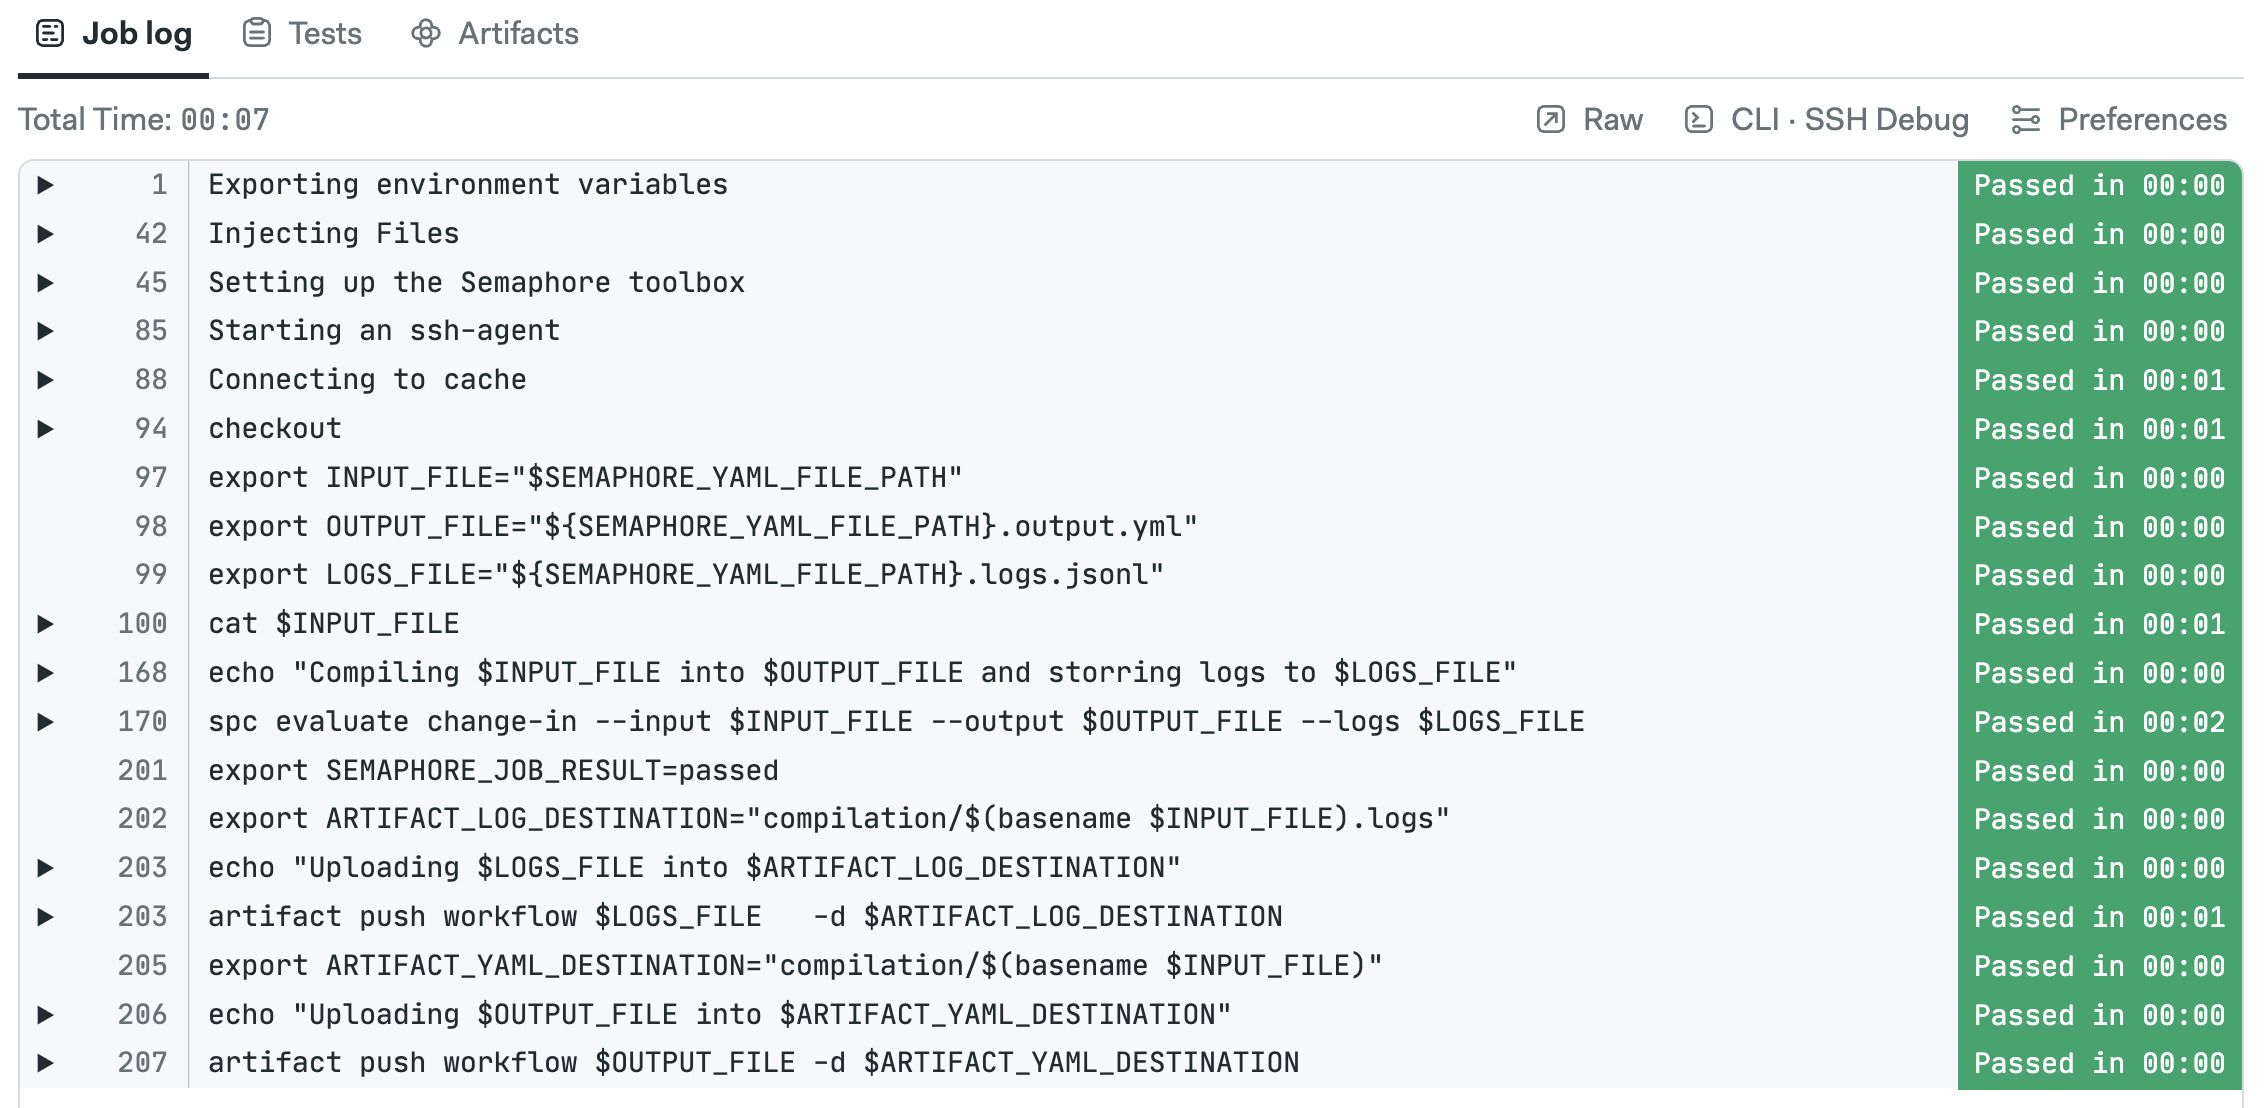
Semaphore shows an Initializing message for pipelines with an initialization job. You can see the log by clicking on the See log link at the top of the pipeline.
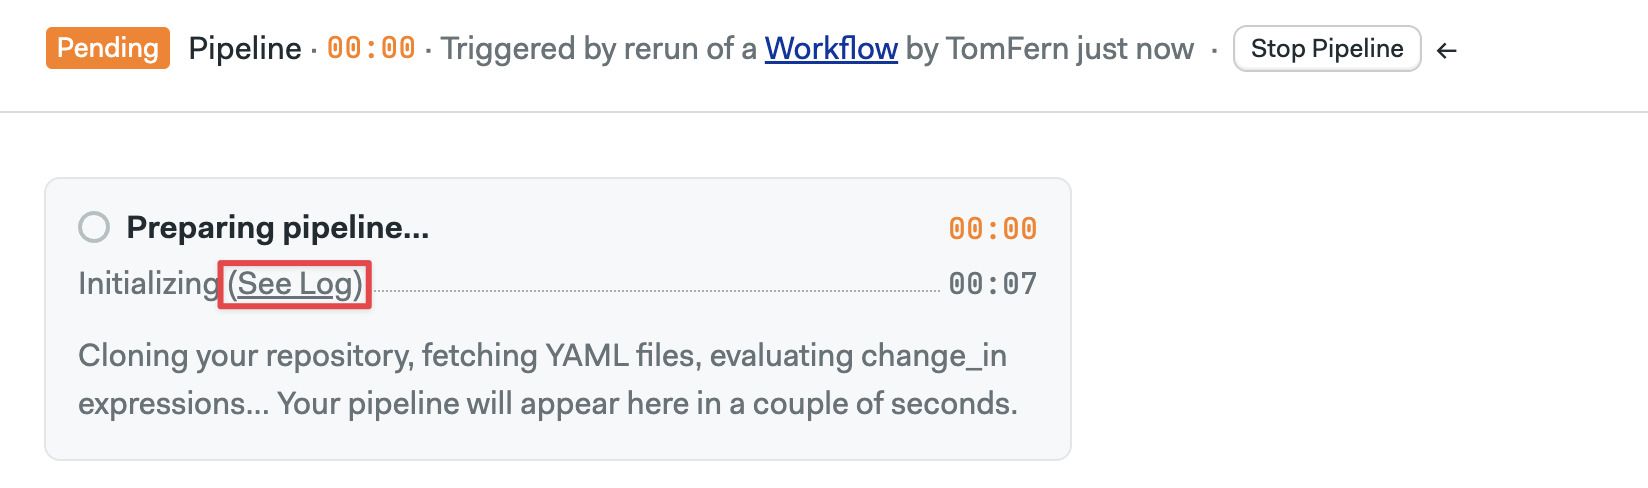
Here you can see the how spc evaluated the pipeline and all the actions taken during initialization.
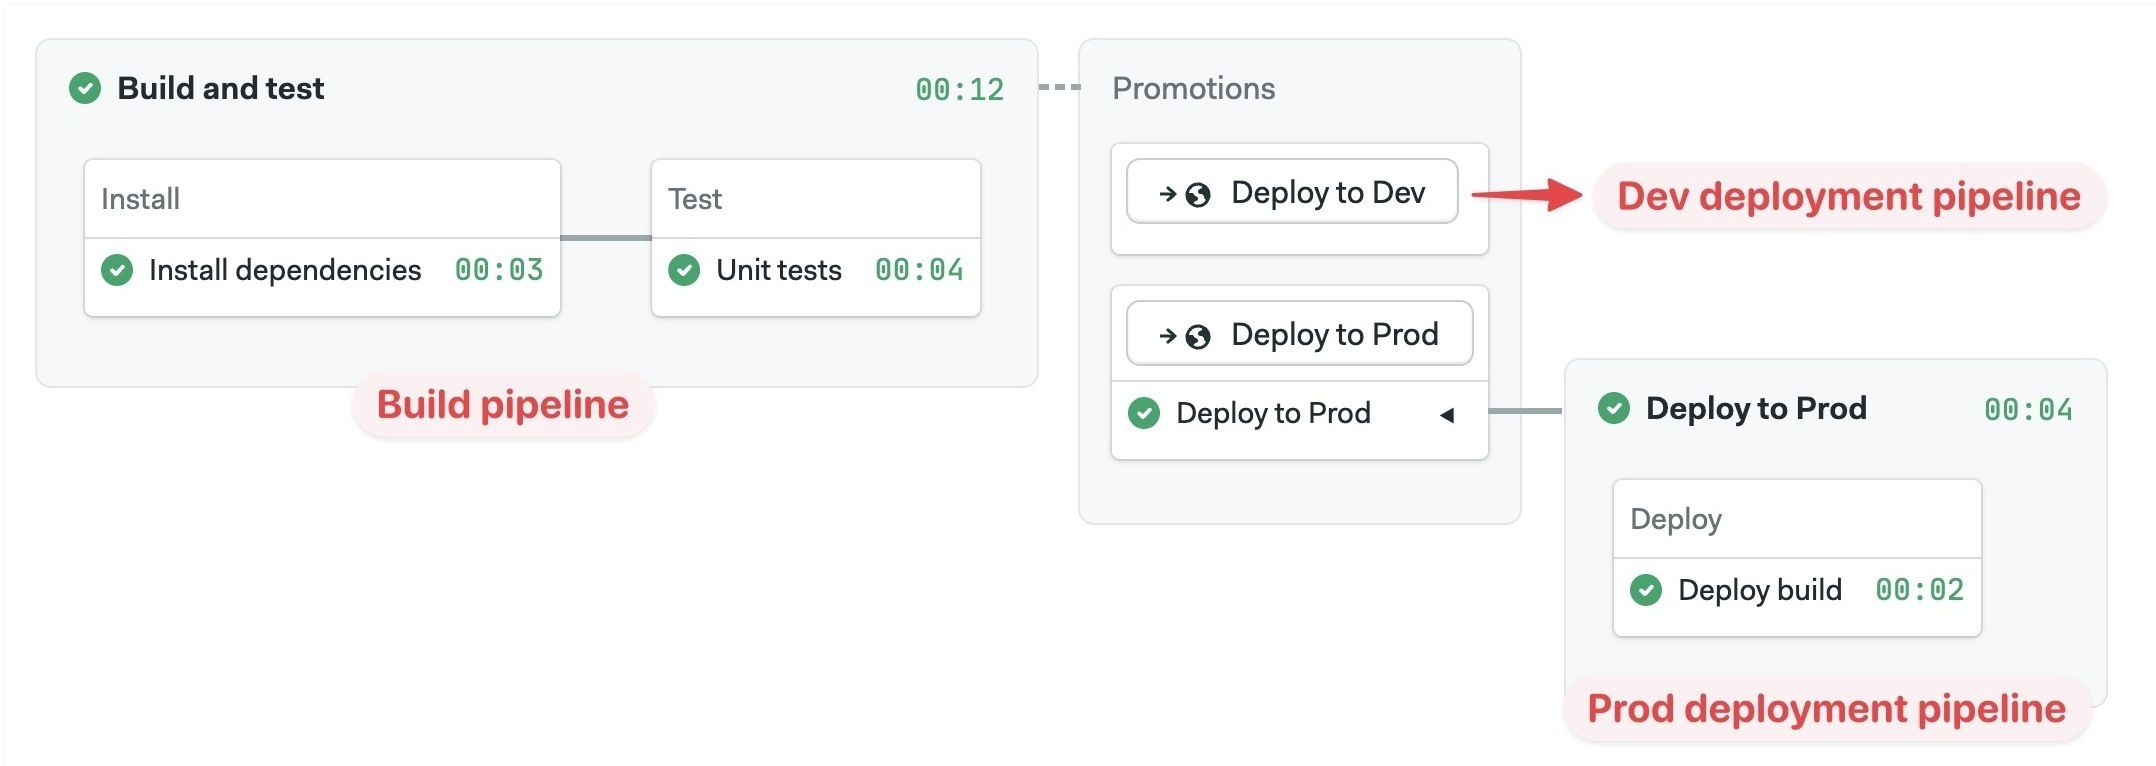
Connecting pipelines with promotions
Your project can have multiple pipelines to perform different tasks such as build, release, or test. Promotions connect pipelines. Multiple pipelines can be chained to create branching workflows to automate almost any task.
The workflow always starts with the default pipeline (located at .semaphore/semaphore.yml) and flows from left to right following promotions.
For more information, see the Promotions page.
Pipeline settings
Pipeline settings are applied to all its blocks. You can change pipeline settings with the editor or directly in the YAML.
Agents
An agent is the machine and operating system where a job run. Semaphore keeps a pool of warm agents to ensure there's always one ready to work.
Semaphore Cloud provides the following agent types in x86 and ARM architectures:
- Linux Virtual Machines
- Docker containers running on Linux
- Apple macOS Machines
- Windows Virtual Machines (only for self-hosted agents)
You can add your own machines by installing self-hosted agents.
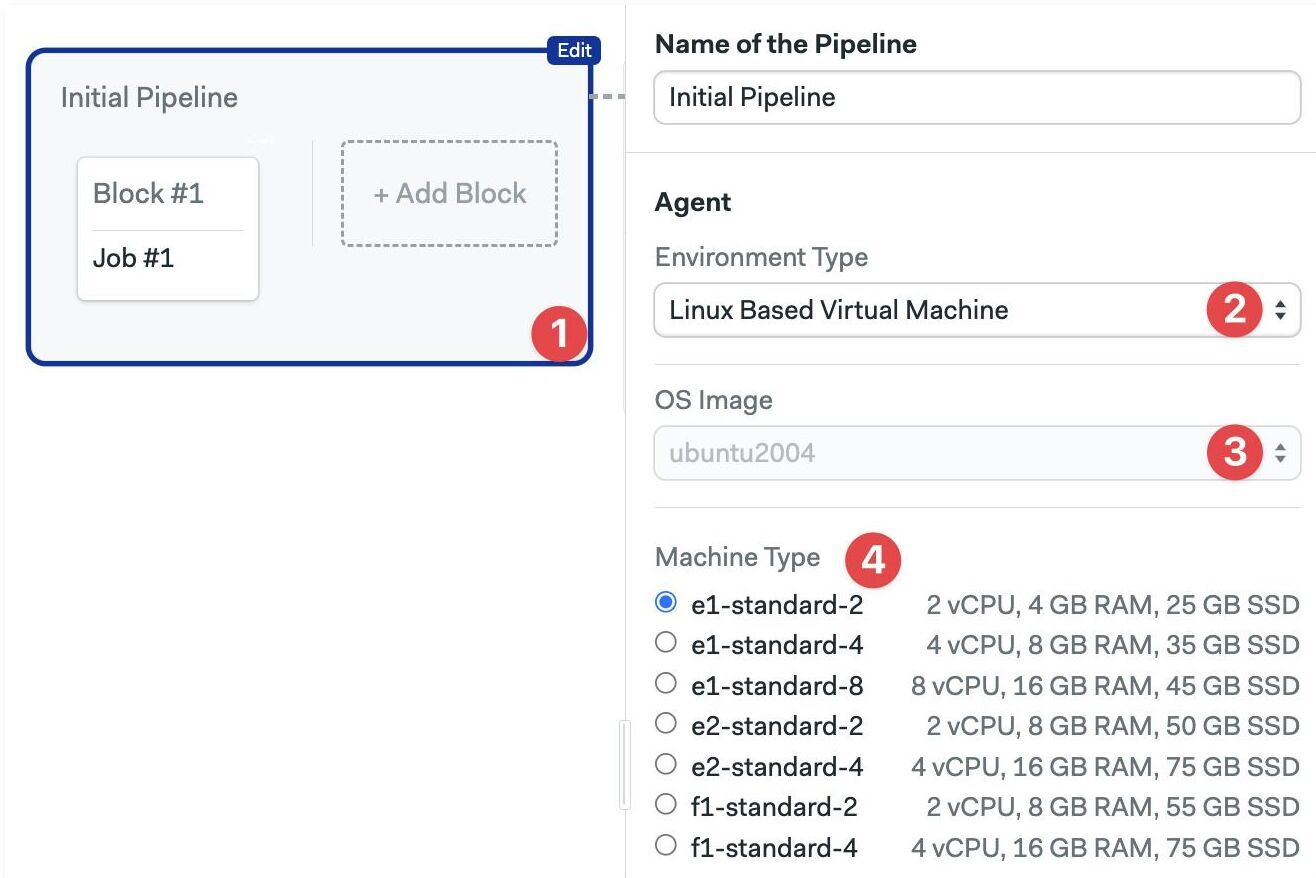
To select the agent running your jobs in a pipeline:
- Editor
- YAML
- Select the pipeline
- Select the Environment Type
- Select the Operating System
- Select the machine type
The available hardware changes depending on the type of environment you selected.
- Add the
agentandmachinekeys - Add the hardware
type. The value must be one of the supported machine types - Add the
os_image. The value must be one of the supported operating systems
version: v1.0
name: Initial Pipeline
agent:
  machine:
    type: e1-standard-2
    os_image: ubuntu2004
blocks:
  - name: 'Block #1'
    dependencies: []
    task:
      agent:
        machine:
          type: e1-standard-2
          os_image: ubuntu2004
      jobs:
        - name: 'Job #1'
          commands:
            - checkout
Docker containers
If you want to build and run Docker images in your jobs, check the working with Docker page.
Jobs can run inside Docker containers. This allows you to define a custom-build environment with pre-installed tools and dependencies needed for your project. You can enable this setting in the pipeline agent or in the block agent override.
You can run multiple containers at the same time. The job runs in the first container (called main) and attaches the other containers to the same network. This is similar to how containers inside a Kubernetes pod communicate.
The network addresses of all containers are mapped to their names. Let's say you have two containers, "main" and "mysql", you can connect to the database from main with:
mysql --host=mysql --user=root
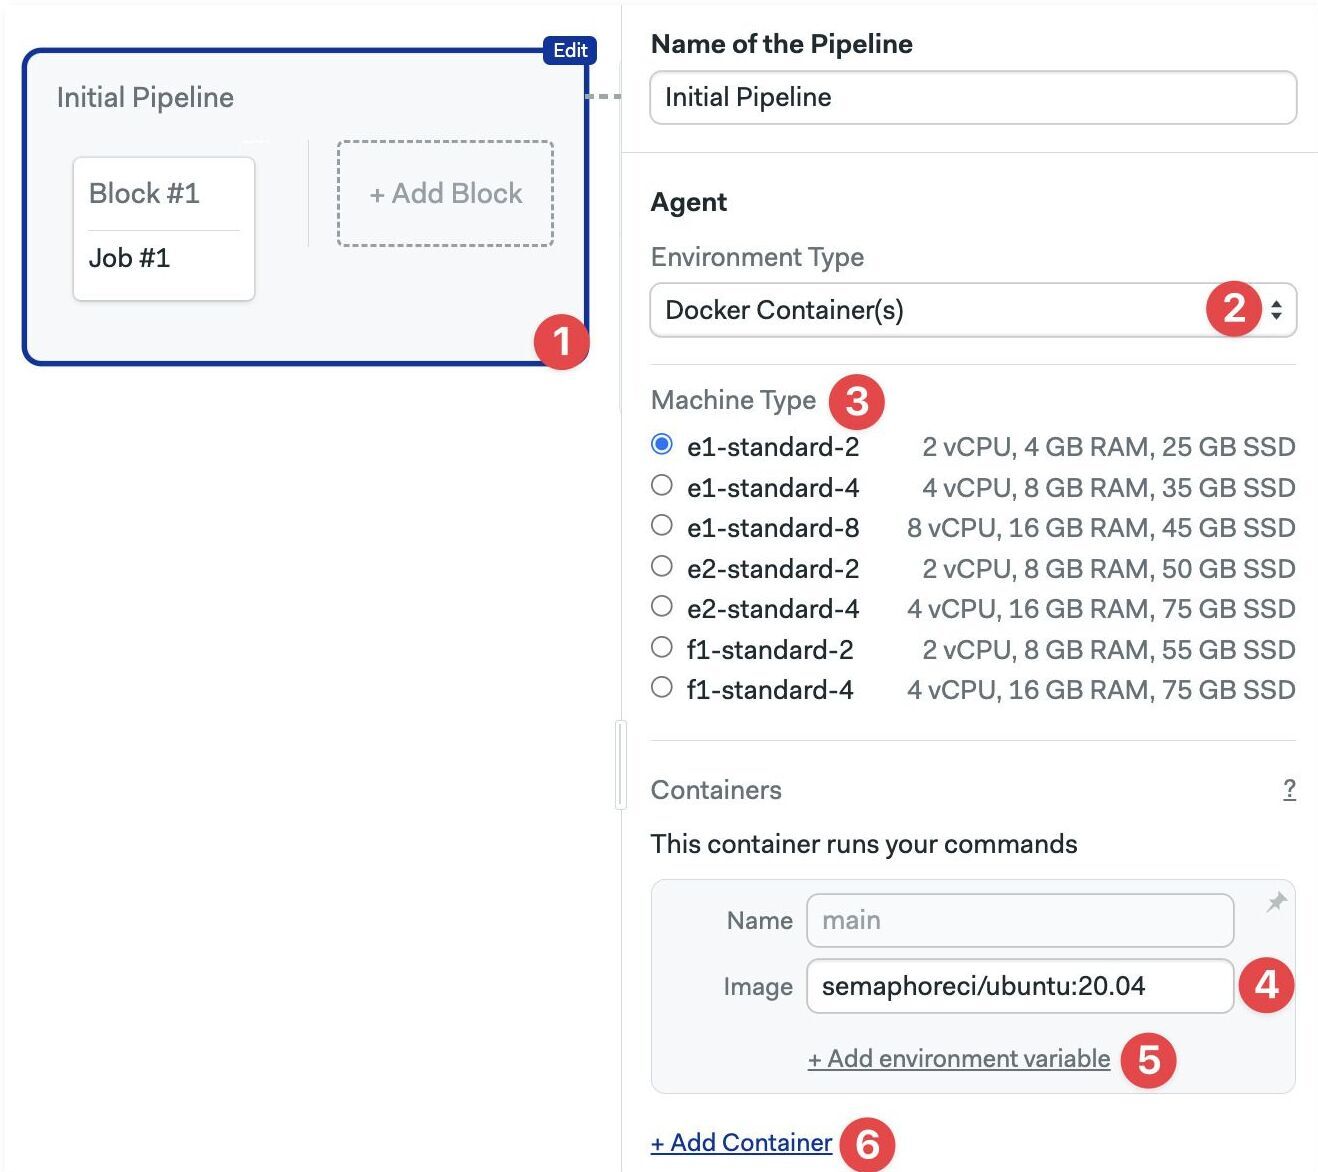
To run the job inside a Docker container:
- Editor
- YAML
- Select the pipeline
- In Environment Types select Docker Container(s)
- Select the machine type
- Type the Image name for this container
- Optionally, add environment variables
- Optionally, add more containers
- Add the
agentandmachine - Add a
containerskey - Each list item is a container. The first one must be called
main - Add the
image - Optionally, add
env_vars - Optionally, add more containers
version: v1.0
name: Initial Pipeline
agent:
  machine:
    type: e1-standard-2
    os_image: ubuntu2004
  containers:
    - name: main
      image: 'semaphoreci/ubuntu:20.04'
      env_vars:
        - name: FOO_1
          value: BAR_1
    - name: web
      image: nginx
blocks:
  - name: 'Block #1'
    dependencies: []
    task:
      jobs:
        - name: 'Job #1'
          commands:
            - 'curl http://web'
To use images in private repositories see Private Docker Registries.
Semaphore provides a public Docker registry for popular images.
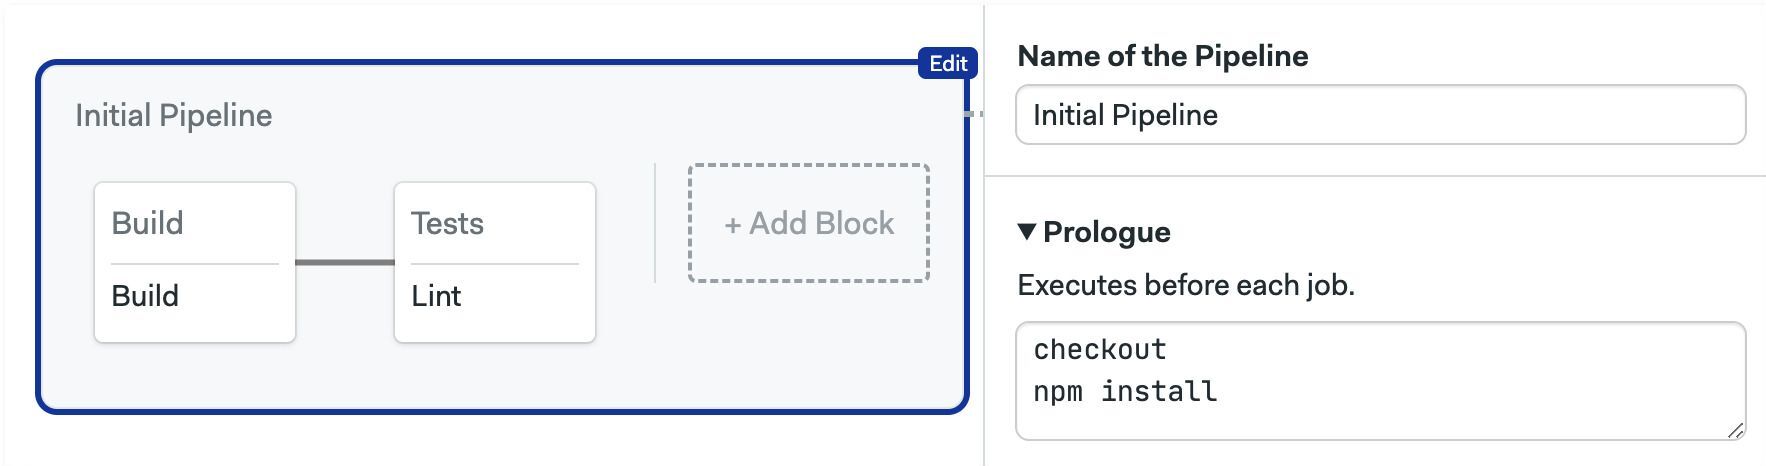
Prologue
Commands in the prologue run before the jobs in the block start. Semaphore prepends these commands to every job contained in the pipeline. This works like the block prologue but for all blocks in the pipeline.
- Editor
- YAML
version: v1.0
name: Initial Pipeline
agent:
  machine:
    type: e1-standard-2
    os_image: ubuntu2004
global_job_config:
  prologue:
    commands:
      - checkout
      - npm install
blocks:
  - name: Build
    dependencies: []
    task:
      jobs:
        - name: Build
          commands:
            - npm run build
  - name: Tests
    dependencies:
      - Build
    task:
      jobs:
        - name: Lint
          commands:
            - npm run build
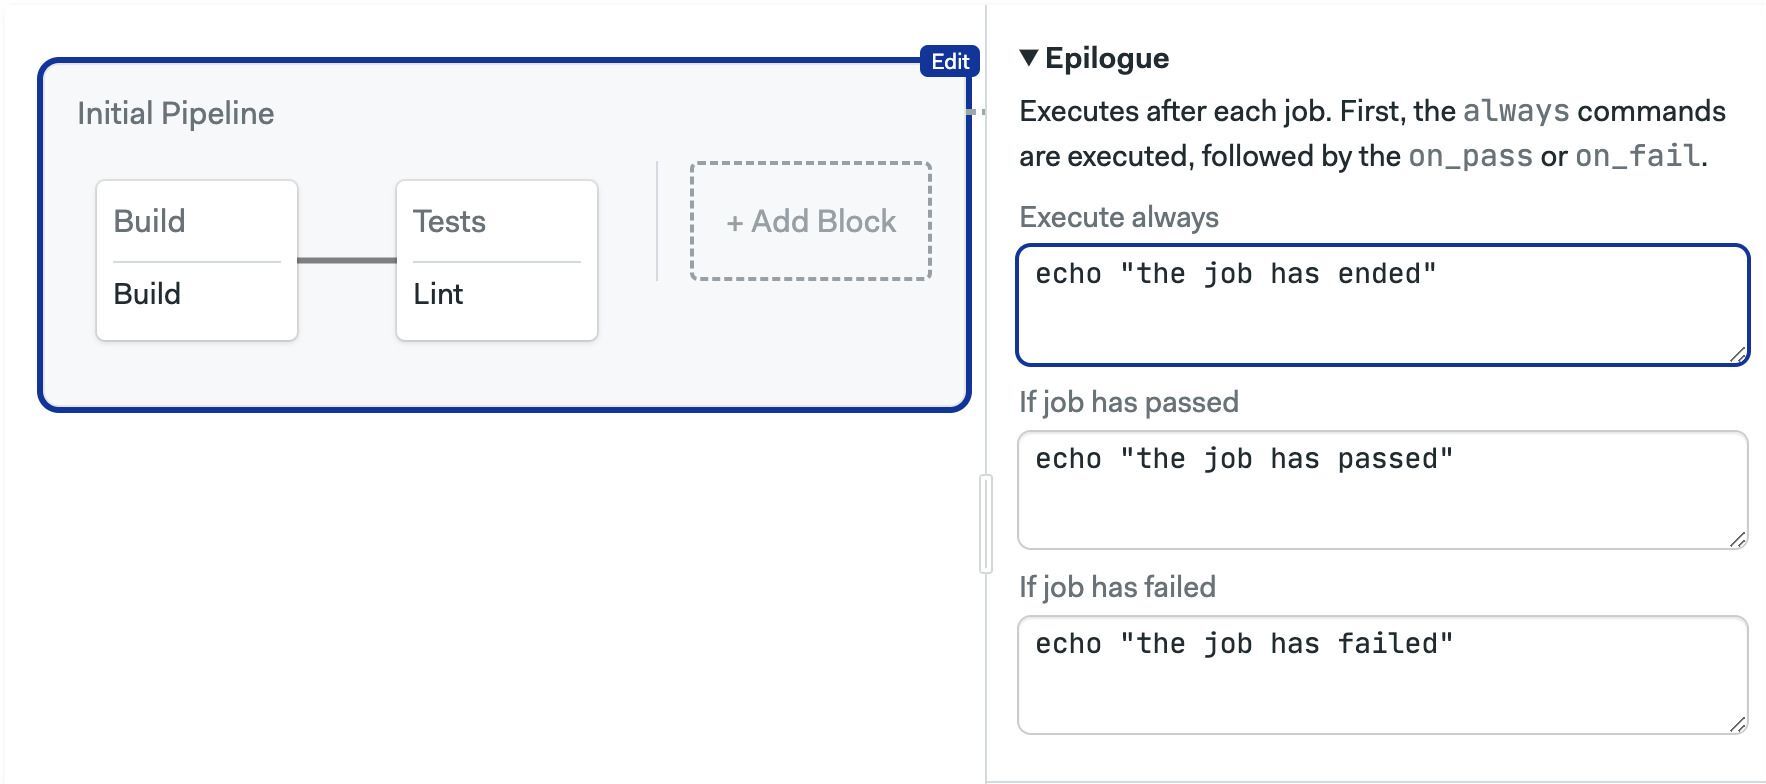
Epilogue
Commands in the epilogue run at the end of the jobs in all blocks. Semaphore appends these commands to every job contained in the pipeline. This works like the block epilogue but for all blocks in the pipeline.
- Editor
- YAML
version: v1.0
name: Initial Pipeline
agent:
  machine:
    type: e1-standard-2
    os_image: ubuntu2004
global_job_config:
  epilogue:
    always:
      commands:
        - echo "the job has ended"
    on_pass:
      commands:
        - echo "the job has passed"
    on_fail:
      commands:
        - echo "the job has failed"
blocks:
  - name: Build
    dependencies: []
    task:
      jobs:
        - name: Build
          commands:
            - npm run build
  - name: Tests
    dependencies:
      - Build
    task:
      jobs:
        - name: Lint
          commands:
            - npm run build
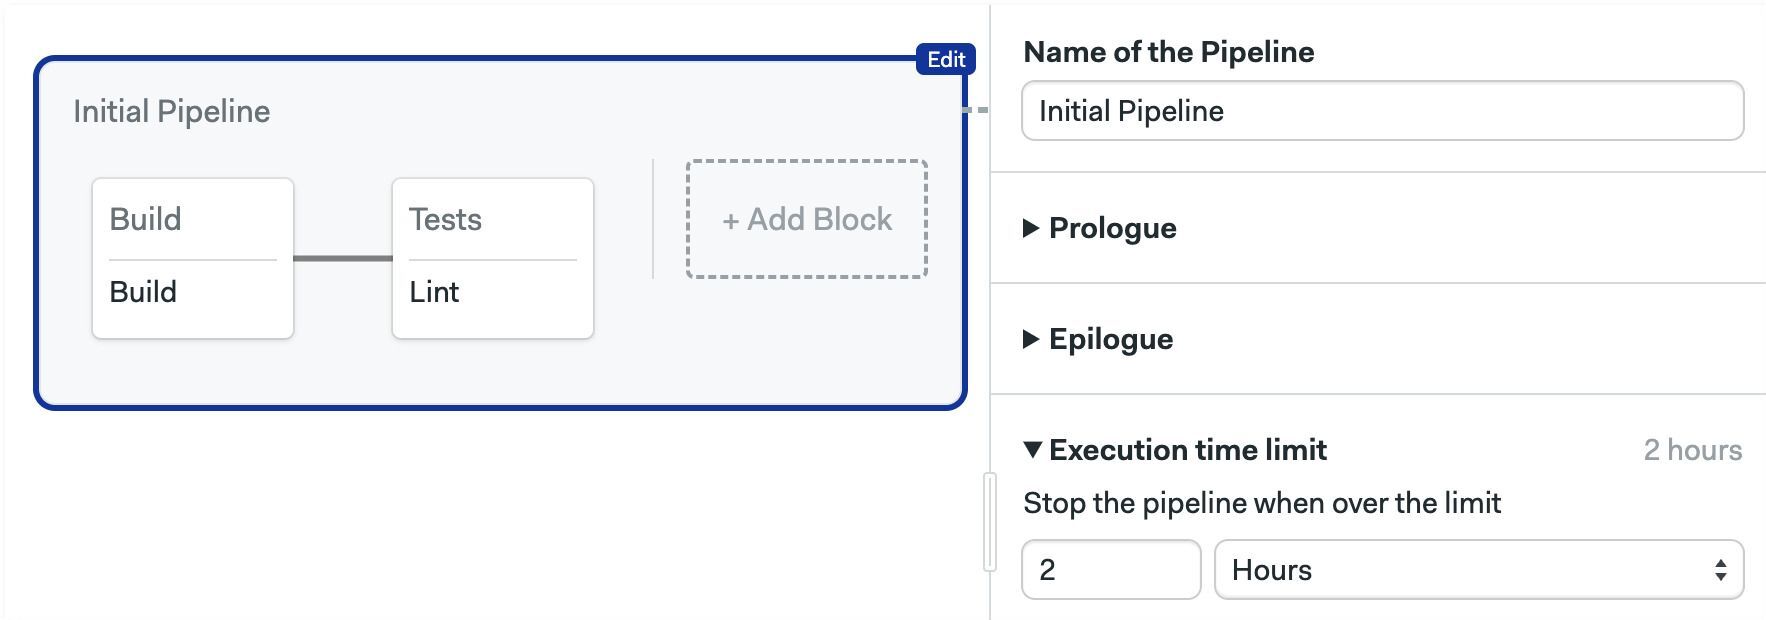
Execution time limit
The time limit for job execution. Defaults to 1 hour. Jobs running longer that the limit are forcibly terminated.
- Editor
- YAML
version: v1.0
name: Initial Pipeline
agent:
  machine:
    type: e1-standard-2
    os_image: ubuntu2004
execution_time_limit:
  hours: 2
blocks:
  - name: Build
    dependencies: []
    task:
      jobs:
        - name: Build
          commands:
            - npm run build
  - name: Tests
    dependencies:
      - Build
    task:
      jobs:
        - name: Lint
          commands:
            - npm run build
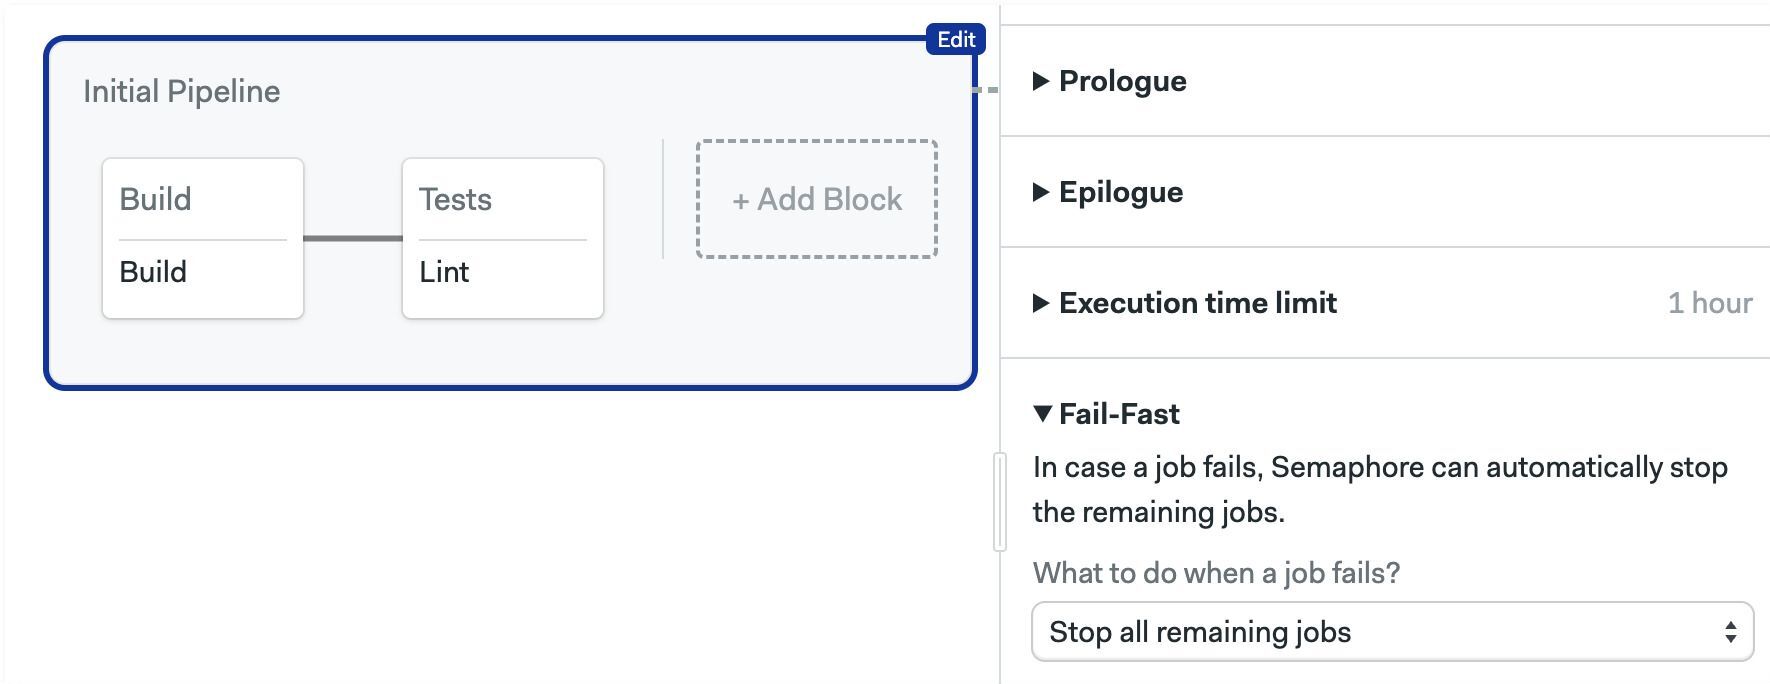
Fail-fast
Changes Semaphore behavior when a job fails. The possible actions are:
- Stop: stop all running jobs
- Cancel: already-running jobs are allowed to finish
The available strategies are:
- Do nothing: fail fast is disabled
- Stop all remaining jobs: stops the jobs
- Cancel pending jobs: cancels the jobs that have not yet started
- Stop remaining jobs, unless on the master branch: stops the jobs when the current branch is not "master"
- Run a custom fail-fast strategy: define custom conditions for stop and cancel. See conditions DSL
- Editor
- YAML
version: v1.0
name: Initial Pipeline
agent:
  machine:
    type: e1-standard-2
    os_image: ubuntu2004
fail_fast:
  stop:
    when: 'true'
blocks:
  - name: Build
    dependencies: []
    task:
      jobs:
        - name: Build
          commands:
            - npm run build
  - name: Tests
    dependencies:
      - Build
    task:
      jobs:
        - name: Lint
          commands:
            - npm run build
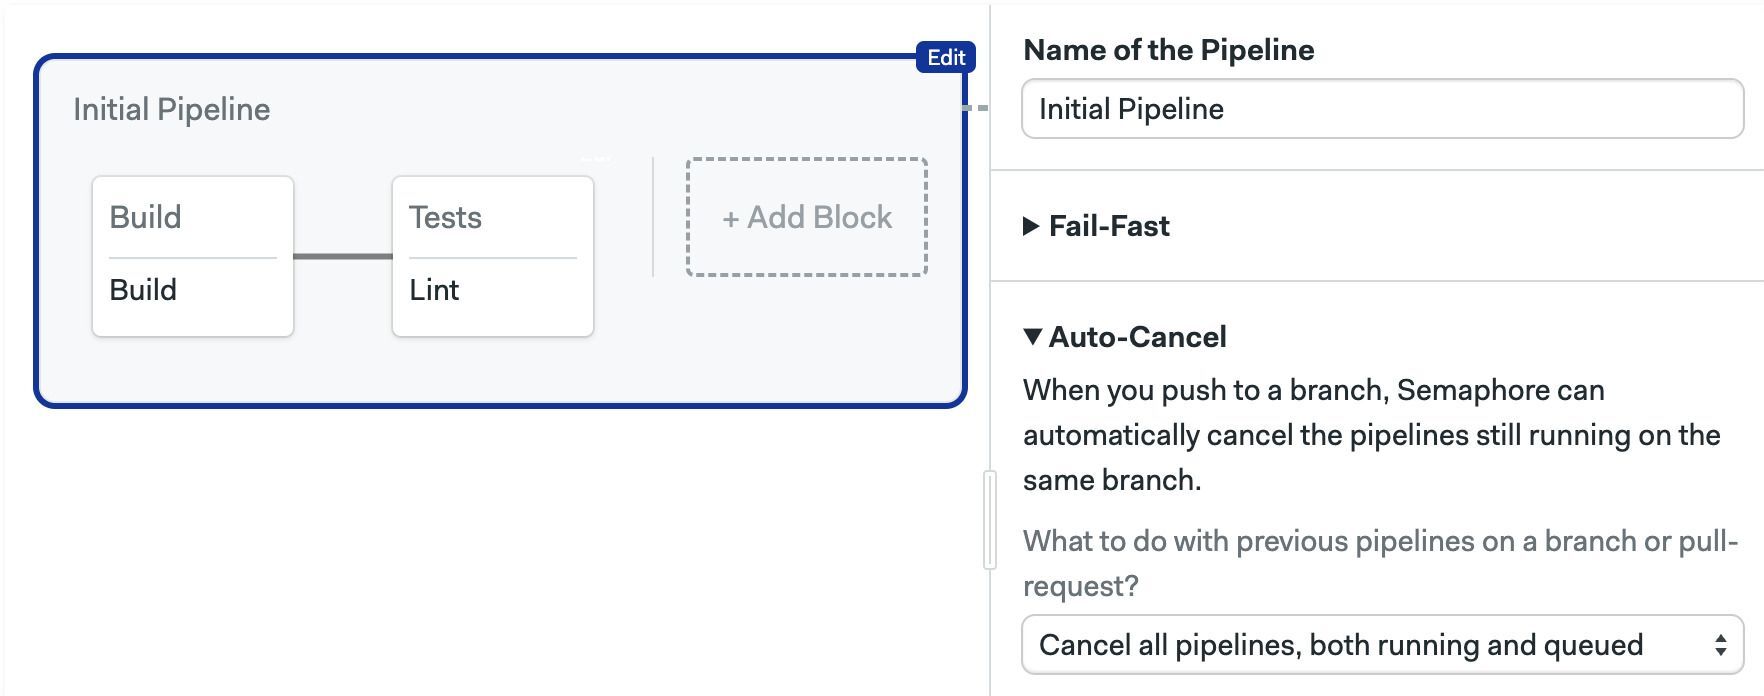
Auto-cancel
Define what happens when changes are pushed to the remote repository while a pipeline is running. By default, all pipelines will enter a First-In-First-Out (FIFO) queue and be executed in turn.
The possible strategies when a new pipeline is queued are:
- running: stops and cancels all pipelines in the queue. Starts the new pipeline immediately
- queued: cancels queued but no-yet-started pipelines. Waits for running pipelines to finish before starting the new one
The options are:
- Do nothing: disables auto-cancel
- Cancel all pipelines, both running and queued: stops running pipelines and cancel queued pipelines
- Cancel only queued pipelines: cancels queued pipelines, wait for already-started pipelines to finish
- On the master branch cancel only queued pipelines, on others cancel both running and queued: a mix of the last two strategies
- Run a custom auto-cancel strategy: define custom conditions for stop and cancel. Uses the conditions DSL
- Editor
- YAML
version: v1.0
name: Initial Pipeline
agent:
  machine:
    type: e1-standard-2
    os_image: ubuntu2004
auto_cancel:
  running:
    when: 'true'
blocks:
  - name: Build
    dependencies: []
    task:
      jobs:
        - name: Build
          commands:
            - npm run build
  - name: Tests
    dependencies:
      - Build
    task:
      jobs:
        - name: Lint
          commands:
            - npm run build
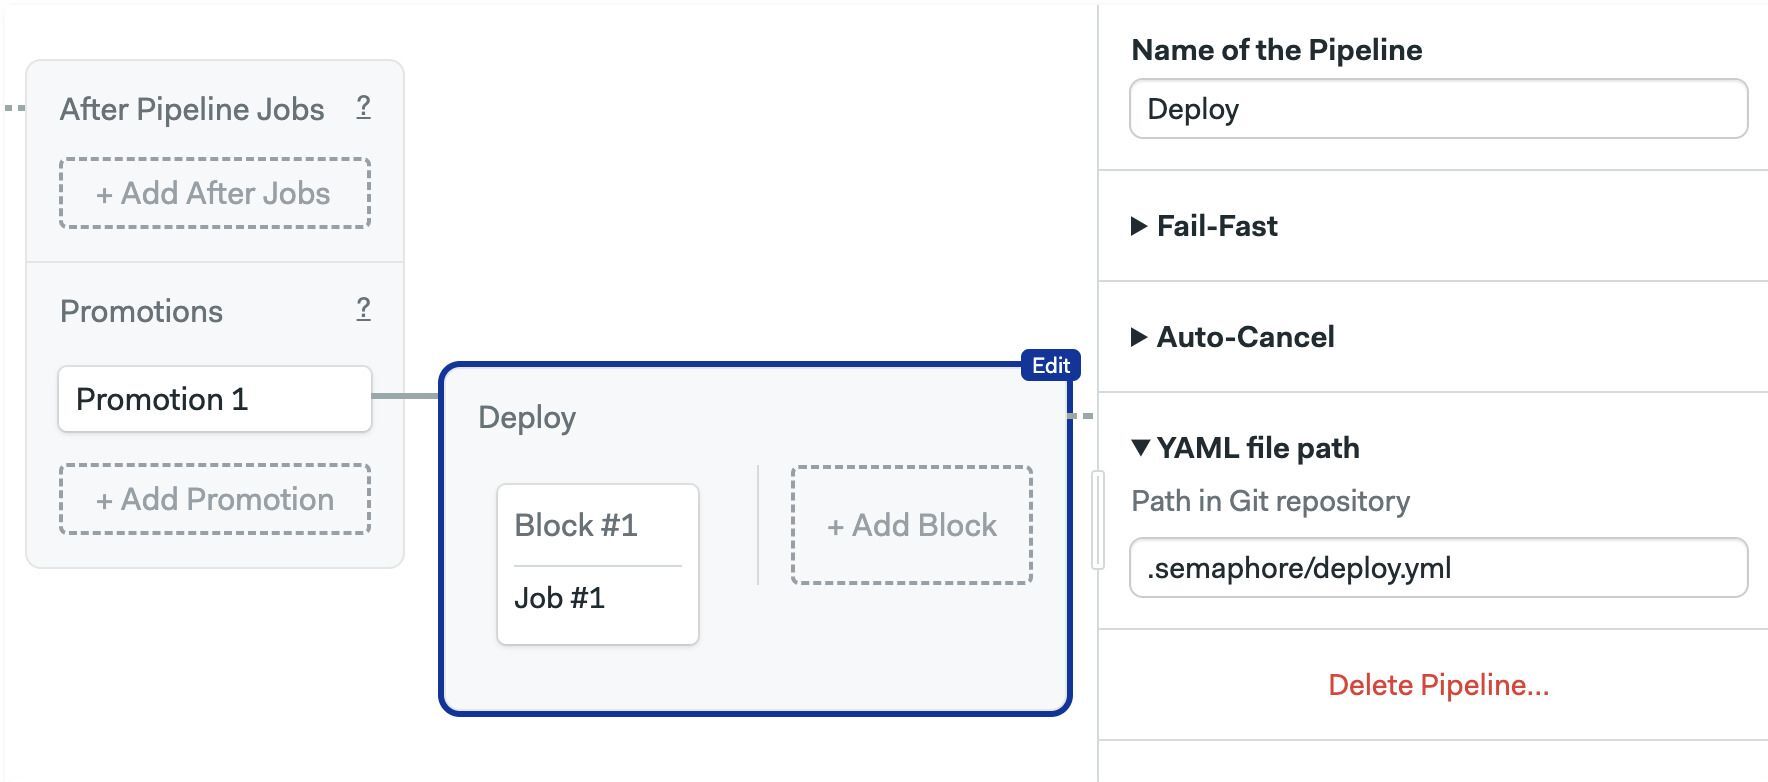
YAML file path
This option overrides the location of the pipeline file. This option is not available for the default pipeline (located at .semaphore/semaphore.yml).
- Editor
- YAML
version: v1.0
name: Deploy
agent:
  machine:
    type: e1-standard-2
    os_image: ubuntu2004
blocks:
  - name: 'Block #1'
    task:
      jobs:
        - name: 'Job #1'
          commands:
            - echo "job 1"
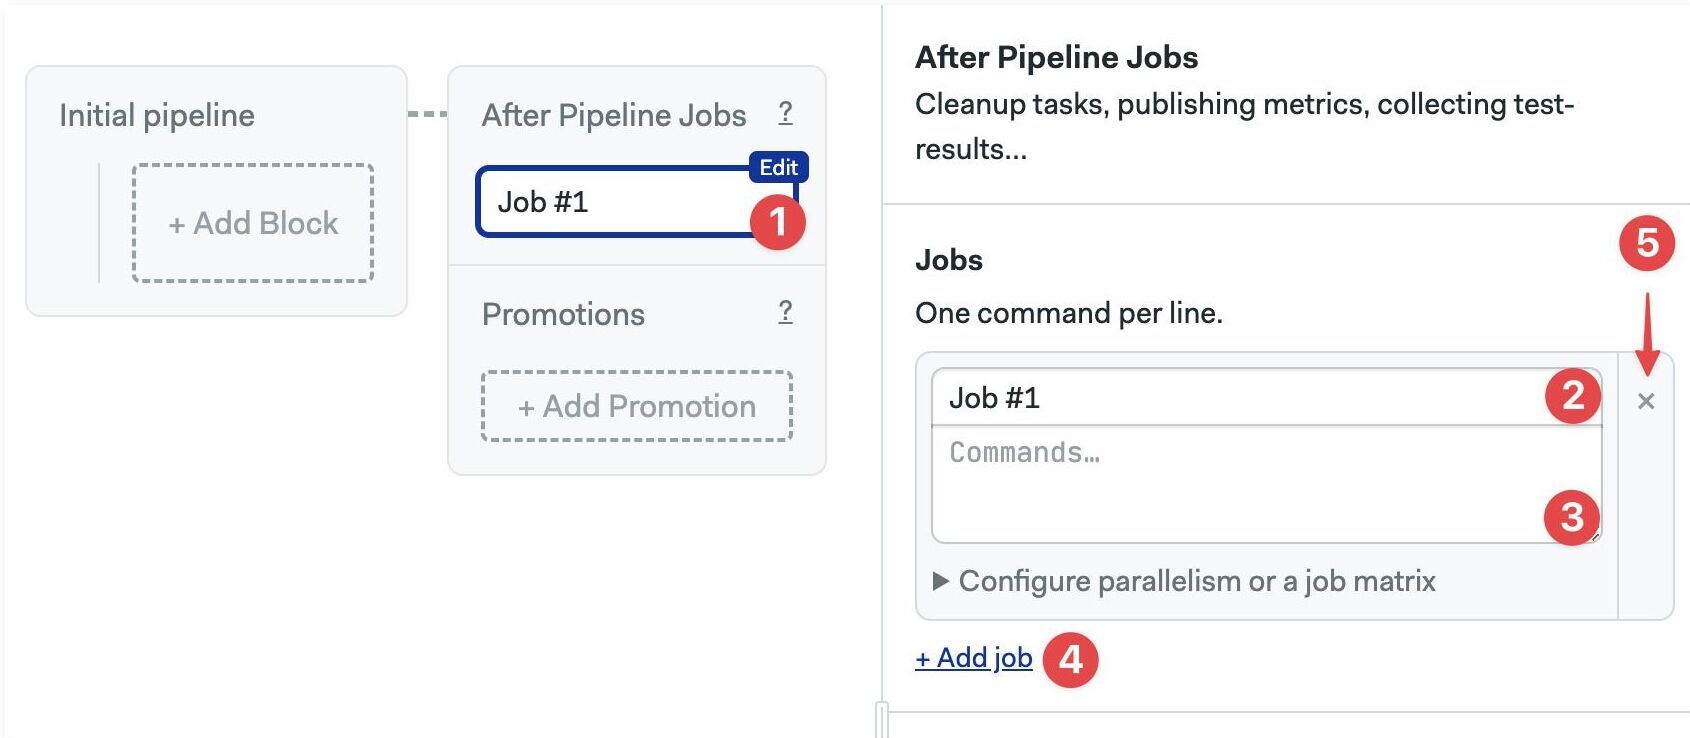
After pipeline jobs
You can configure jobs to run once a pipeline stops. After pipeline jobs always run, even when jobs are canceled or have failed.
After-pipeline jobs are executed in parallel. Typical use cases for after-pipeline jobs are sending notifications, collecting test reports, or submitting metrics to an external server.
You can add after-pipeline jobs using YAML or the editor.
- Editor
- YAML
- Press +Add After Jobs
- Type the name of the job
- Add your commands
- Optionally, you can add more jobs
- To delete them, click the X next to the job
- Add
after_pipelinekey at the top level of the YAML. - Create a
task.jobskey - Add the list of jobs with
nameandcommands
version: v1.0
name: Initial Pipeline
agent:
  machine:
    type: e1-standard-2
    os_image: ubuntu2004
blocks:
  - name: 'Block #1'
    dependencies: []
    task:
      agent:
        machine:
          type: e1-standard-2
          os_image: ubuntu2004
      jobs:
        - name: 'Job #1'
          commands:
            - checkout
            - make build
after_pipeline:
  task:
    jobs:
      - name: Submit metrics
        commands:
          - export DURATION_IN_MS=$((SEMAPHORE_PIPELINE_TOTAL_DURATION * 1000))
          - 'echo "ci.duration:${DURATION_IN_MS}|ms" | nc -w 3 -u statsd.example.com'
Private Docker Registries
If the images you need for your docker environment are not publicly available, you need to provide authentication credentials in your pipeline. This feature is only available by editing the pipeline YAML directly.
See containers in pipeline YAML for more details.
Images in Docker Hub
To pull images from a private Docker Hub registry, follow these steps:
-
Create a secret with the following key-value pairs:
DOCKER_CREDENTIAL_TYPE=DockerHubDOCKERHUB_USERNAME=<your Docker Hub account username>DOCKERHUB_PASSWORD=<your Docker Hub account password>
-
Import the secret by name into the agent using
image_pull_secret. The following example assumes the secret is calleddockerhub-pull
agent:
   machine:
     type: e1-standard-2
   containers:
     - name: main
       image: <your-private-repository>/<image>
   image_pull_secrets:
     - name: dockerhub-pull
Images in AWS ECR
To pull images from a private AWS Elastic Container Registry (ECR), follow these steps:
-
Create a secret with the following key-value pairs:
DOCKER_CREDENTIAL_TYPE=AWS_ECRAWS_REGION=<aws-ecr-region>AWS_ACCESS_KEY_ID=<your-aws-access-key>AWS_SECRET_ACCESS_KEY=<your-aws-secret-key>
-
Import the secret by name into the agent using
image_pull_secret. The following example assumes the secret is calledecr-pull
agent:
   machine:
     type: e1-standard-2
   containers:
     - name: main
       image: <your-private-repository>/<image>
   image_pull_secrets:
     - name: ecr-pull
Images in Google GCR
To pull images from a private Google Container Registry (GCR), follow these steps:
-
Create a secret with the following key-value pairs:
DOCKER_CREDENTIAL_TYPE=GCRGCR_HOSTNAME=gcr.io
-
Download the service account keyfile that provides access to your Google Container Registry.
-
Upload the keyfile to the secret created on step 1
Important: the file must be mounted on
/tmp/gcr/keyfile.json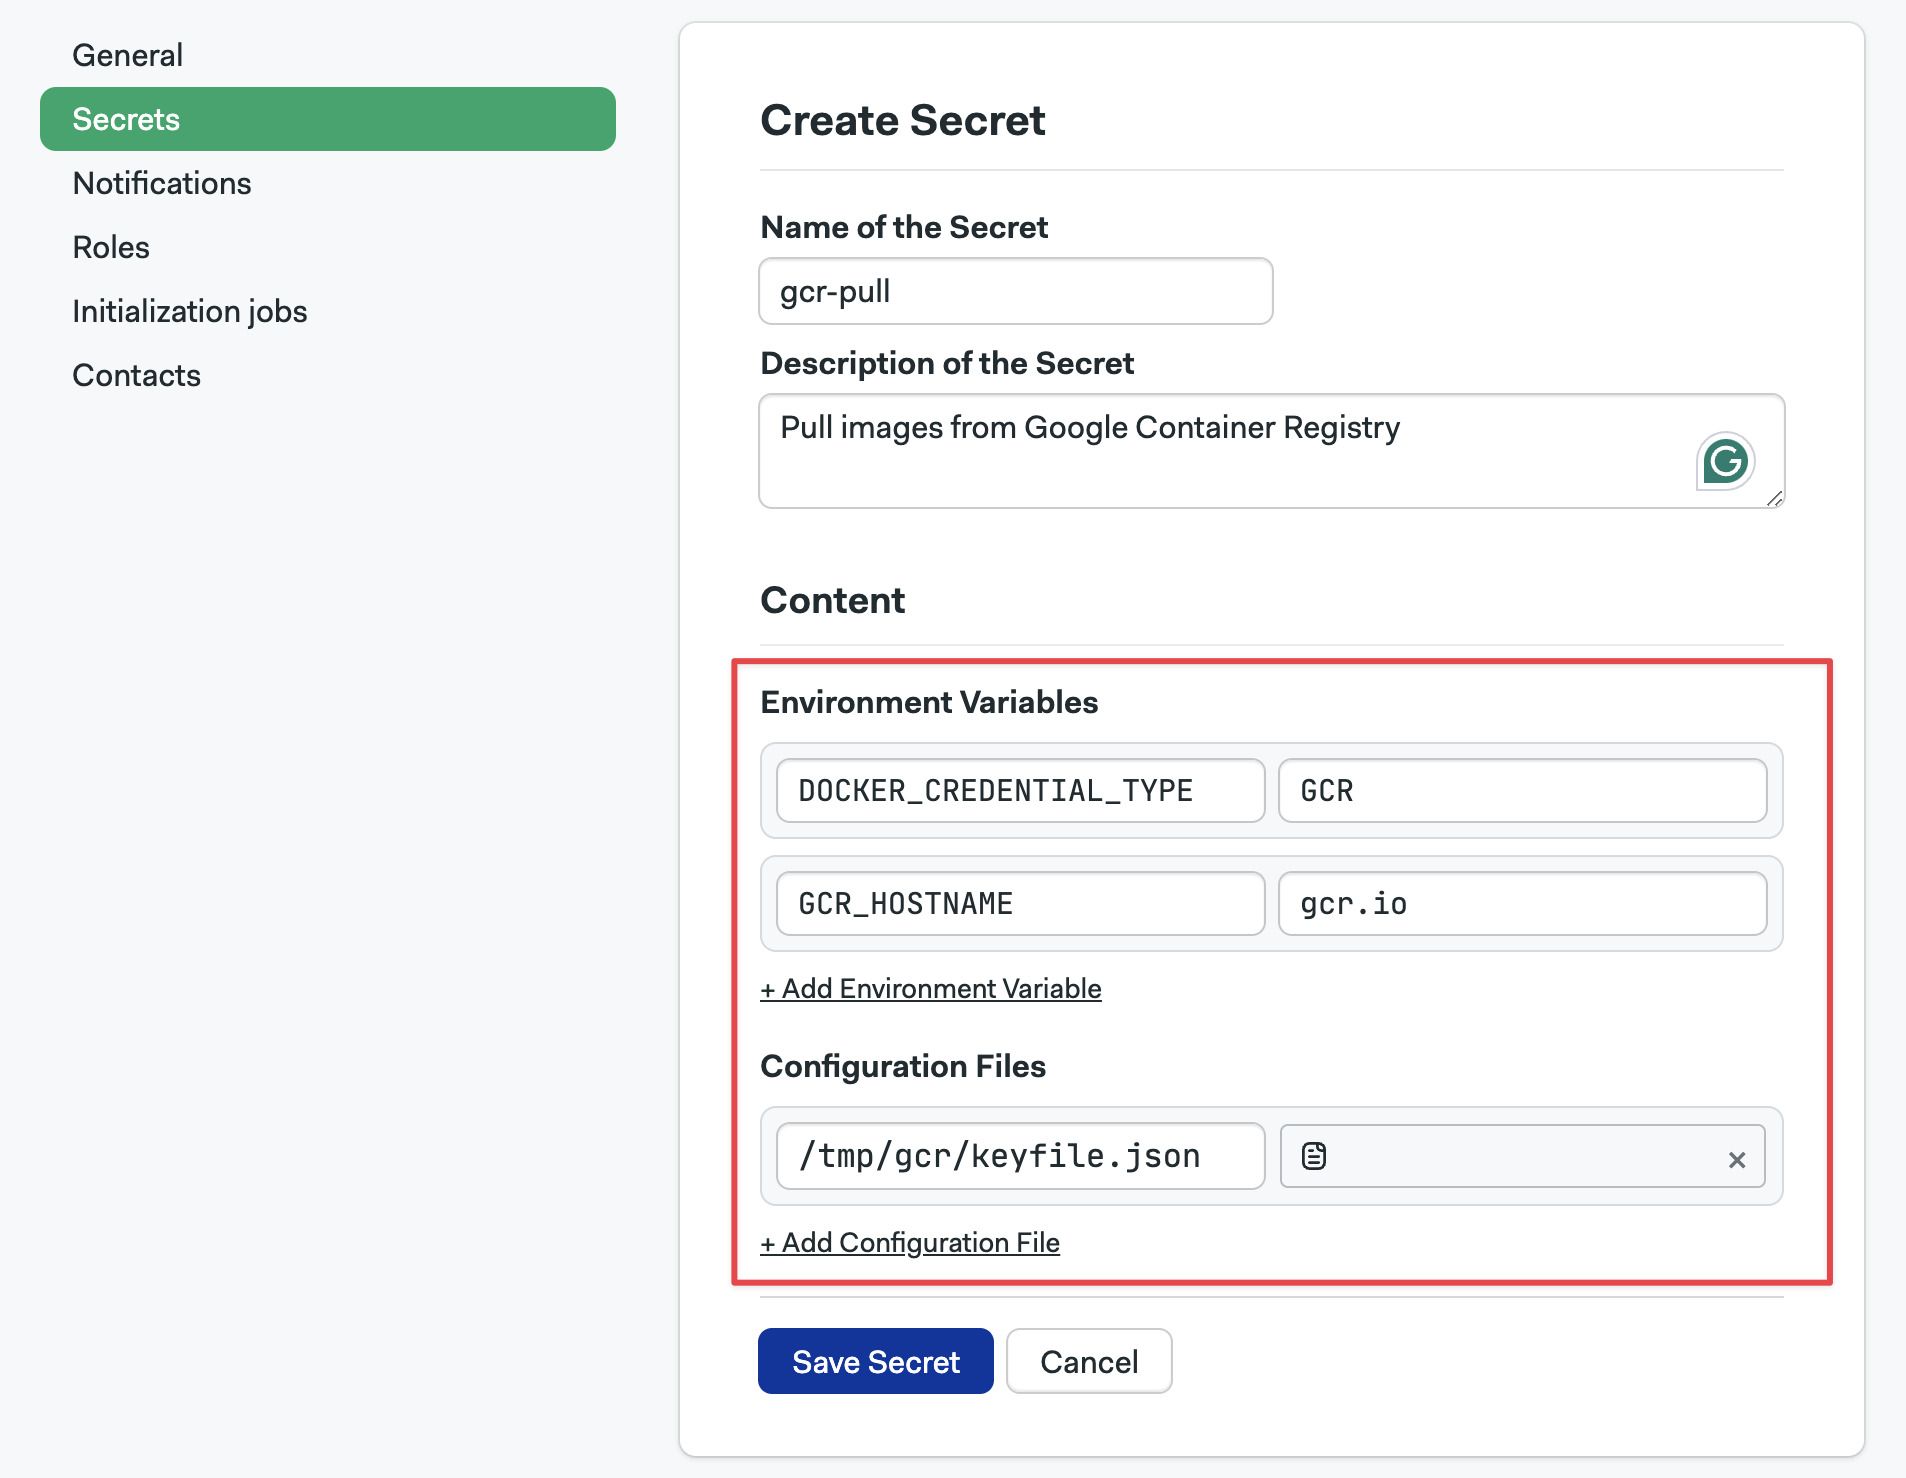
-
Import the secret by name into the agent using
image_pull_secret. The following example assumes the secret is calledgcr-pull
agent:
   machine:
     type: e1-standard-2
   containers:
     - name: main
       image: <your-private-repository>/<image>
   image_pull_secrets:
     - name: gcr-pull
Images in Quay.io
To pull images from a private Quay.io registry, follow these steps:
-
Create a secret with the following key-value pairs:
DOCKER_CREDENTIAL_TYPE=GenericDockerDOCKER_URL=quay.ioDOCKER_USERNAME=<your-quay-username>DOCKER_PASSWORD=<your-quay-password>
-
Import the secret by name into the agent using
image_pull_secret. The following example assumes the secret is calledquay-pull
agent:
   machine:
     type: e1-standard-2
   containers:
     - name: main
       image: <your-private-repository>/<image>
   image_pull_secrets:
     - name: quay-pull
Images in generic registries
To pull images from any arbitrary Docker registry, follow these steps:
-
Create a secret with the following key-value pairs:
DOCKER_CREDENTIAL_TYPE=GenericDockerDOCKER_URL=<your-repository-url>DOCKER_USERNAME=<your-registry-username>DOCKER_PASSWORD=<your-registry-password>
-
Import the secret by name into the agent using
image_pull_secret. The following example assumes the secret is calledregistry-pull
agent:
   machine:
     type: e1-standard-2
   containers:
     - name: main
       image: <your-private-repository>/<image>
   image_pull_secrets:
     - name: registry-pull
Pipeline queues
Queues allow you to control the order in which pipelines run. Semaphore pipelines can run sequentially or in parallel. For example, you can run CI pipelines in parallel on the main branch, while limiting deployment pipelines to run one at at time to prevent conflicts or race conditions.
Default and named queues
Semaphore creates a queue for each Git push or pull requests. All workflows sharing the same commit SHA belong in the same queue and run sequentially.
In other words, every time you re-run a workflow, create a pull request, push a tag, or start a promotion, the pipeline is added to the end of the same-commit queue.
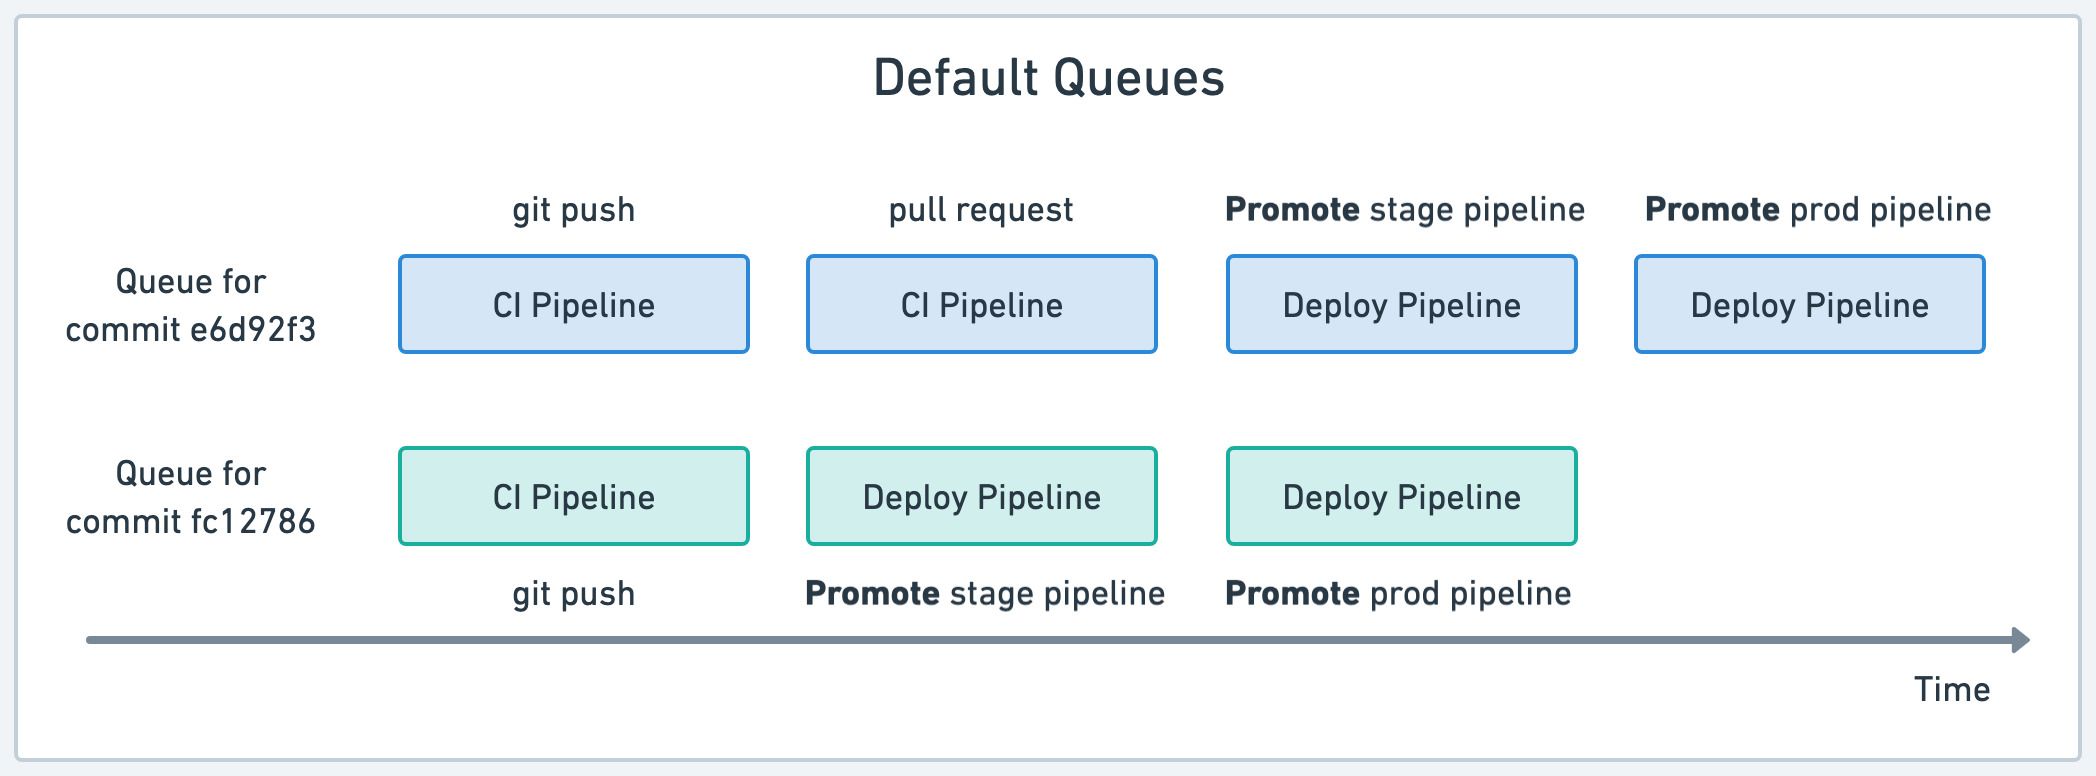
The downside of this strategy is that it may create conflicts due to pipelines running in parallel. In the example above, two deploy pipelines may try to deploy conflicting versions into the same environment, leading to instability.
You can avoid conflicts with named queues. Named queues allow you to manually assign pipelines to specific queues to they always run in sequence.
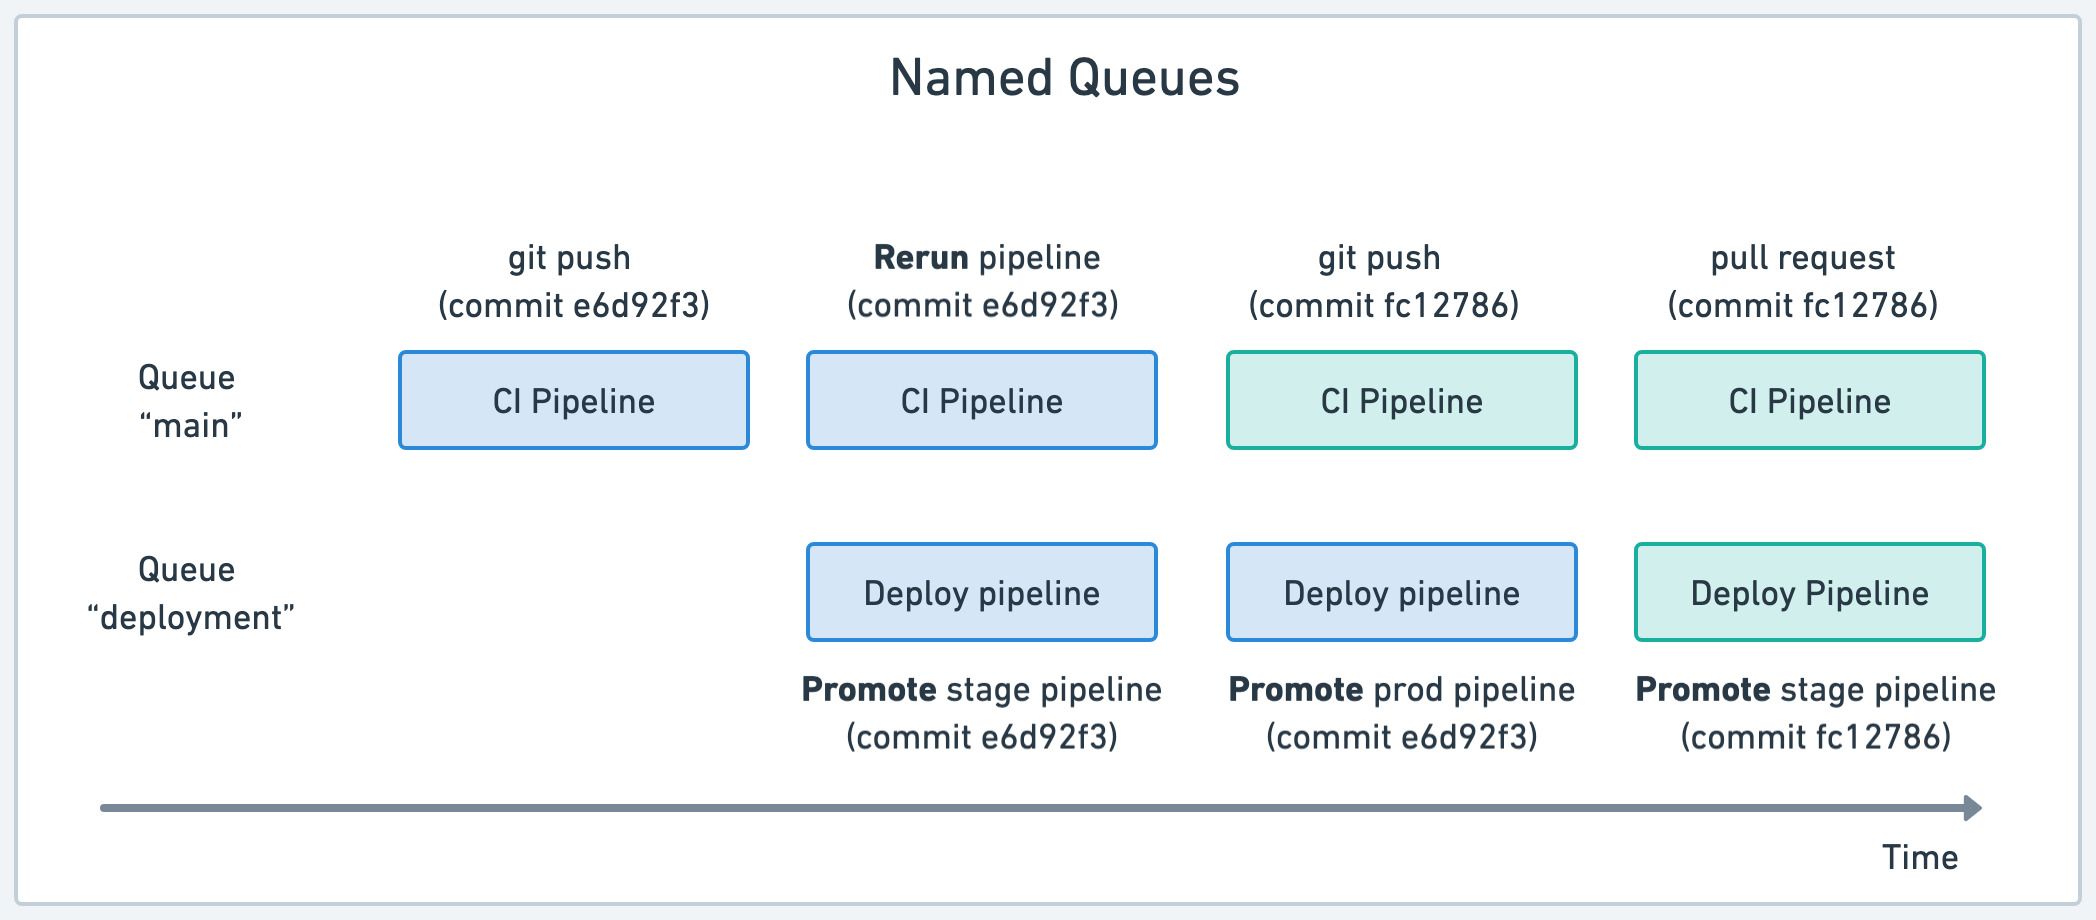
In the example above we have two queues. The "main" queue runs CI pipelines for all commits. The possibly-disrupting deployment pipelines are assigned to a separate "deployment" queue. Thus, deployments are forced to run in sequence, avoiding conflicts due to parallelism.
Queue scopes
Queues can be configured on two scopes:
- Project (the default): pipelines belonging to the same project
- Organization: pipelines belonging to all projects withing an organization
How to assign named queues
Queues can only be defined using the pipeline YAML. There is currently no support for queue management using the visual editor.
To assign a pipeline to a named queue, follow these steps:
- Open the pipeline file
- Add
queue,nameandscopeat the root level of the YAML - Save the file and push it to the repository
The following example shows how to assign the pipeline to project-level queue called "Deployment queue".
version: v1.0
name: Production deployment
agent:
  machine:
    type: e1-standard-2
    os_image: ubuntu2004
queue:
  name: Deployment queue
  scope: project
blocks:
  - name: Deploy
    task:
      jobs:
      - commands:
          - make deploy
We can do the same with organization-level queues. This example shows how to assign the pipeline a queue called "Shared deployment queue" for all projects in the organization.
version: v1.0
name: Project A deployment
agent:
  machine:
    type: e1-standard-2
    os_image: ubuntu2004
queue:
  name: Shared deployment queue
  scope: organization
blocks:
  - name: Deploy
    task:
      jobs:
      - commands:
          - make deploy
How to disable queues
You can force pipelines to run in parallel by disabling queuing. This can help to obtain faster feedback when pipelines are completely independent and have no chance of causing conflicts.
To disable queue for a pipeline, follow these steps:
- Open the pipeline file
- Add
queue,processing: parallelat the root level of the YAML - Save the file and push it to the repository
The following example shows a pipeline that always runs in parallel. So, the pipeline starts as soon as an agent is available to take the jobs.
version: v1.0
name: Tests
agent:
  machine:
    type: e1-standard-2
    os_image: ubuntu2004
queue:
  processing: parallel
blocks:
  - name: Unit Tests
    task:
      jobs:
      - commands:
          - make test
Conditional queues
You can use conditional statements to assign pipelines based on parameters like branch name or tag name.
The following example uses three rules:
- On "master" branch: assign pipeline to organization queue called "Production"
- When the commit includes any Git tag: assign pipeline to project-level queue called "Image build queue"
- If none of the other rule match: default to running pipeline in parallel (no queue)
version: v1.0
name: Example project
agent:
  machine:
    type: e1-standard-2
    os_image: ubuntu2004
queue:
  - when: "branch = 'master'"
    name: Production
    scope: organization
  - when: "tag =~ '.*'"
    name: Image build queue
  - when: true
    processing: parallel
blocks:
  - name: Unit Tests
    task:
      jobs:
      - commands:
          - make test
  - name: Build and push image
    run:
      when: "branch = 'master' or tag =~ '.*'"
    task:
      jobs:
      - commands:
          - make image.build
          - make image.push
  - name: Deploy to production
    run:
      when: "branch = 'master'"
    task:
      jobs:
      - commands:
          - make deploy
See conditional queue reference for more details.
Pipeline limits
Semaphore enforces a few limits to prevent misconfigured jobs and runaway processes from using all the resources in your organization.
This section describes the limits that Semaphore applies to pipelines. See job limits to see limits that apply to jobs.
Global job duration
All jobs in a pipeline have a 1 hour limit. Jobs exceeding this limit are terminated.
You can change the limit up to a maximum value of 24 hours.
- Editor
- YAML
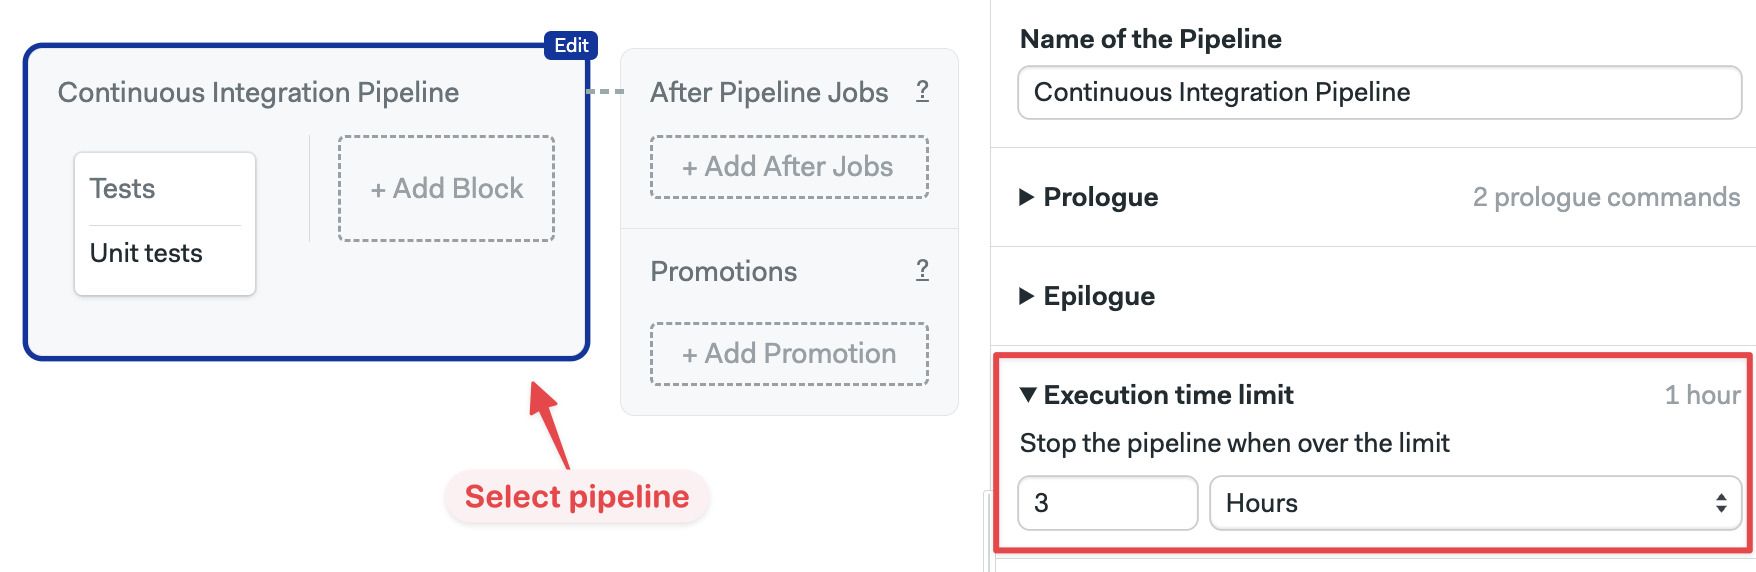
To change the global time limit for all jobs in a pipeline, follow these steps:
- Open the workflow editor
- Select the pipeline
- Scroll down to Execution time limit on the right-side menu
- Select a new value in Hours or Minutes
- Press Run the workflow, then Start
- Open the pipeline YAML
- Add and
execution_time_limitelement at the root of the pipeline - Add
hoursorminutes, set the new value - Save the file and push it to the repository
version: v1.0
name: Pipeline using execution_time_limit
agent:
  machine:
    type: e1-standard-2
    os_image: ubuntu2004
execution_time_limit:
  hours: 3
blocks:
  - name: All jobs have a 3 hour limit
    commands:
      - checkout
      - npm install
      - npm test
See job time limit to change the maximum duration for a single job.
Max pipelines per queue
Pipeline queues have a limit of 30 pipelines. This limit is not configurable.
You can workaround the queue limit by assigning pipelines to named queues.
If you have a use case in which this limit is too constraining, please contact us at support@semaphoreci.com and we will try to work out a solution.
Max blocks per pipeline
There is a hard limit of a 100 blocks per pipeline.
This limit is not adjustable. If you have a use case in which this limit is too constraining, please contact us at support@semaphoreci.com and we will try to work out a solution.