Promotions
Video Tutorial: How to use promotions
Promotions connect pipelines to implement continuous delivery and deployment, or other types of automation, such as blue-green deployments and canary deployments.
This page explains promotions, how to use them to connect pipelines, and what settings are available.
Connecting pipelines
If your project contains multiple pipelines, you can use promotions to chain them.
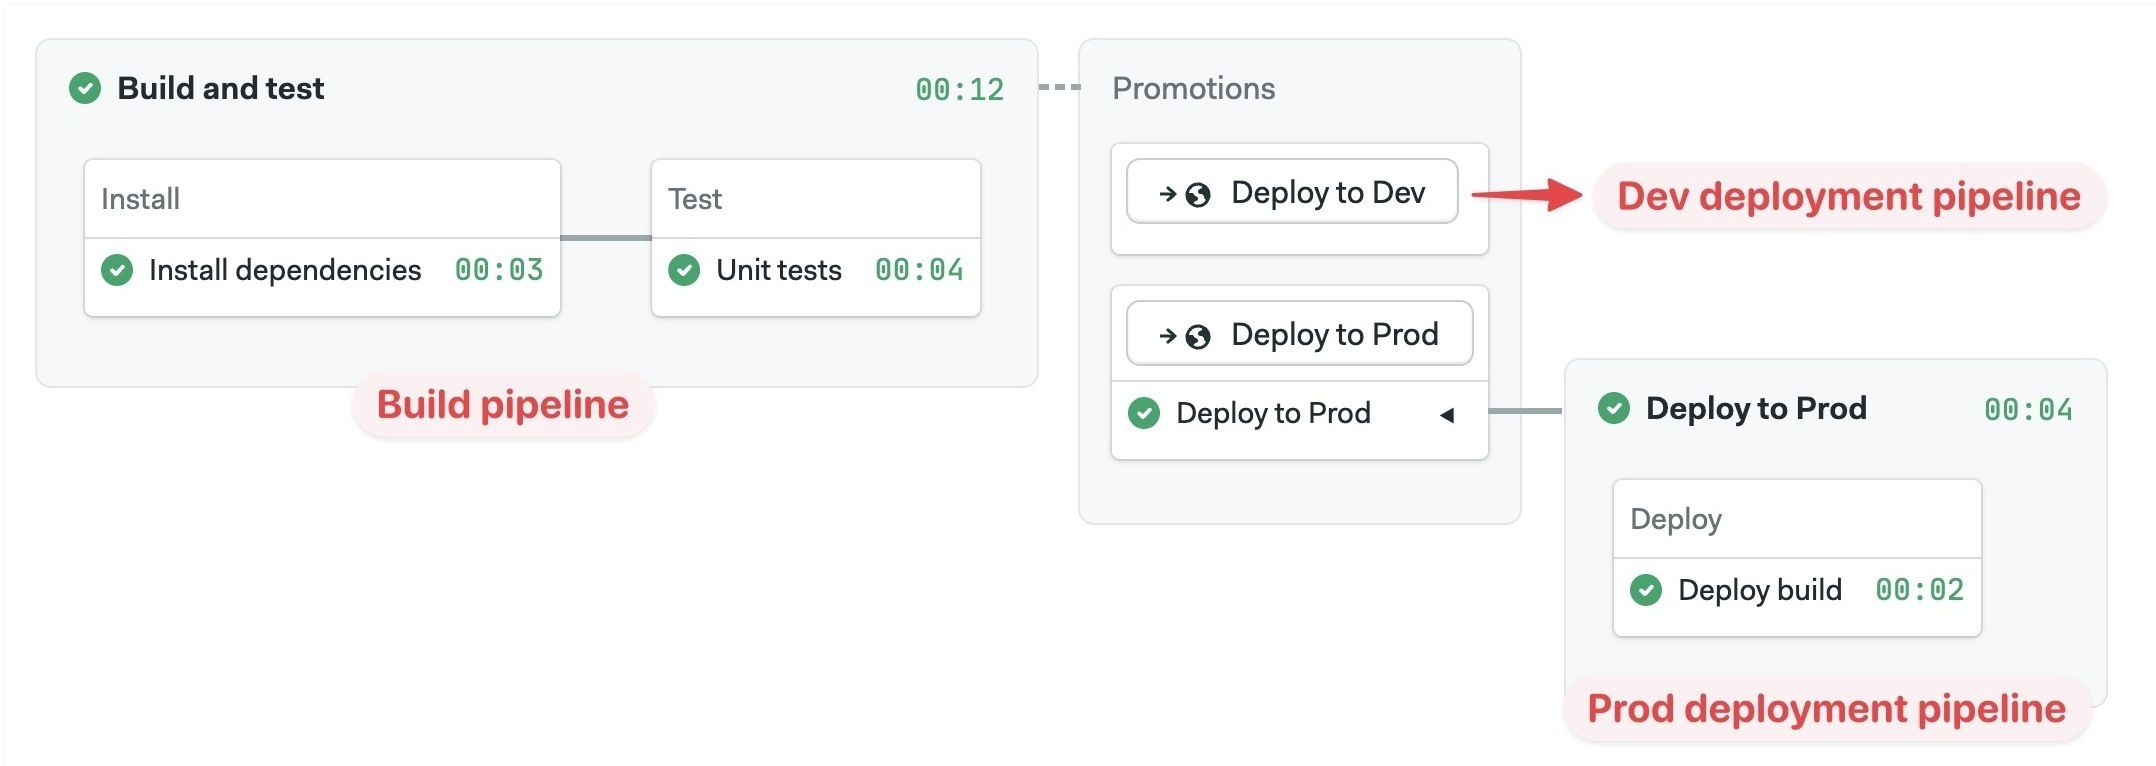
Using promotions, we can create a tree-like structure where pipelines branch off from other pipelines. The root of the tree is the default pipeline located at .semaphore/semaphore.yml.
Promoted pipelines are typically used for continuous delivery and continuous deployment. The following example shows the default pipeline branching into two continuous delivery pipelines: production and development. In each of these, we define the sequence of jobs needed to deploy the application in the respective environment.
Promotion triggers
Triggering a promotion means starting the next pipeline in the chain. There are three ways of triggering a promotion:
- Manual promotions: this is the default. Start the next pipeline manually
- Auto promotions: automatically start a promotion based on predefined conditions
- Parameterized promotions: allow you to pass values as environment variables into the next pipelines, enabling pipeline reuse for different tasks
How to add promotions
Promotions are defined as pointers to the next pipelines in the chain. You can create multiple promotions and nest pipelines as needed.
- Editor
- YAML
- Press +Add Promotion
- Set a descriptive name for the promotion
- Configure the new pipeline and add jobs as needed
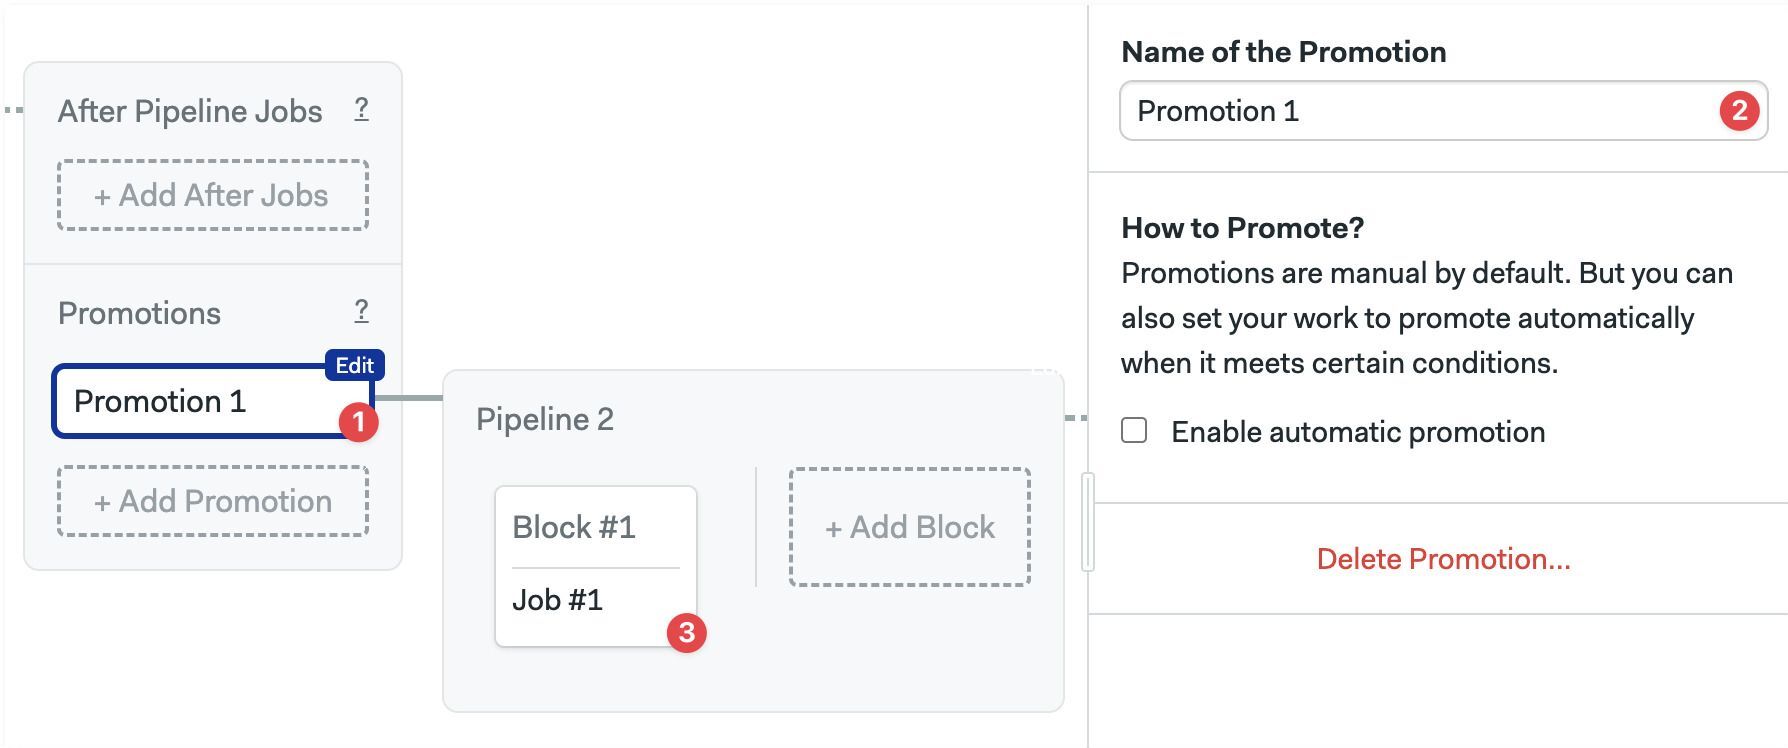
Press Delete Promotion to completely delete the promotion along with all its child pipelines.
- Create a new pipeline file in the
.semaphorefolder, e.g.,deploy.yml - Edit the pipeline from which the new one (from step 1) branches off, e.g.,
semaphore.yml - Add the
promotionskey at the root level of the YAML - Type the
nameof the promotion - Type the
pipeline_filefilename of the pipeline created in step 1
version: v1.0
name: Initial Pipeline
agent:
  machine:
    type: f1-standard-2
    os_image: ubuntu2004
blocks:
  - name: Build
    dependencies: []
    task:
      jobs:
        - name: Build
          commands:
            - checkout
            - npm run build
promotions:
  - name: Promotion 1
    pipeline_file: deploy.yml
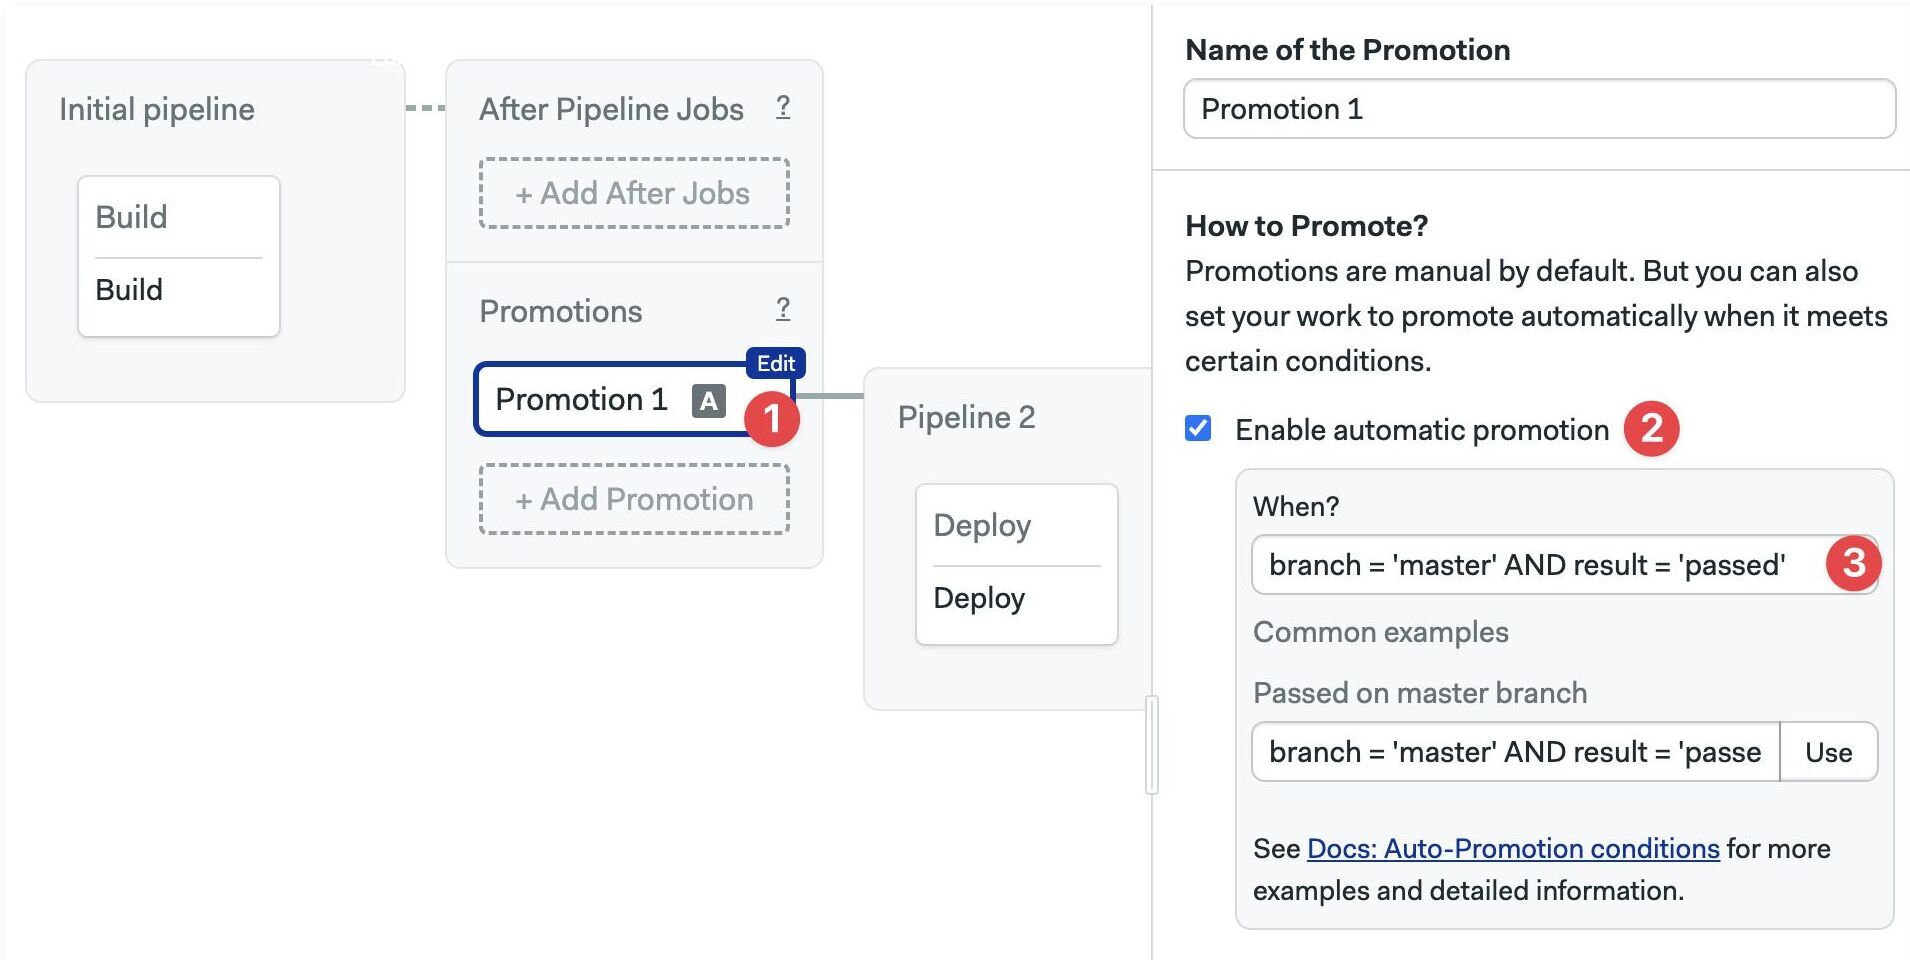
Automatic promotions
Automatic promotions start a pipeline based on user-defined conditions.
After adding a promotion, you can set automatic conditions. Whenever Semaphore detects that these conditions are met, the child pipeline automatically starts.
- Editor
- YAML
- Open the promotion you want to autostart
- Enable the checkbox Enable automatic promotion
- Type in the start conditions
- Open the pipeline file containing the promotion you want to autostart
- Add an
auto_promotekey - Add a child
whenkey. Type in the start conditions
version: v1.0
name: Initial Pipeline
agent:
  machine:
    type: f1-standard-2
    os_image: ubuntu2004
blocks:
  - name: 'Block #1'
    dependencies: []
    task:
      jobs:
        - name: 'Job #1'
          commands:
            - checkout
            - make build
promotions:
  - name: Promotion 1
    pipeline_file: deploy.yml
    auto_promote:
      when: branch = 'master' AND result = 'passed'
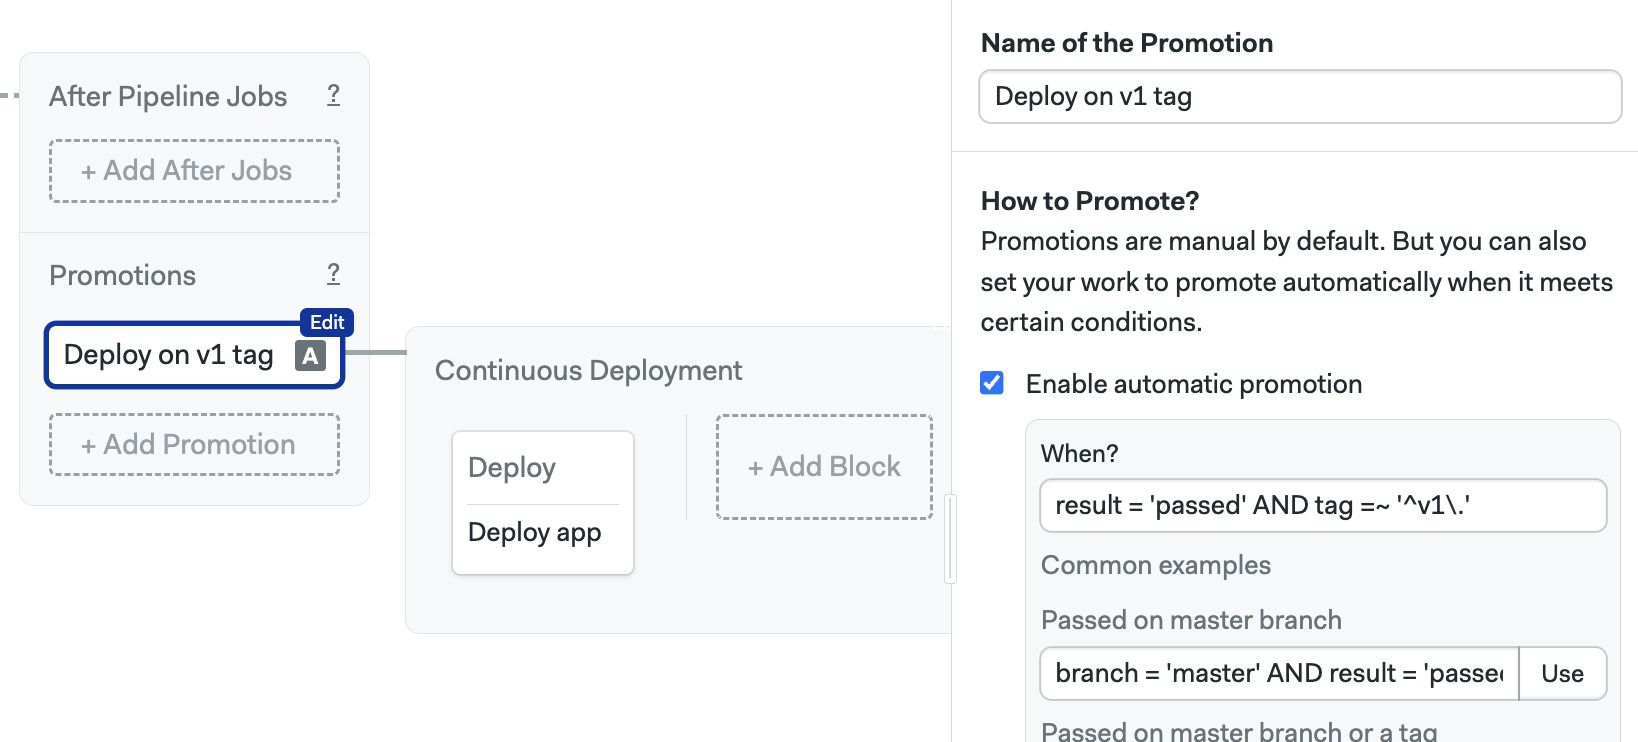
Tagged promotions
Many teams use Git tags to manage their release cycles. To auto-trigger a promotion with tags, you can use Perl Compatible Regular Expressions.
For example:
tag =~ '.*'matches all tags. The presence of any Git tag alone is enough to match the conditiontag =~ '^v1\.'matches any tag starting with "v1"
You can mix tags and other conditions to trigger promotions with a high level of control.
- Editor
- YAML
The following example shows how to trigger a deployment promotion when all tests have passed and there is a Git tag starting with "v1".
The following example shows how to trigger a deployment promotion when all tests have passed and there is a Git tag starting with "v1".
version: v1.0
name: Continuous Integration Pipeline
agent:
  machine:
    type: f1-standard-2
    os_image: ubuntu2004
blocks:
  - name: Install
    dependencies: []
    task:
      jobs:
        - name: Job
          commands:
          - checkout
          - npm install
          - npm test

promotions:
  - name: Deploy on v1 tag
    pipeline_file: deploy.yml
    auto_promote:
      when: result = 'passed' AND tag =~ '^v1\.'
Parameterized promotions
Parameterized promotions allow you to propagate environment variables across all jobs in the next pipeline.
Use parameters to reduce pipeline duplication. For example, if you create a parameterized pipeline that reads the target environment from a variable, you can reuse it to deploy an application to both production and testing environments. Parameters work with both manual and automatic promotions.
Parameterized promotions cause Semaphore to run an initialization job before the pipeline starts.
How to add parameters
- Editor
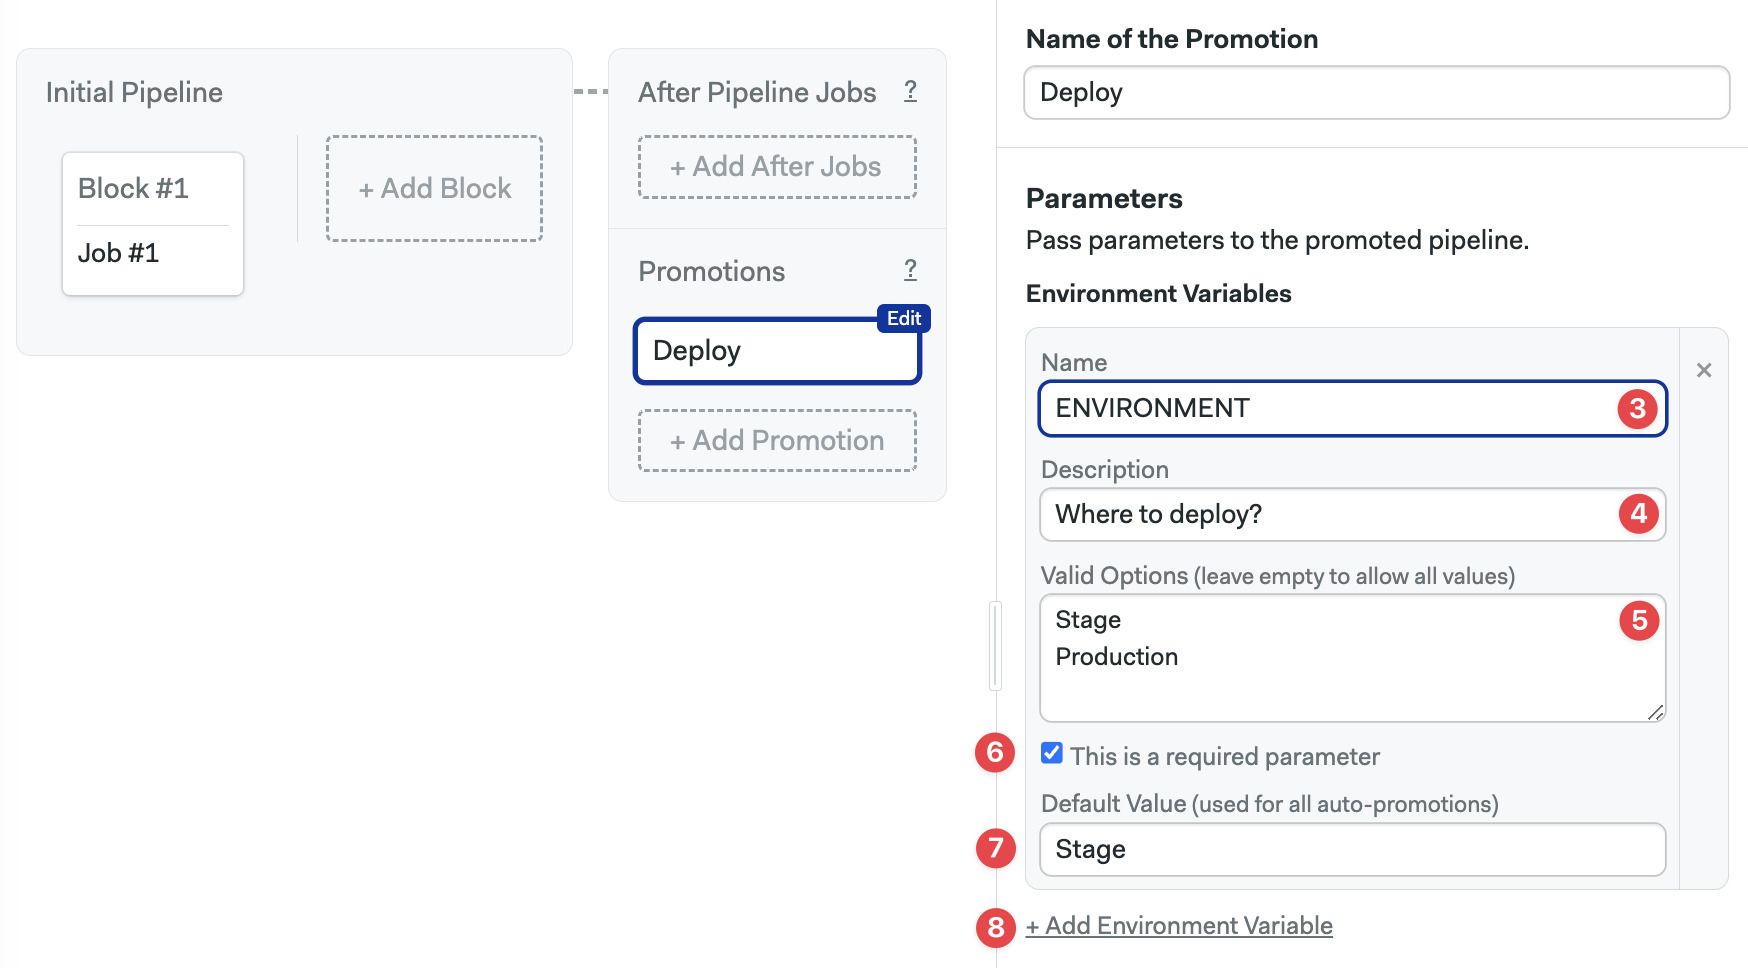
- YAML
To add parameters to a promotion with the workflow editor, follow these steps:
-
Select the promotion to which you want to add parameters
-
Click +Add Environment Variable
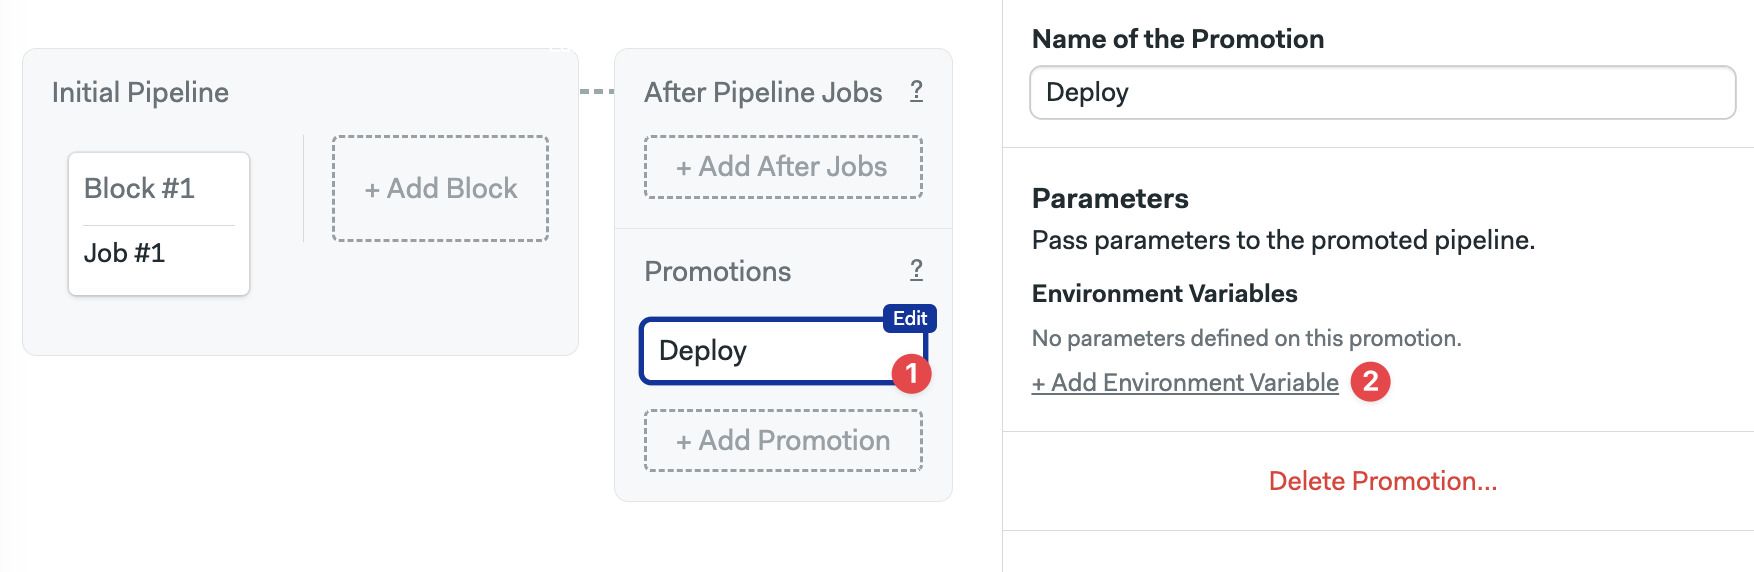
-
Set the variable name
-
Set an optional description
-
Set optional valid options. Leave blank to input value as freeform text
-
Enable the "This is a required parameter" checkbox if the parameter is mandatory
-
Set a default value (only when the parameter is mandatory)
-
Add more parameters as needed
To add parameters to a promotion using YAML, follow these steps
- Edit the file where you want to add the parameters
- Add a
parameters.env_varskey - Every list item is a new parameter. Set the
nameof the environment variable - Type an optional
description - Optionally set
requiredtotrue|false - Optionally set
options. Each item in the list is a valid option. Leave blank to input value as freeform text - If
required: true, set thedefault_value. Optional parameters don't have a default value
# ...
promotions:
  - name: Push to Prod
    pipeline_file: deploy.yml
    parameters:
      env_vars:
        - required: true
          options:
            - Stage
            - Production
          default_value: Stage
          description: Where to Deploy?
          name: ENVIRONMENT
In the example above, if auto-promotion is triggered, the value for $ENVIRONMENT is Stage by default.
When a pipeline is triggered with automatic promotions the parameter values are automatically filled following these rules:
- Mandatory parameters use the default value
- Optional parameters are left blank
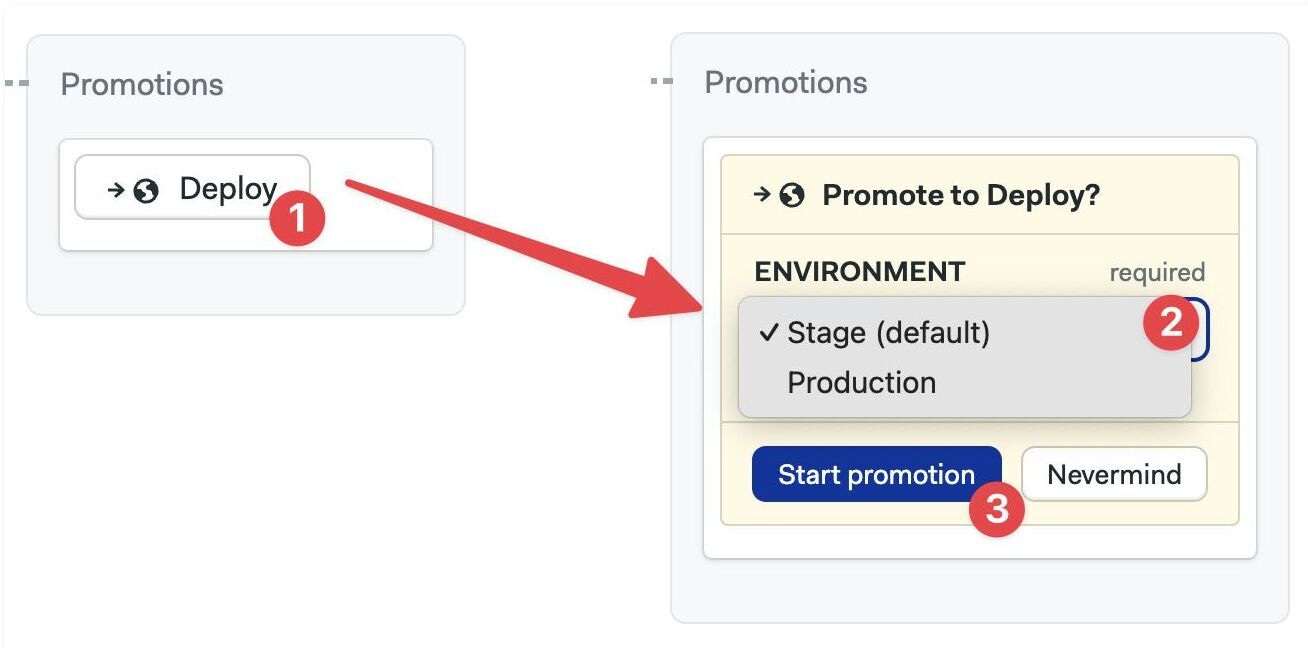
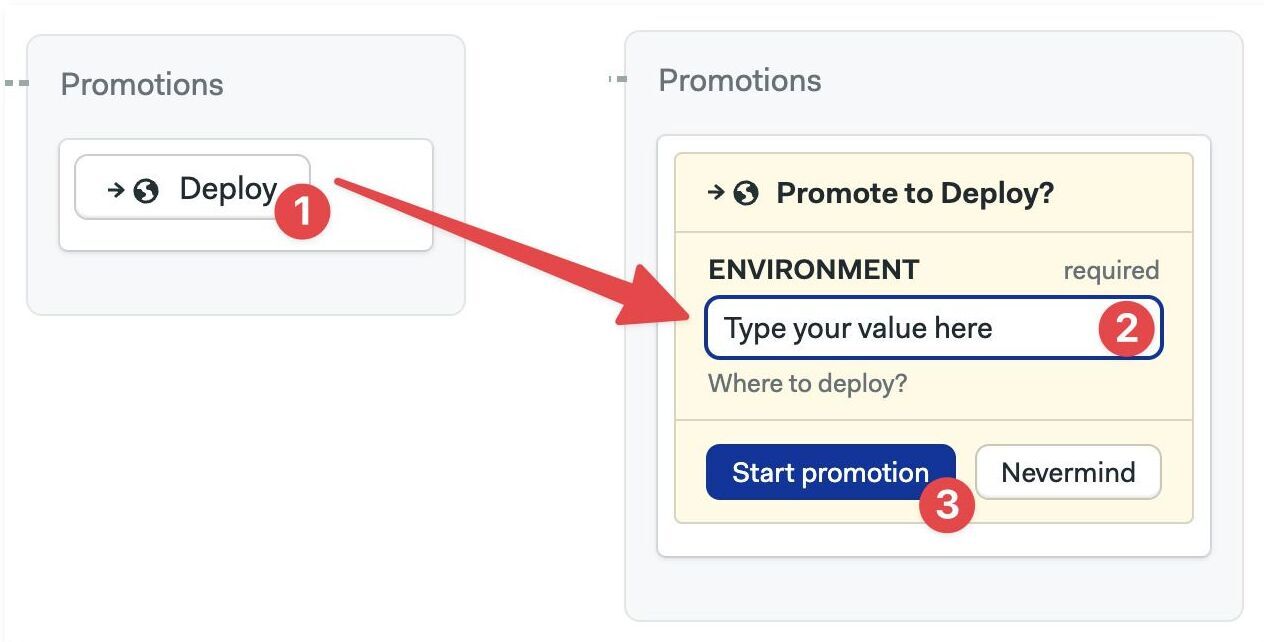
Promoting with the UI
Once you have added a parameter, you can select its value from the Semaphore UI.
- Press the promotion button
- Select or type in the value. Optional parameters can be left blank
- Press Start promotion
- Select value from options
- Freeform type value
Promoting with the API
You can pass parameter values to the promotion when it's triggered using Semaphore API the to trigger promotions. If a promotion is forbidden by the environment, you will receive an HTTP 400 Bad Request response with a reason in the body.
The following is an example of a curl call that includes parameters:
curl -H "Authorization: Token {api_token}" \
 -d "name={promotion_name}&pipeline_id={parent_pipeline_id}&{param_1_name}={param_1_value}&{param_2_name}={param_2_value}" \
 -X POST "https://{org_name}.semaphoreci.com/api/v1alpha/promotions"
Accessing values in jobs
Parameters are exported as environment variables in all the jobs contained in the promoted pipeline.
You can access the parameter value by directly using the environment variable in your commands.
- Editor
- YAML
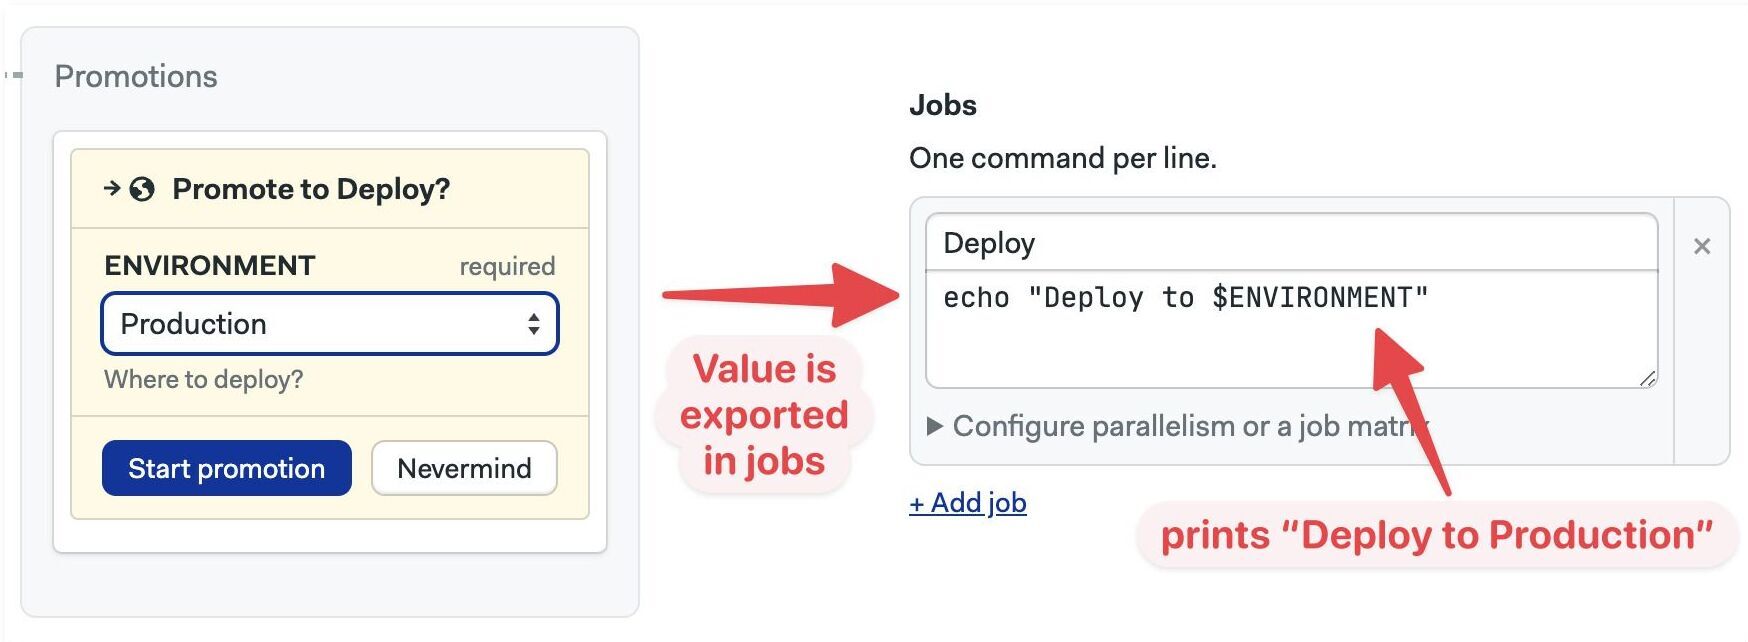
The parameters are accessible as regular environment variables in the commands section.
version: v1.0
name: Deployment pipeline
agent:
  machine:
    type: f1-standard-2
    os_image: ubuntu2004
blocks:
  - name: Deploy
    task:
      jobs:
        - name: Deploy
          commands:
            - echo "Deploy to $ENVIRONMENT"
Accessing values in pipelines
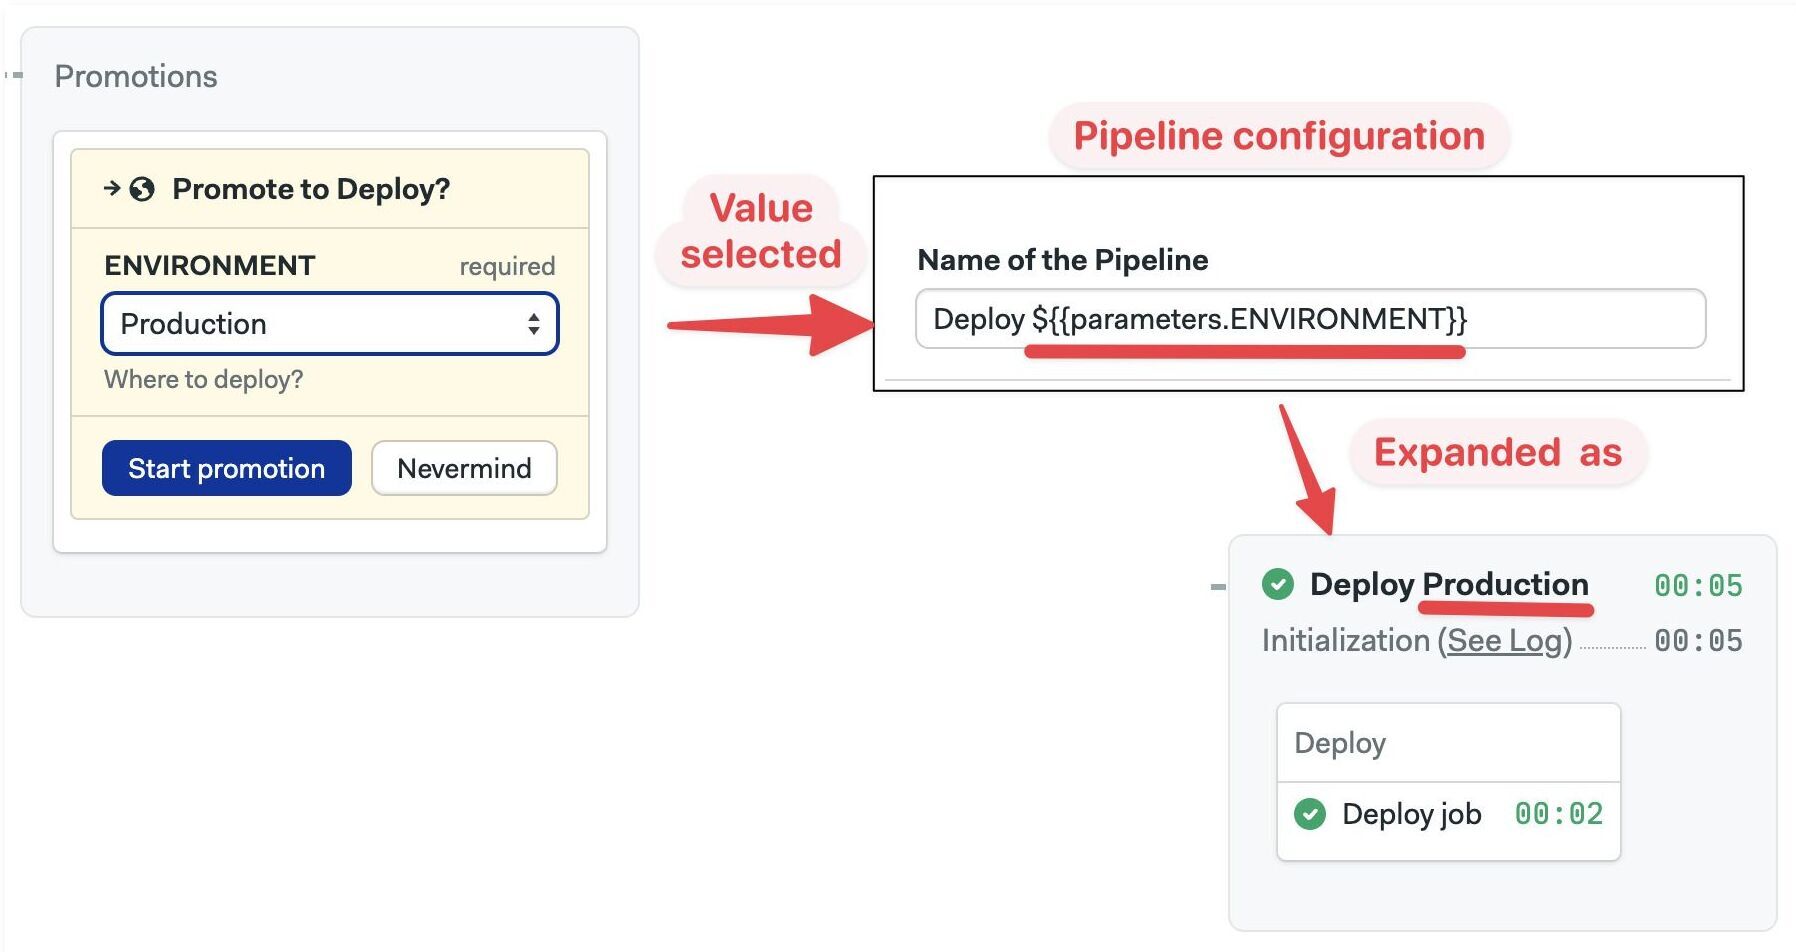
You can use parameters in the pipeline YAML to dynamically define pipelines at runtime. For example, you can use parameters to change the pipeline name, compile a job matrix, or dynamically assign pipeline queue, among many other things.
Parameters can be used in two ways:
- String expansion (starts with
$): parameters using the${{parameters.VAR_NAME}}syntax are expanded at runtime. For example, if you defined a parameter calledENVIRONMENT, you can insert its value in the pipeline definition as${{parameters.ENVIRONMENT}}at runtime - String evaluation (start with
%): strings using the%{{parameters.VAR_NAME}}syntax produce JSON-serialized output, allowing you to dynamically transform values and inject them as YAML into pipeline during runtime. This feature supports string manipulation using pipes and Sprout functions
See the pipeline YAML reference to view all the places where parameters and what functions are supported in the pipeline YAML definition.
- Editor
- YAML
You can access some parameters in the UI with the ${{parameters.VAR_NAME}} syntax. The following example shows how to change the pipeline name based on a parameter called ENVIRONMENT.
The following example shows various ways in which parameters can be using in the pipeline YAML.
version: v1.0
# Change the pipeline name
name: "Deploy to ${{parameters.DEPLOY_ENV}} on ${{parameters.SERVER}}"

agent:
  machine:
    # set the agent type and os image
    type: "${{parameters.MACHINE_TYPE}}"
    os_image: "${{parameters.OS_IMAGE}}"

global_job_config:
  secrets:
    # import the correct secret into all jobs
    - name: "${{parameters.DEPLOY_ENV}}_deploy_key"
    - name: "github_key"

queue:
  # assign the pipeline to the first named queue that matches
  - name: "${{parameters.DEPLOY_ENV}}_deployment_queue"
  - name: "${{parameters.MISSING}}_queue"
  - name: "default_queue"

blocks:
  - name: Run tests
    task:
      agent:
        machine:
          # override the machine type for this job
          type: "${{parameters.MACHINE_TYPE}}"
        containers:
          # set the Docker environment container image and name
          - name: "${{parameters.DEPLOY_ENV}}_test_container"
            image: "${{parameters.DEPLOY_ENV}}_test_image"
            secrets:
              # import the secret to pull the image from a private registry
              - name: ${{parameters.DEPLOY_ENV}}_api_key
      jobs:
        - name: Run tests
          commands:
            - echo "Running tests"
          # set job parallelism to PARALLELISM * 2
          parallelism: "%{{parameters.PARALLELISM | mul 2}}"

  - name: Build and push image
    task:
      secrets:
        # dynamically import the right secrets
        - name: ${{parameters.DEPLOY_ENV}}_dockerhub
        - name: ${{parameters.DEPLOY_ENV}}_ecr

  # change the job name using the parameter DEPLOY_ENV
  - name: Deploy image to ${{parameters.DEPLOY_ENV}}
    task:
      secrets:
        # dynamically import the right secrets
        - name: ${{parameters.DEPLOY_ENV}}_deploy_key
        - name: ${{parameters.DEPLOY_ENV}}_aws_creds
      jobs:
        # change the job name using the parameters DEPLOY_ENV and SERVER
        - name: Deploy to ${{parameters.DEPLOY_ENV}} on ${{parameters.SERVER}}
          # run deployment script in the region
          commands: ./deploy.sh $AWS_REGION
          # create a job matrix from a comma-separated string
          matrix:
            - env_var: AWS_REGION
              values: "%{{parameters.AWS_REGIONS | splitList \",\"}}"

# send notifications to Slack channels and ping the servers once all jobs have ended
after_pipeline:
  task:
    secrets:
      - name: ${{parameters.DEPLOY_ENV}}_slack_token
    jobs:
      - name: "Notify on Slack: %{{parameters.SLACK_CHANNELS | splitList \",\"}}"
        commands:
          - echo "Notifying Slack"
        matrix:
          - env_var: SLACK_CHANNEL
            values: "%{{parameters.SLACK_CHANNELS | splitList \",\" }}"
      - name: Ping ${{parameters.DEPLOY_ENV}} from %{{parameters.PARALLELISM}} jobs
        commands:
          - echo "Pinging environment"
        parallelism: "%{{parameters.PARALLELISM | int64 }}"
Deployment targets
Video Tutorial: How to Use Deployment Targets
Deployment targets (also known as Environments) provide additional controls over pipelines. You can limit who can trigger a pipeline and under which circumstances, or define fine-grained secrets and environment variables.
Overview
Environments allow you to tightly control promotions, preventing unauthorized users from starting a critical pipeline. Additionally, deployment targets can restrict branches, and pull requests, and protect secrets.
Environments also provide a convenient way to view the history of your deployments.
Configuring a deployment target is a two-step process:
- Create a deployment target
- Associate the target with a promotion
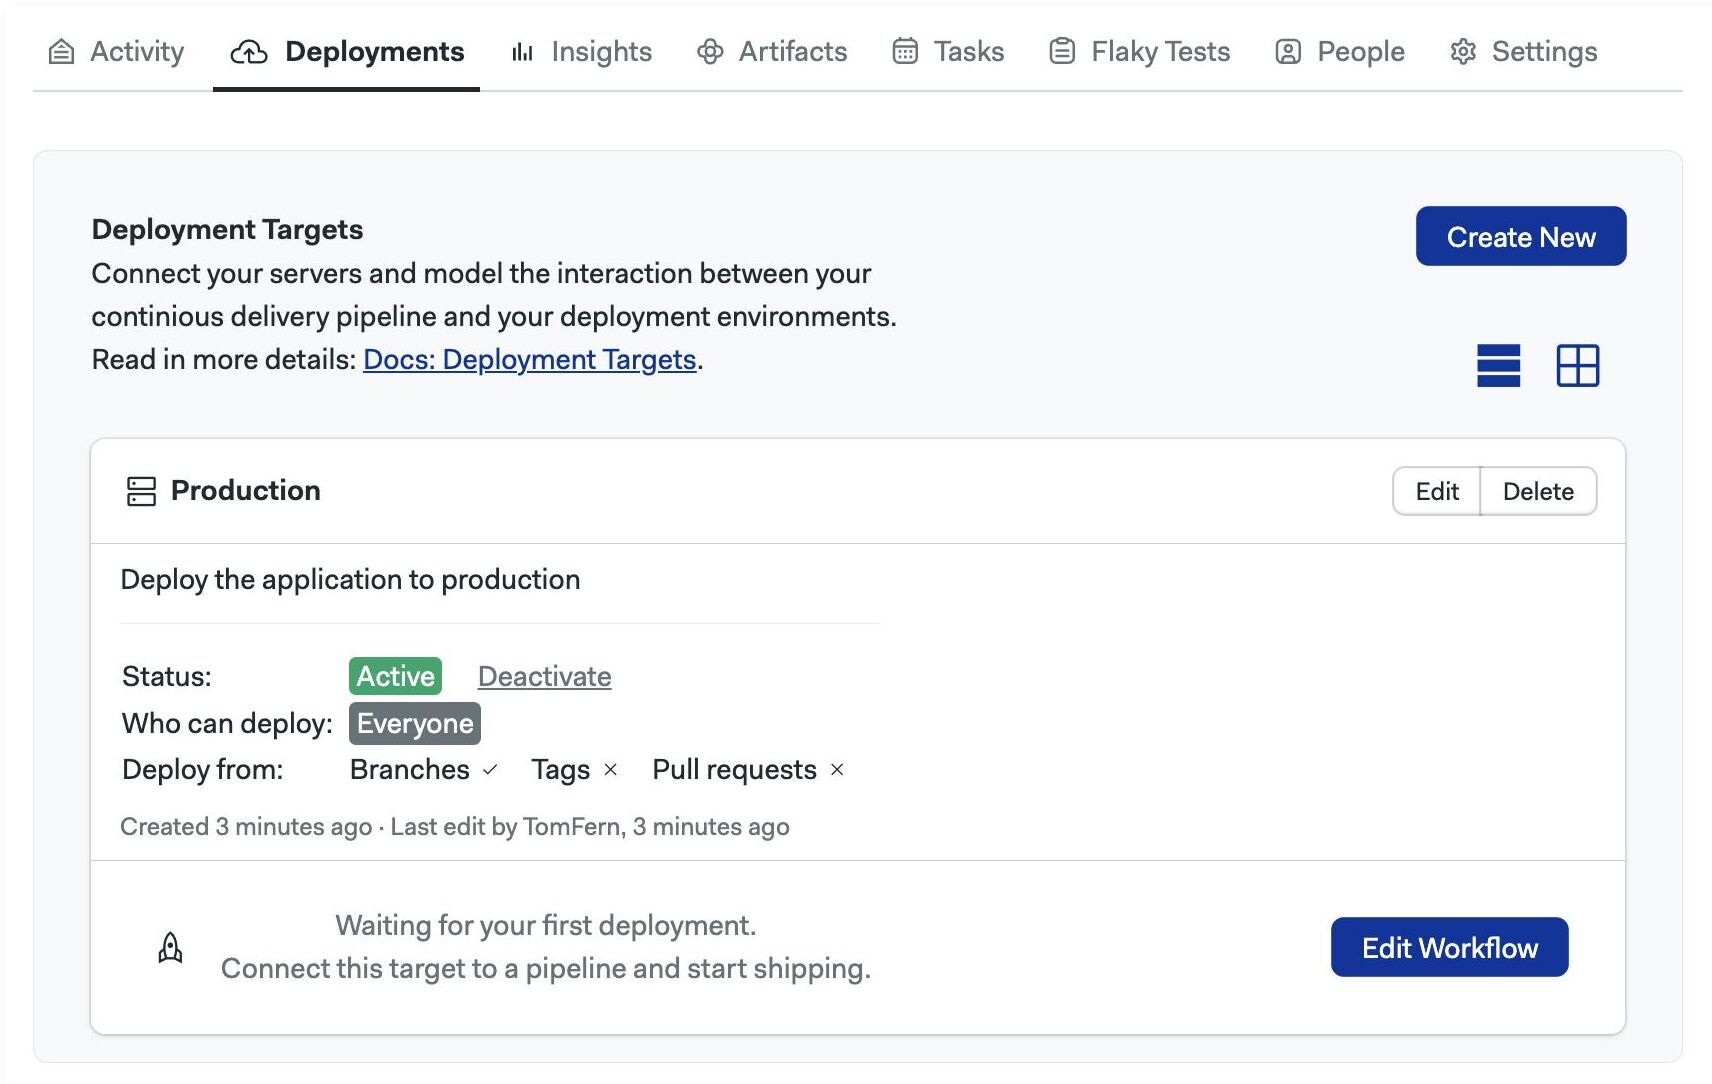
How to create an environment
Environments can be defined once and used in multiple promotions in a project.
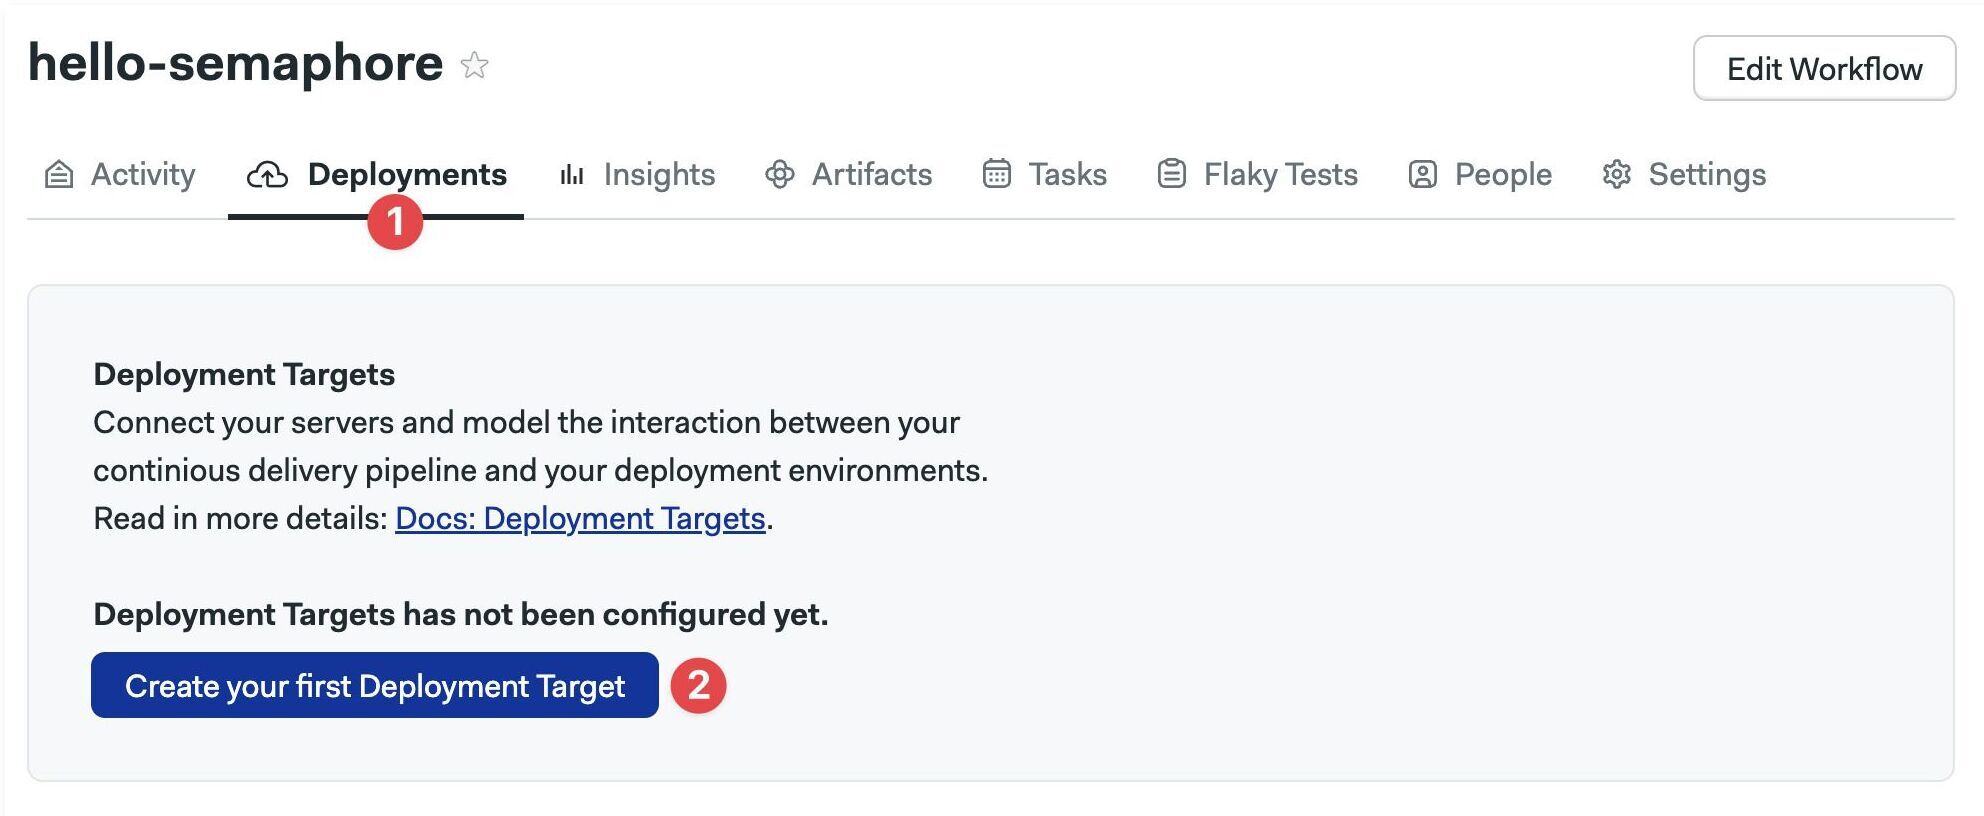
To create an environment, navigate to your Semaphore project and:
-
Go to the Deployment Targets tab
-
Press Create your first Deployment Target
-
Fill in the deployment details:
- Name of the deployment
- Optional description
- Optional URL of the deployed application
- Optional bookmarks
-
Press Next
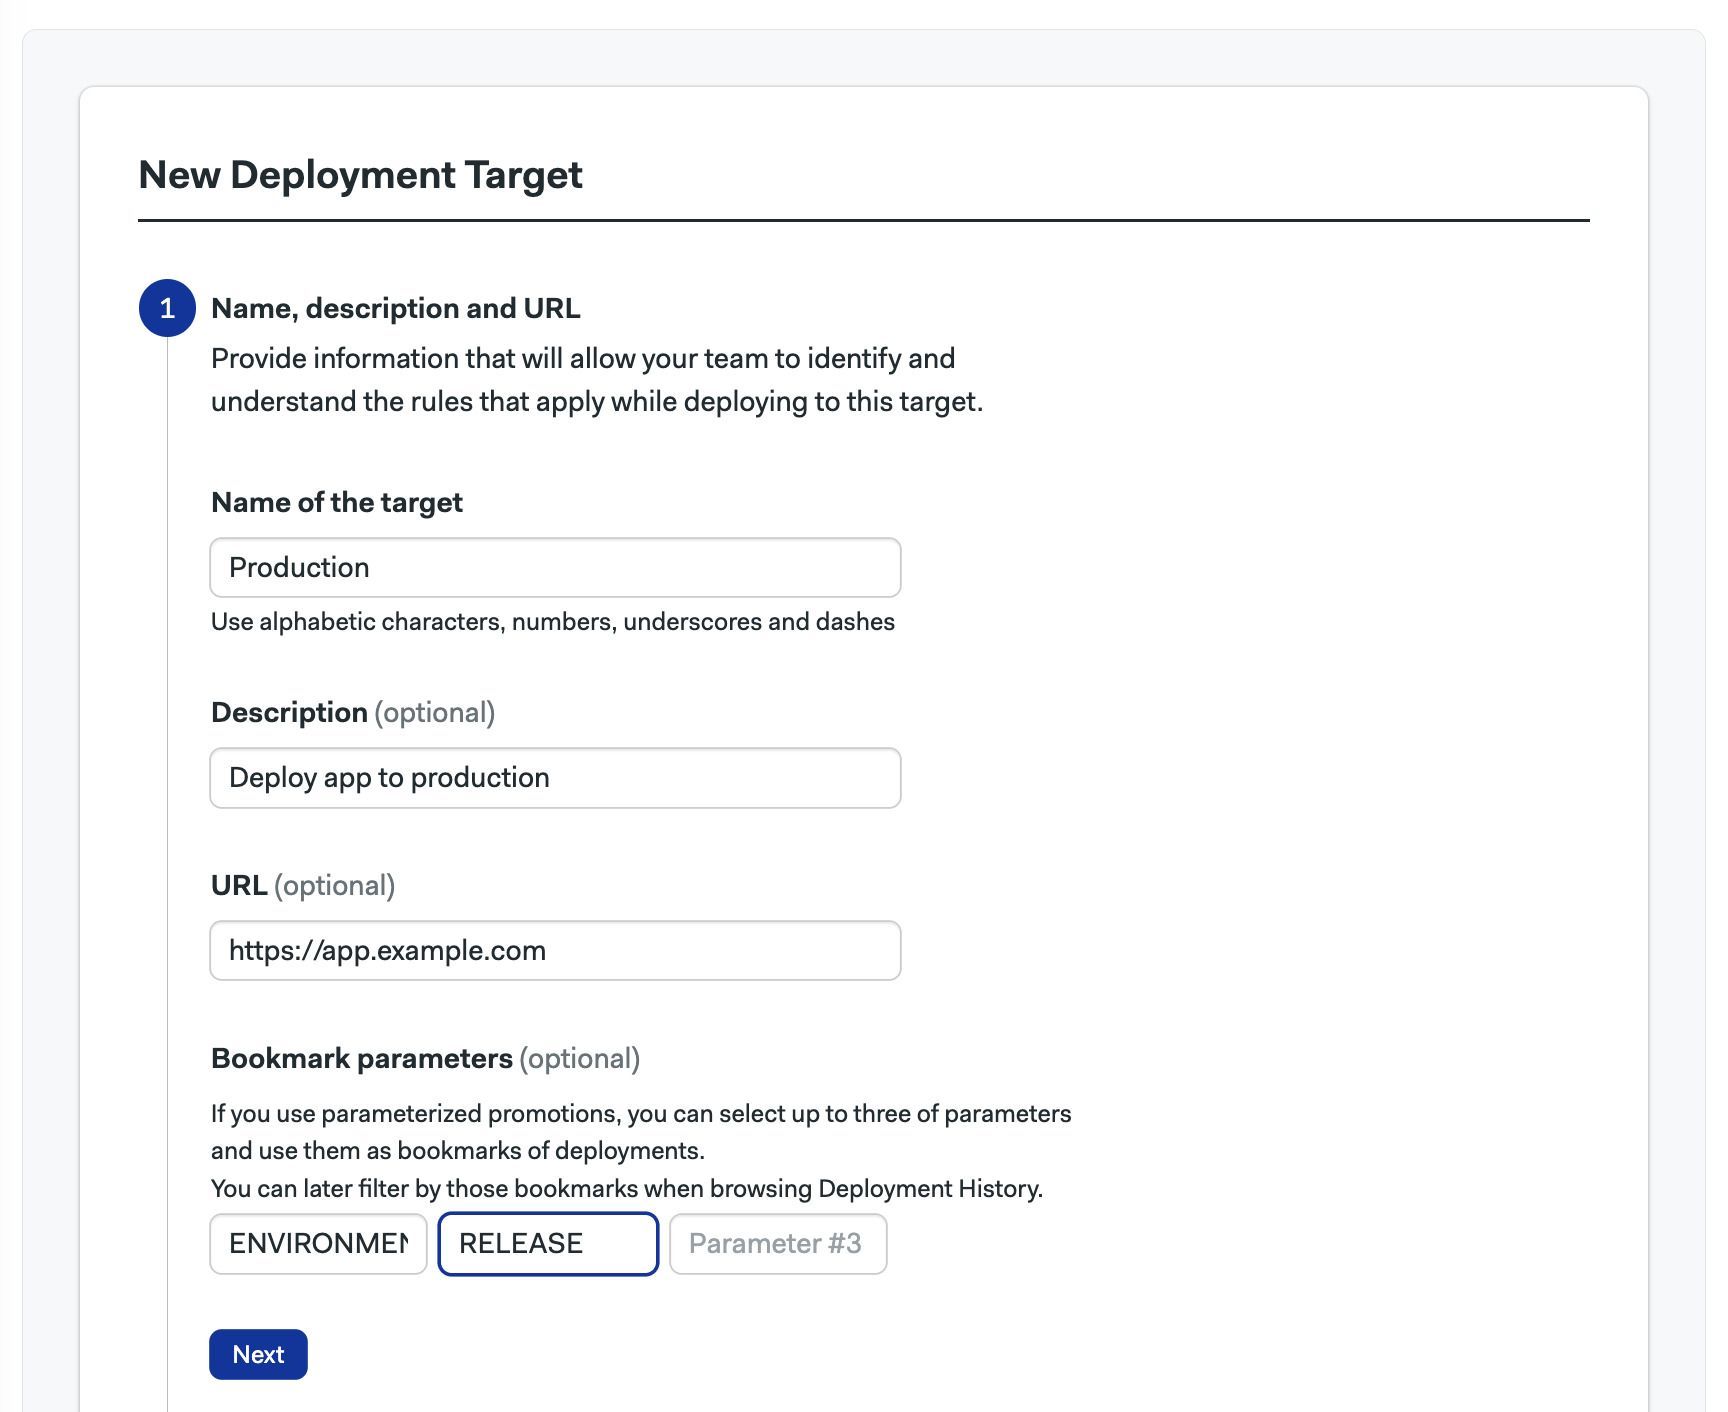
The bookmarks are useful when using parameterized promotions. You can add up to three bookmarks matching the names of the parameters in the promotions. Think of the bookmarks as additional filters available in the deployment history view.
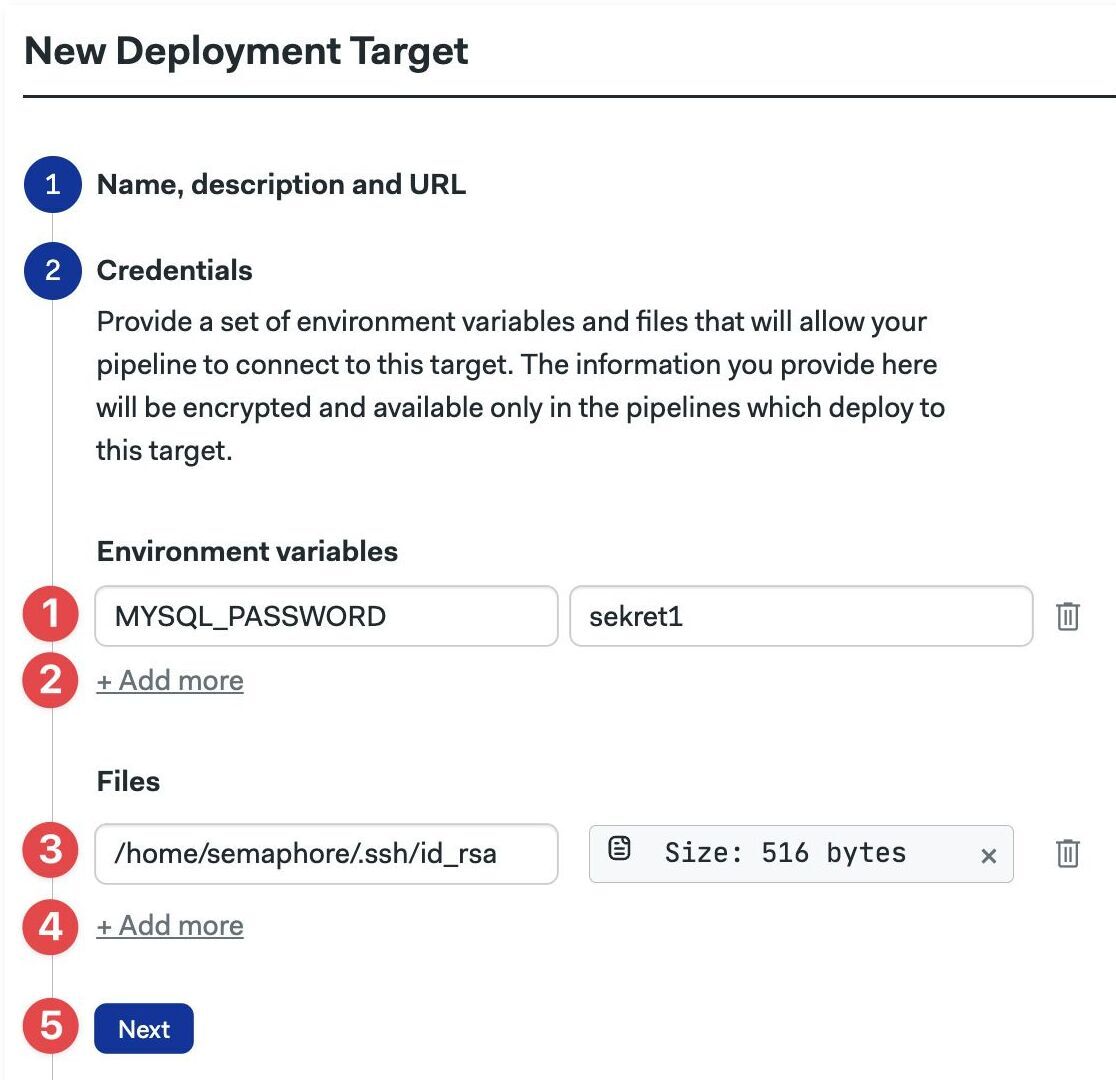
Credentials and secrets
Credentials are a restricted type of secrets that are only accessible to authorized members of your organization.
In the second part, you can define environment variables and upload files that will be accessible to the promoted pipelines. All information will be encrypted once saved.
Credentials are optional. Go to the next step if you don't need them.
-
Set the environment variable name and value
-
Add more variables as needed
-
Upload a file and set where to put it in the agent
-
Add more files as needed
-
Press Next
Show me
Granular permissions
In the "Who can deploy?" section, you can define the users and roles that can manually start the promotion. Granular permissions are optional. You can go to the next section if you don't need to restrict access to the promotion.
By default, everyone can start the promotion linked to this environment. To restrict access:
-
Select Allow only particular users to deploy
-
Optionally, select the roles that can deploy from the list
-
Optionally, select the members of your organization that can deploy
-
Uncheck the Allow automatic promotions from target option to disallow automatic promotions
-
Press Next
Show me

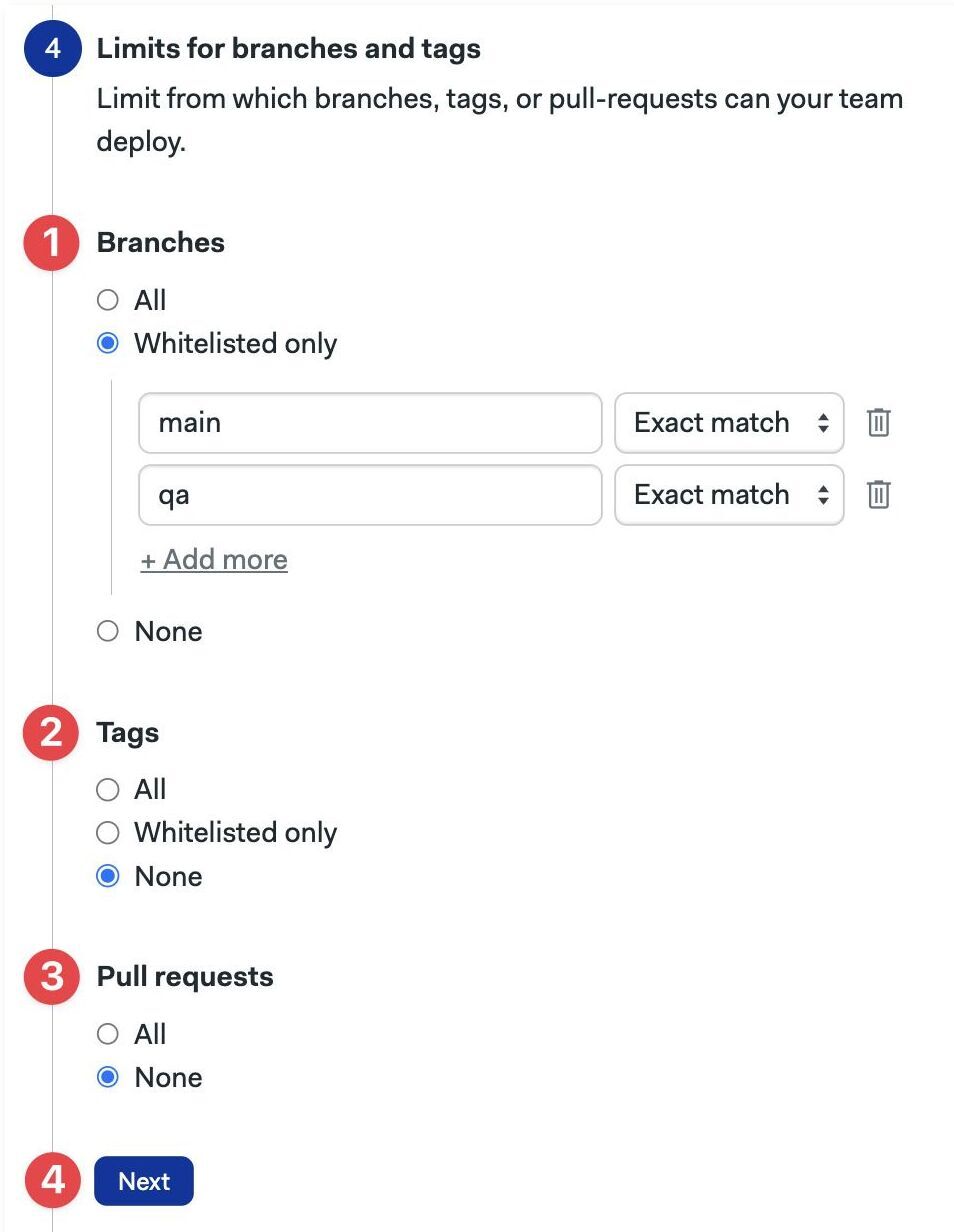
Git-based permissions
In the fourth part, you can restrict which Git branches and tags are allowed to start a promotion. Here, you can also block promotions coming from pull requests. This section is optional.
To restrict Git-based access:
-
Select which branches are enabled for promotions: all, none, or a list of allowed branches
-
Select which Git tags are enabled: all, none, or a list of allowed tags
-
Enable or disable pull requests from triggering promotions
-
Press Next
-
Press Create
Show me
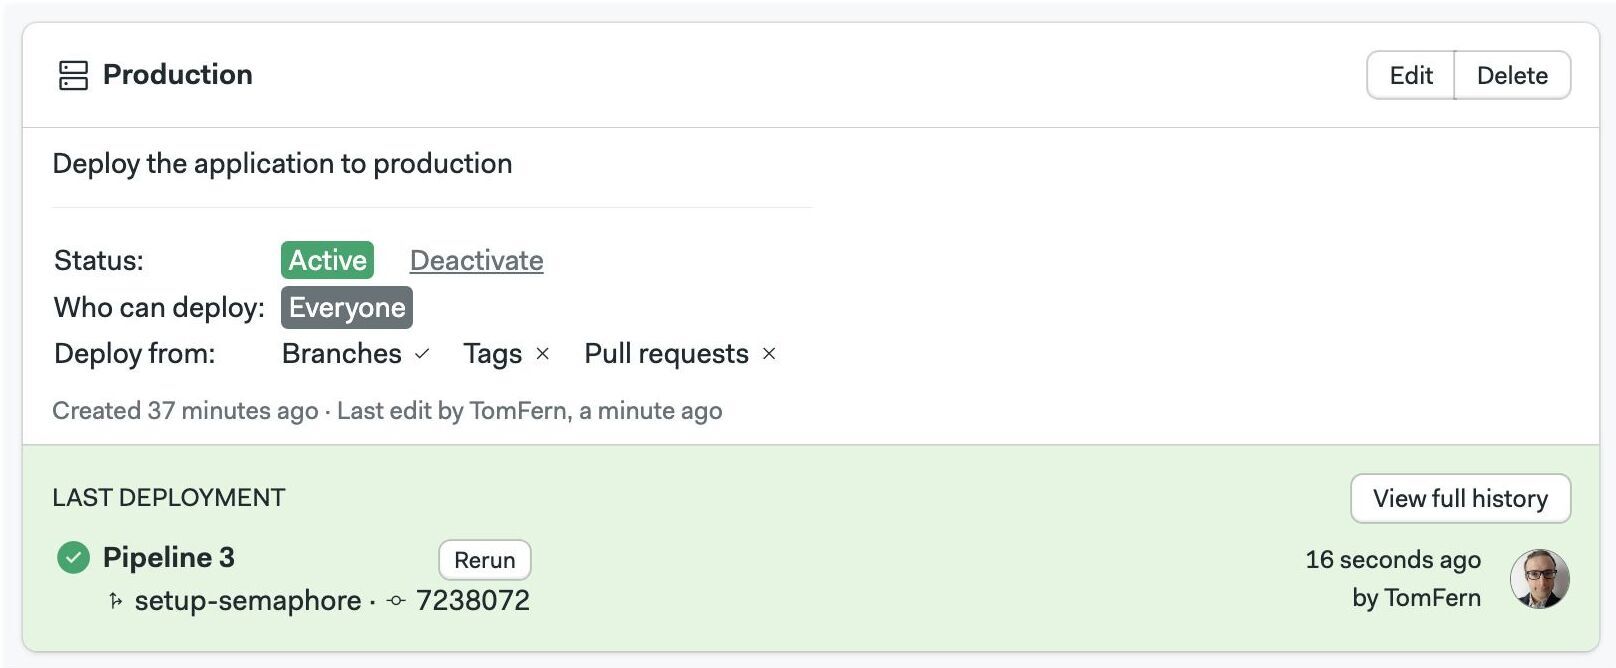
Once done, you can see the created environment in the Deployments tab.
Branches and tags can be matched in two ways:
- Exact match: strings must match exactly
- Regex match: strings are matched using Perl-compatible regular expressions. See the Erlang re module documentation to see more details on the syntax
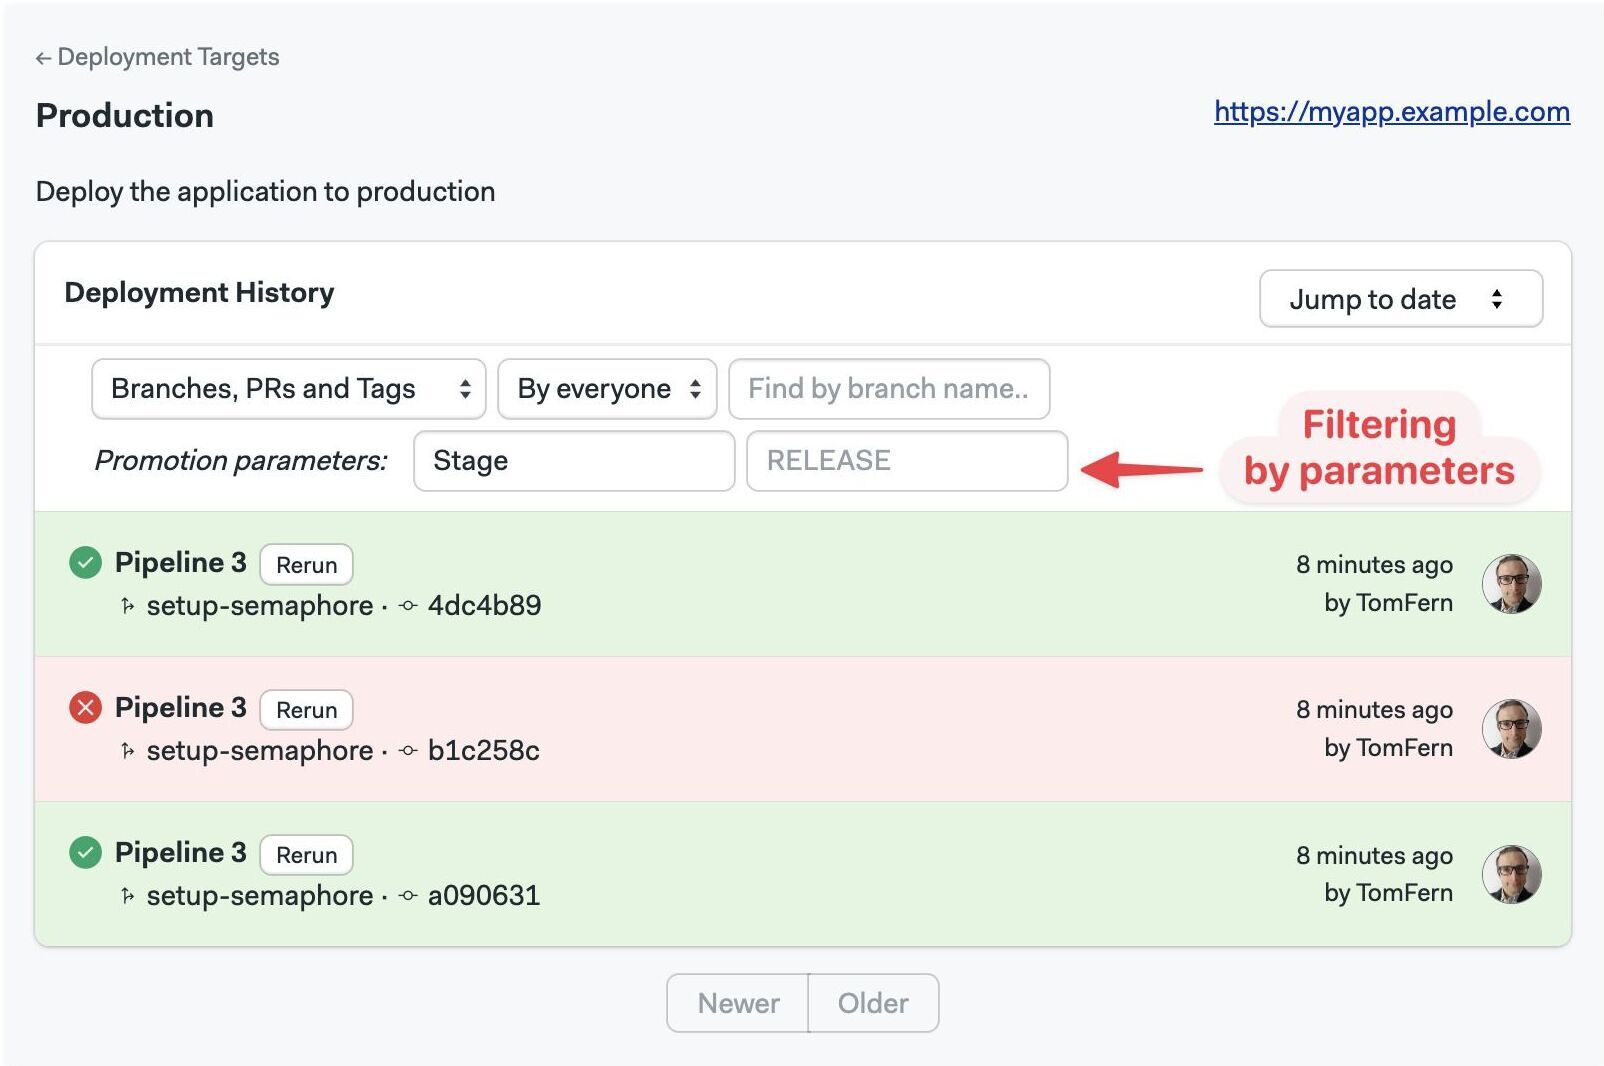
How to view deployment history
The Deployment tab allows you to track your previous deployments. In this tab, you can see:
- Who started the last deployment
- Which commit was used
- Which workflow the deployment belongs to
You can also stop a running pipeline or rerun a promotion if you have the rights to do so.
Press View full history to see the latest deployments in reverse chronological order.
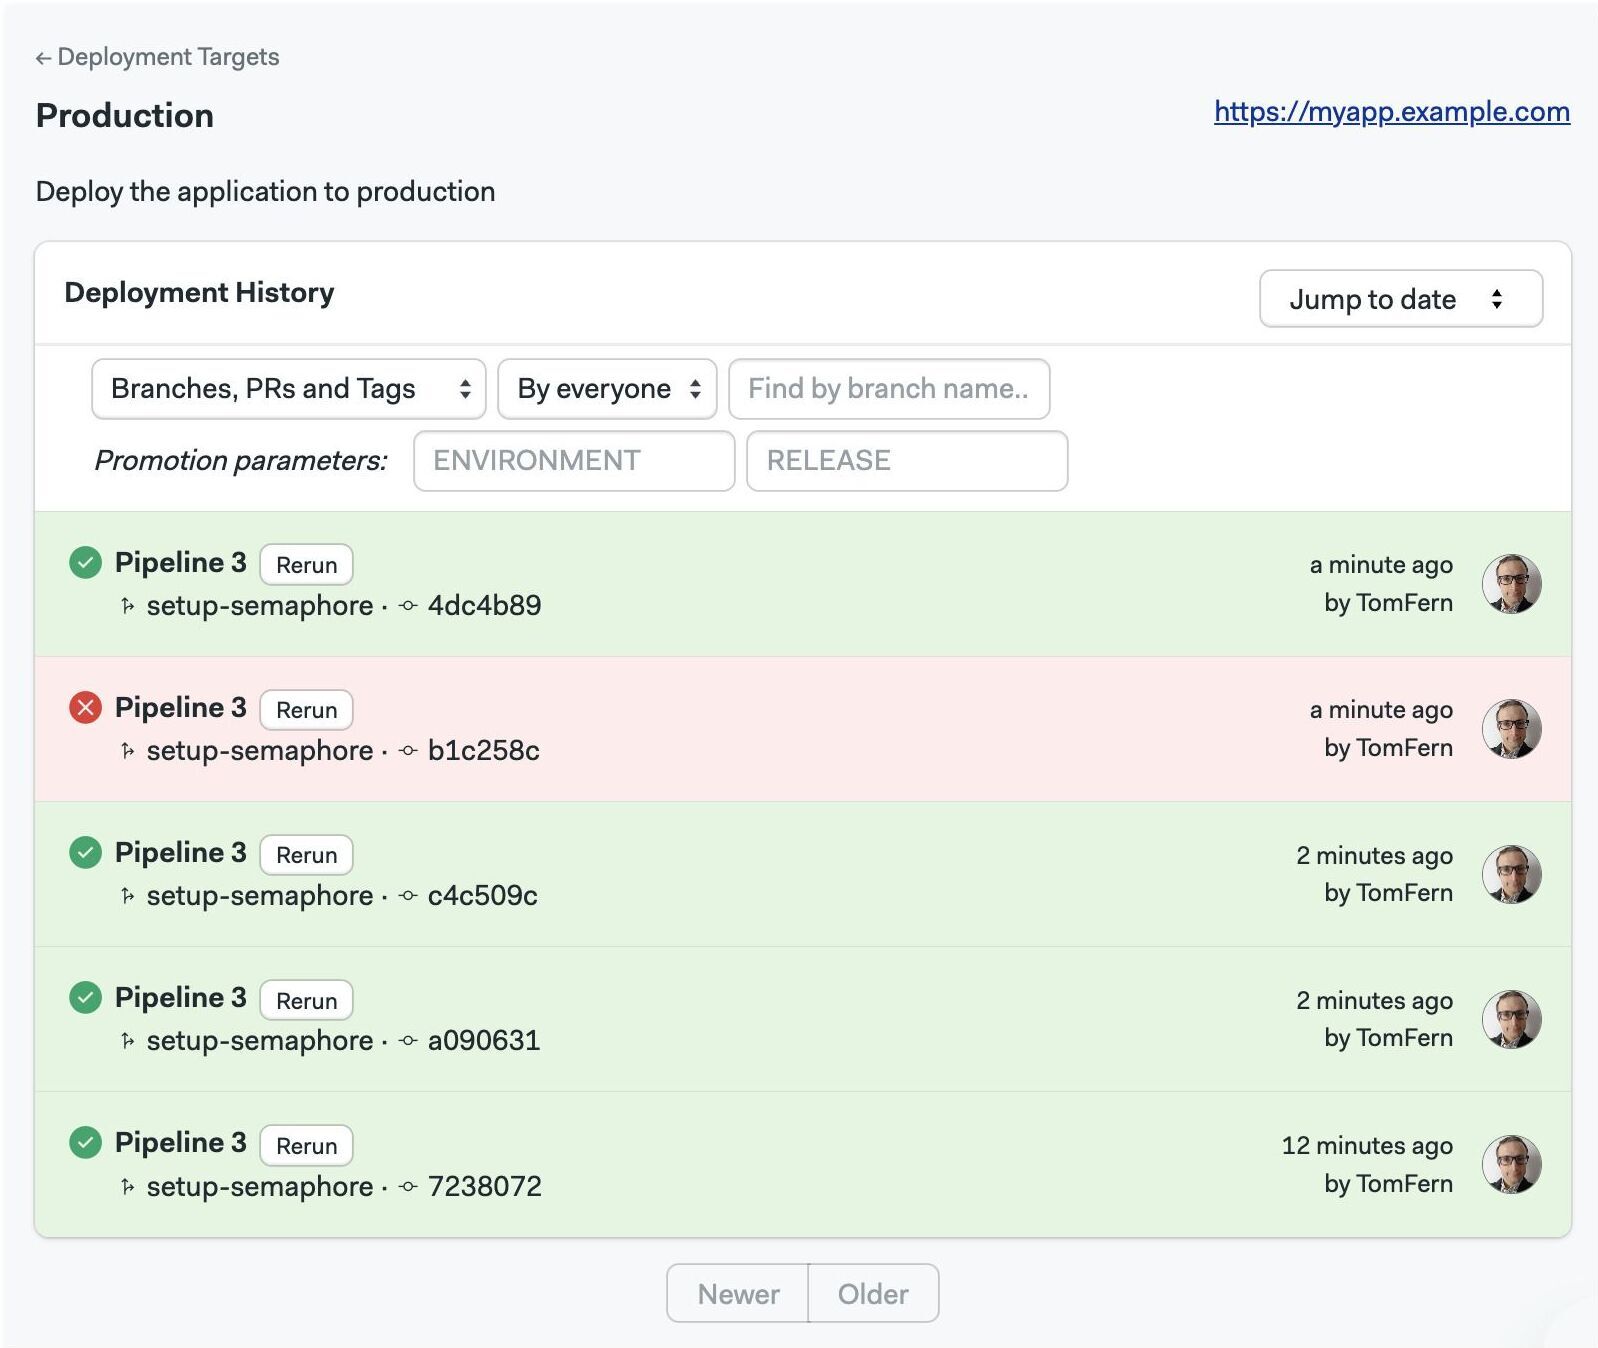
Use Newer and Older buttons to navigate to other pages. You can also jump to a specific date.
You can also filter deployments by:
- Type: View branches, tags, pull requests, or everything
- Author: Everyone or just you
- Origin: Branch, tag, or pull request
- Promotion parameters: These are the bookmarks added to the environment target
To filter using promotion parameters, type the value of the parameter and press Enter. This feature is useful when you have parameterized promotions.
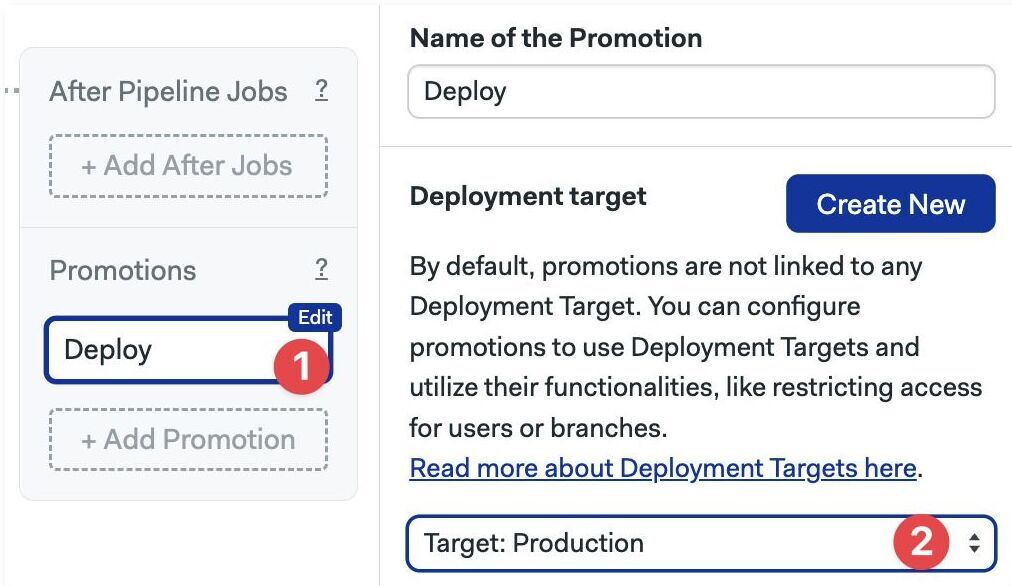
How to target promotions
Once you have created at least one environment, you can associate it with a promotion. This creates a targeted promotion.
- Editor
- YAML
Press Edit workflow to open the visual editor and:
- Select or create a promotion
- In Deployment target, select the target from the dropdown list
Select No target to remove the association between the deployment target and the promotion.
- Edit the pipeline file with the promotion you want to target
- Add a
deployment_targetkey to the promotion. The value is the name of the environment you want to associate with this promotion
Delete deployment_target to remove the association between the environment and the promotion.
# ...
promotions:
  - name: Promotion 1
    pipeline_file: pipeline_4.yml
    deployment_target: Production
Promoting environments
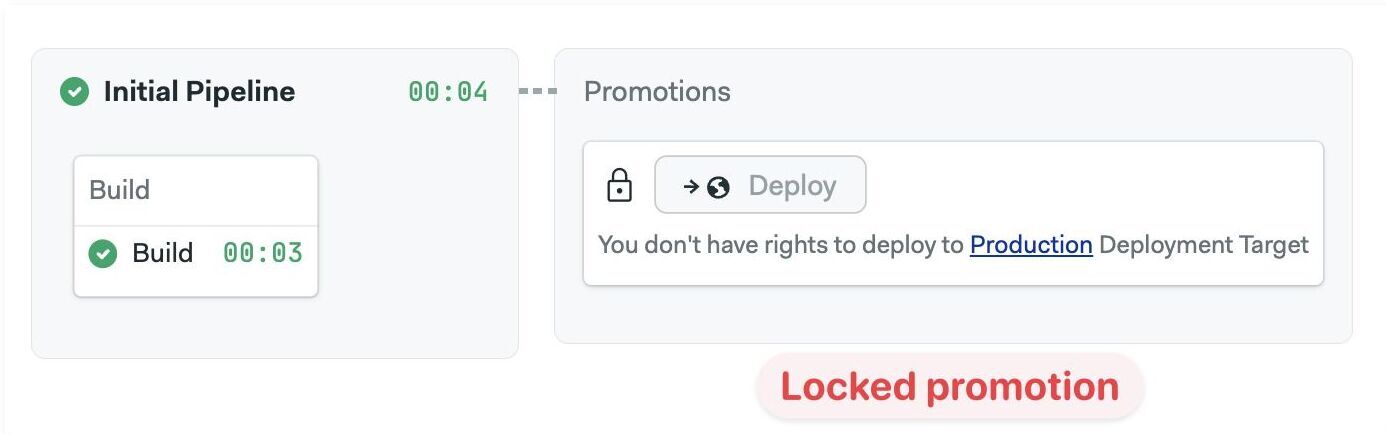
Promotions with attached environments show a lock icon next to the promotion button. The icon will be unlocked if you have permission to start the promotion or locked if you don't.
- Unlocked promotion
- Locked promotion
The promotion is unlocked. Press the promotion button to start the next pipeline.
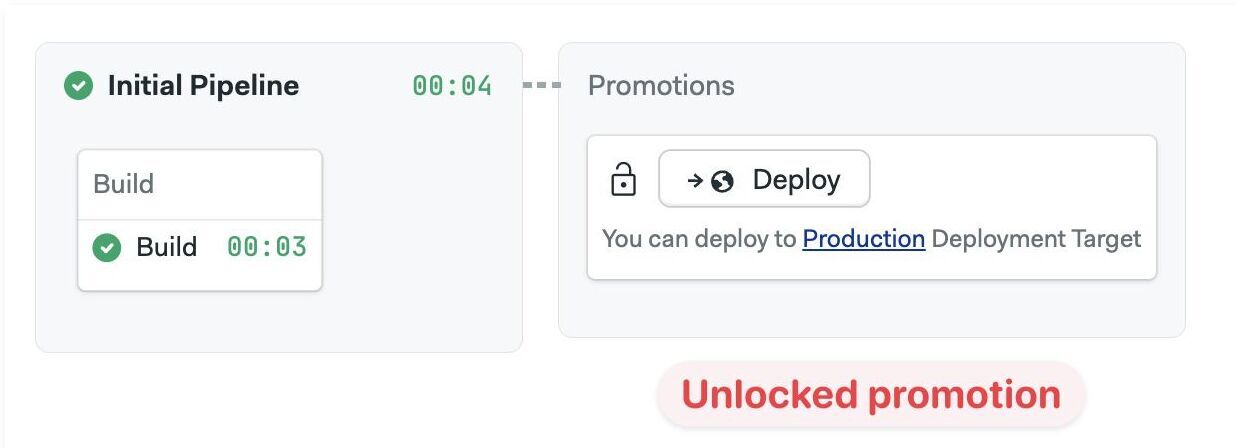
The promotion is locked. The button is grayed out, and you can't start the next pipeline.
Anyone with write access to the repository can edit the pipeline file and remove the environment in the promotion.
Help! I can't start a promotion
Once a promotion is targeted, you may be locked out from starting it. The most common reasons that a promotion appears as blocked are:
- You don't have the correct permissions to deploy to the bound environment
- You are on a Git branch, tag, or pull request that isn't allowed
- You are not logged in, or you are viewing a build of a public project
- The environment is deactivated or deleted
Promoting environments via API
You can also use the Semaphore API to trigger promotions. If a promotion is forbidden by the environment, you will receive an HTTP 400 Bad Request response with a reason in the body.