Artifacts
Video Tutorial: How to use artifacts
Artifacts provide persistent storage for files and folders. This page explains how to store, retrieve, and view artifacts, and how to manage retention policies.
Artifact storage can affect your billing. We recommend learning about artifact usage and setting up retention policies.
Overview
Artifacts provide a persistent file store for all your projects. Artifacts are ideal for:
- passing files between jobs, like build artifacts or compiled executables
- long-term storage of final deliverables
- collecting debug data from your jobs, such as screenshots and build logs
- storing test results for processing Test Reports and Flaky Tests
Using artifacts on self-hosted agents requires additional setup steps.
Artifact usage
The syntax for storing files or folders in the artifact store is:
artifact push <namespace> /path/to/file/or/folder
To retrieve files or folders from the store, use:
artifact pull <namespace> <file or folder name>
Add the --force option to overwrite files or folders during pull or push actions. For more information on syntax, see the Semaphore toolbox page.
Artifact namespaces
The artifact store is partitioned into three namespaces:
- job: each job gets a dedicated namespace on every run. Job artifacts are suitable for collecting debug data, logs, or screenshots for end-to-end tests
- workflow: accessible to all pipelines in the same workflow. Workflow artifacts are ideal for passing data between jobs
- project: a global namespace for the project. Project artifacts are ideal for storing final deliverables
Job artifacts
The job namespace is not shared between jobs. Instead, each job is assigned a dedicated namespace for every run.
Job artifacts are ideal for storing debugging data, such as build logs, screenshots, and screencasts. In other words, use them when you don't need to share data with other jobs.
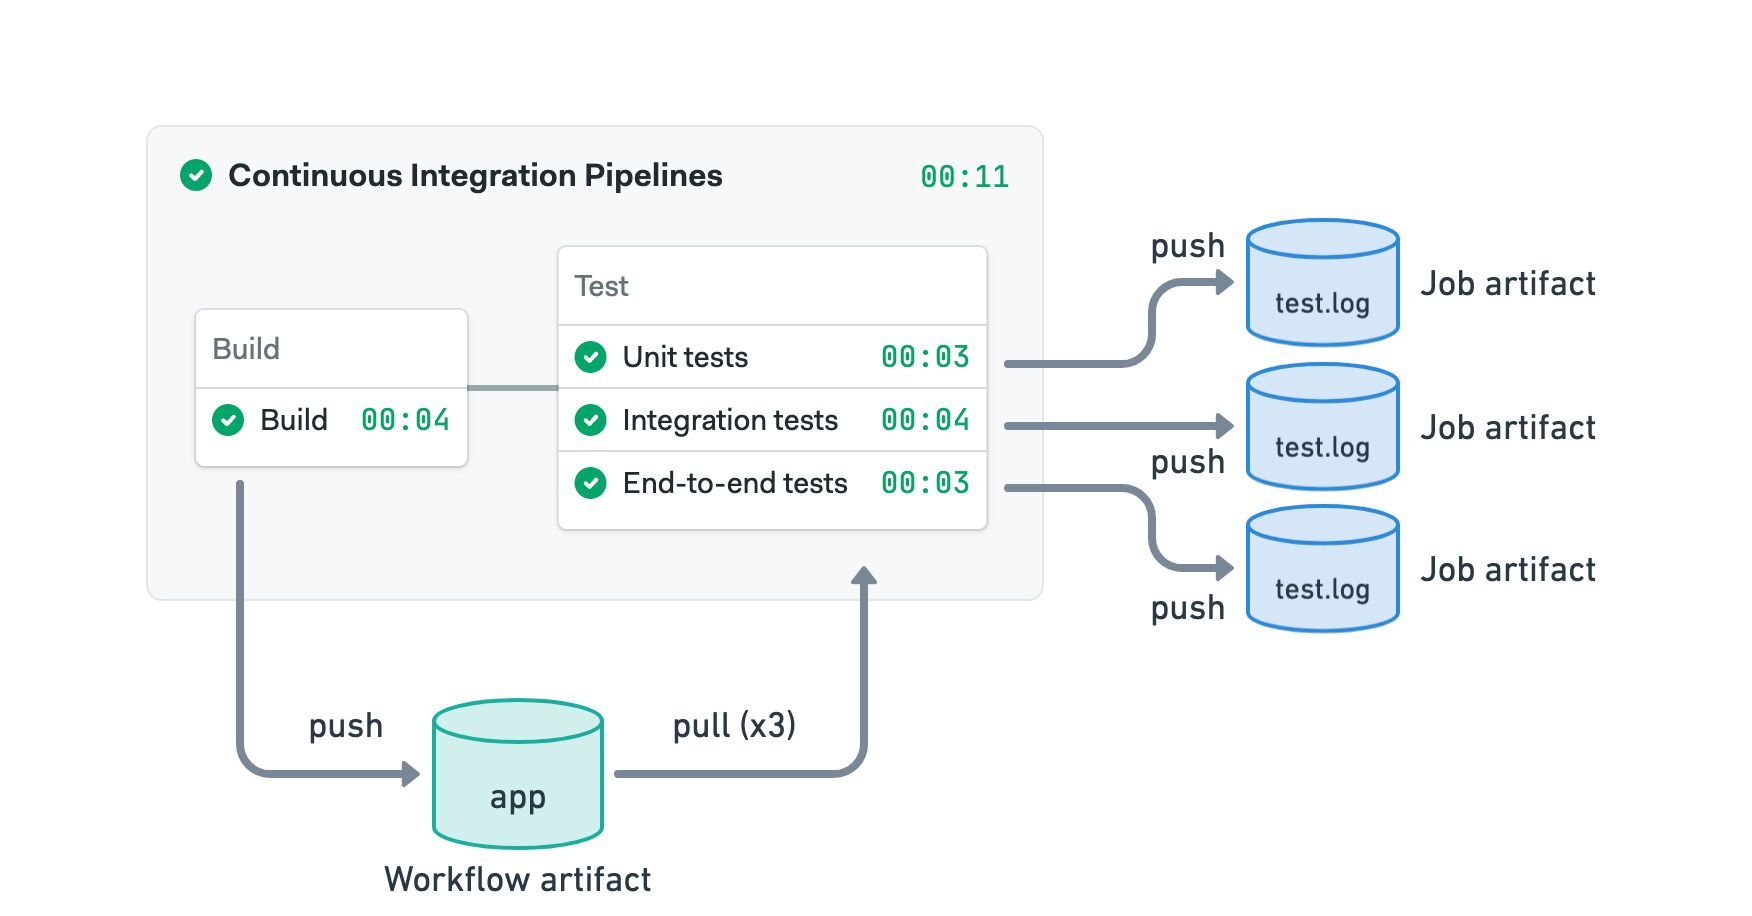
The following example shows a common combination of job and workflow artifacts:
- Use the workflow artifact to pass the compiled application from the build to the test jobs
- Each test job pushes its test log to the job artifact
- Editor
- YAML
version: v1.0
name: Continuous Integration Pipelines
agent:
  machine:
    type: f1-standard-2
    os_image: ubuntu2004
blocks:
  - name: Build
    dependencies: []
    task:
      jobs:
        - name: Build
          commands:
            - checkout
            - make build
            - artifact push workflow app
  - name: Test
    dependencies:
      - Build
    task:
      jobs:
        - name: Unit tests
          commands:
            - checkout
            - artifact pull workflow app
            - make unit
            - artifact push job test.log
        - name: Integration tests
          commands:
            - checkout
            - artifact pull workflow app
            - make integration
            - artifact push job test.log
        - name: End-to-end tests
          commands:
            - checkout
            - artifact pull workflow app
            - make e2e
            - artifact push job test.log
See the YAML tab to view the commands used in the example.
Workflow artifacts
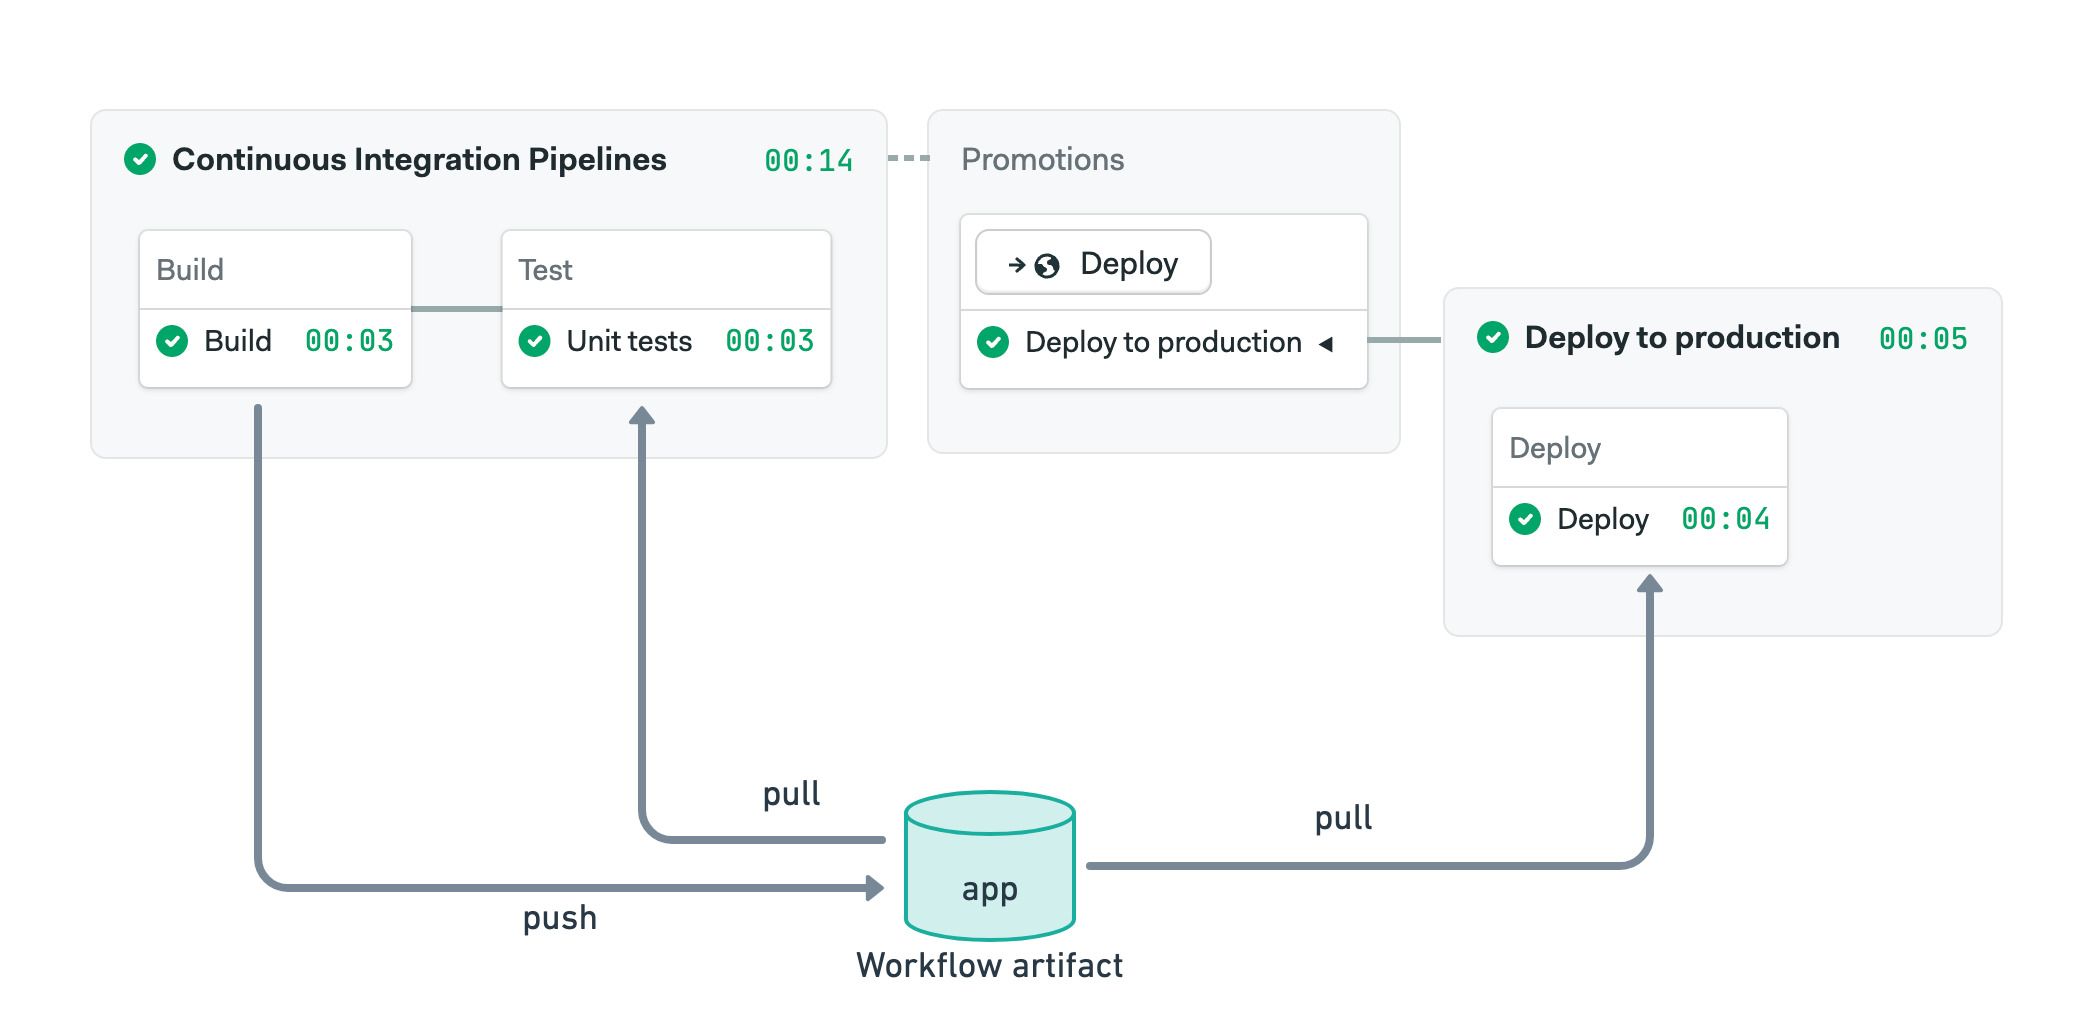
The workflow artifact is used to pass data between jobs in the same run. This namespace is accessible to all pipelines, including those connected with promotions.
The following example shows how to use the workflow artifact to pass a compiled binary between the build, test, and deploy jobs. Note that the deploy job can access the workflow artifact even if it is in a different pipeline.
- Editor
- YAML
version: v1.0
name: Continuous Integration Pipelines
agent:
  machine:
    type: f1-standard-2
    os_image: ubuntu2004
blocks:
  - name: Build
    dependencies: []
    task:
      jobs:
        - name: Build
          commands:
            - checkout
            - make build
            - artifact push workflow app
  - name: Test
    dependencies:
      - Build
    task:
      jobs:
        - name: Unit tests
          commands:
            - checkout
            - artifact pull workflow app
            - make tests
promotions:
  - name: Deploy
    pipeline_file: deploy.yml
This is the deployment pipeline:
version: v1.0
name: Deploy to production
agent:
  machine:
    type: f1-standard-2
    os_image: ubuntu2004
blocks:
  - name: Deploy
    task:
      jobs:
        - name: Deploy
          commands:
            - checkout
            - artifact pull workflow app
            - make deploy
See the YAML tab to view the commands used in the example.
Project artifacts
The project namespace is globally shared across all runs in a given project. This namespace is used to store final deliverables, such as compiled binaries.
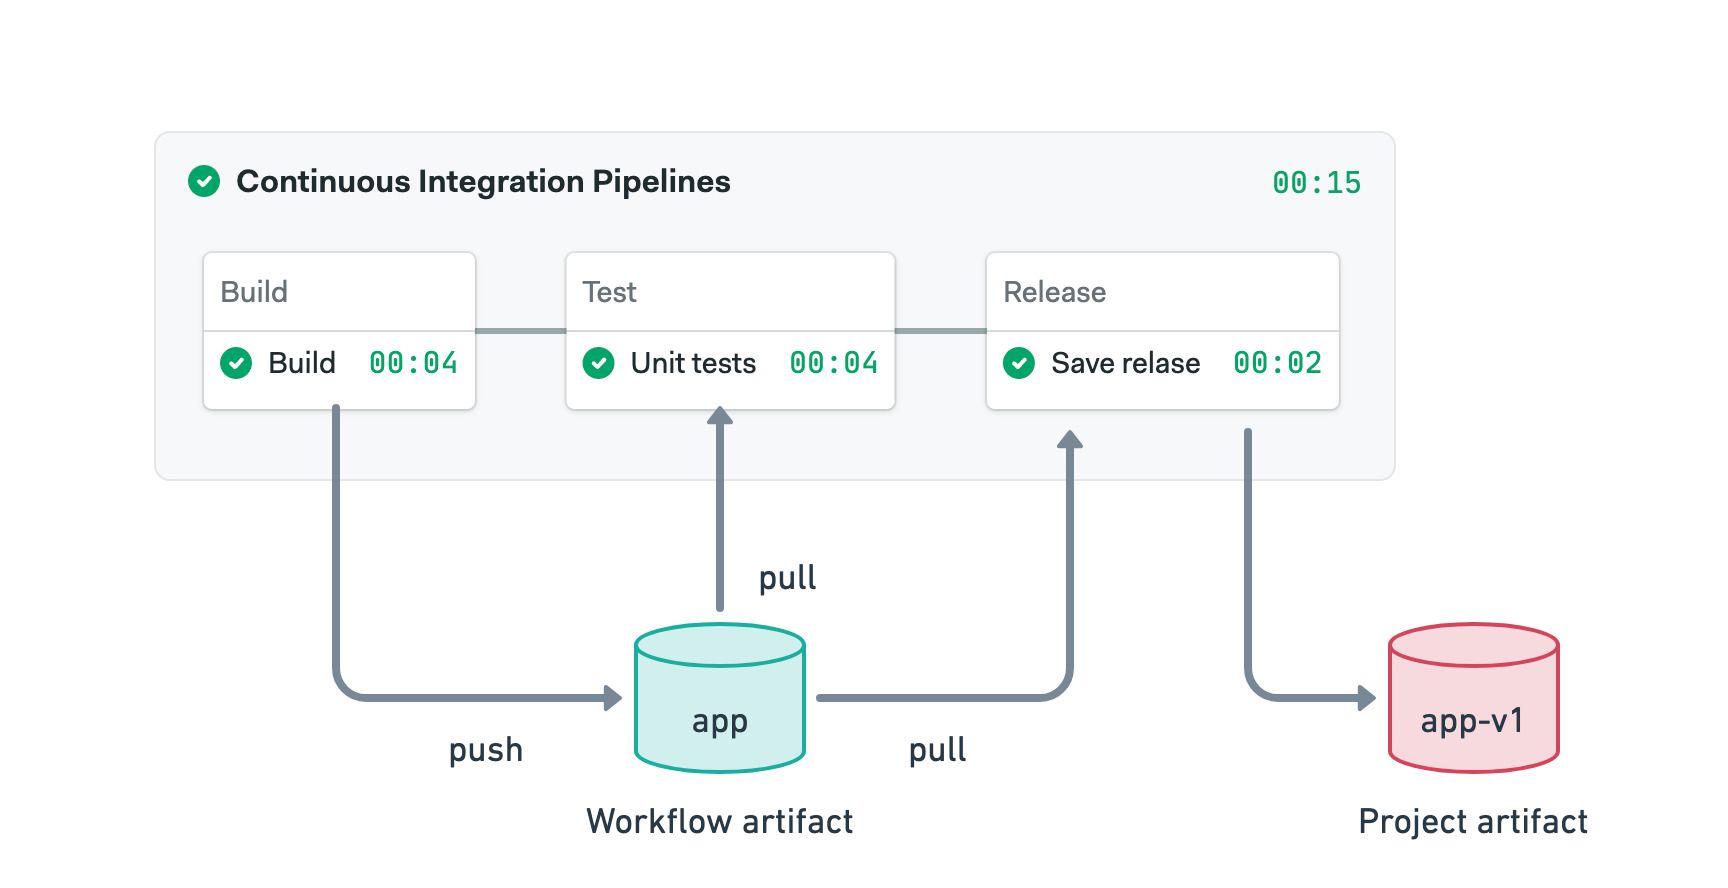
In the following example, we use both workflow and project artifacts:
- The workflow artifact is used to pass the compiled binary between the build and other jobs
- Once tests pass, the binary is tagged with the version number and stored in the project artifact
- Editor
- YAML
version: v1.0
name: Continuous Integration Pipelines
agent:
  machine:
    type: f1-standard-2
    os_image: ubuntu2004
blocks:
  - name: Build
    dependencies: []
    task:
      jobs:
        - name: Build
          commands:
            - checkout
            - make build
            - artifact push workflow app
  - name: Test
    dependencies:
      - Build
    task:
      jobs:
        - name: Unit tests
          commands:
            - checkout
            - artifact pull workflow app
            - make tests
  - name: Release
    dependencies:
      - Test
    task:
      jobs:
        - name: Save release
          commands:
            - artifact pull workflow app
            - mv app app-$SEMAPHORE_GIT_TAG_NAME
            - artifact push project app-$SEMAPHORE_GIT_TAG_NAME
See the YAML tab to view the commands used in the example.
How to view artifacts
In addition to accessing artifacts from the job using the artifact command, you can view, delete, and download artifacts from the Semaphore project page.
Job artifacts
Open the job log and go to the Artifacts tab. All artifacts for this job are displayed.
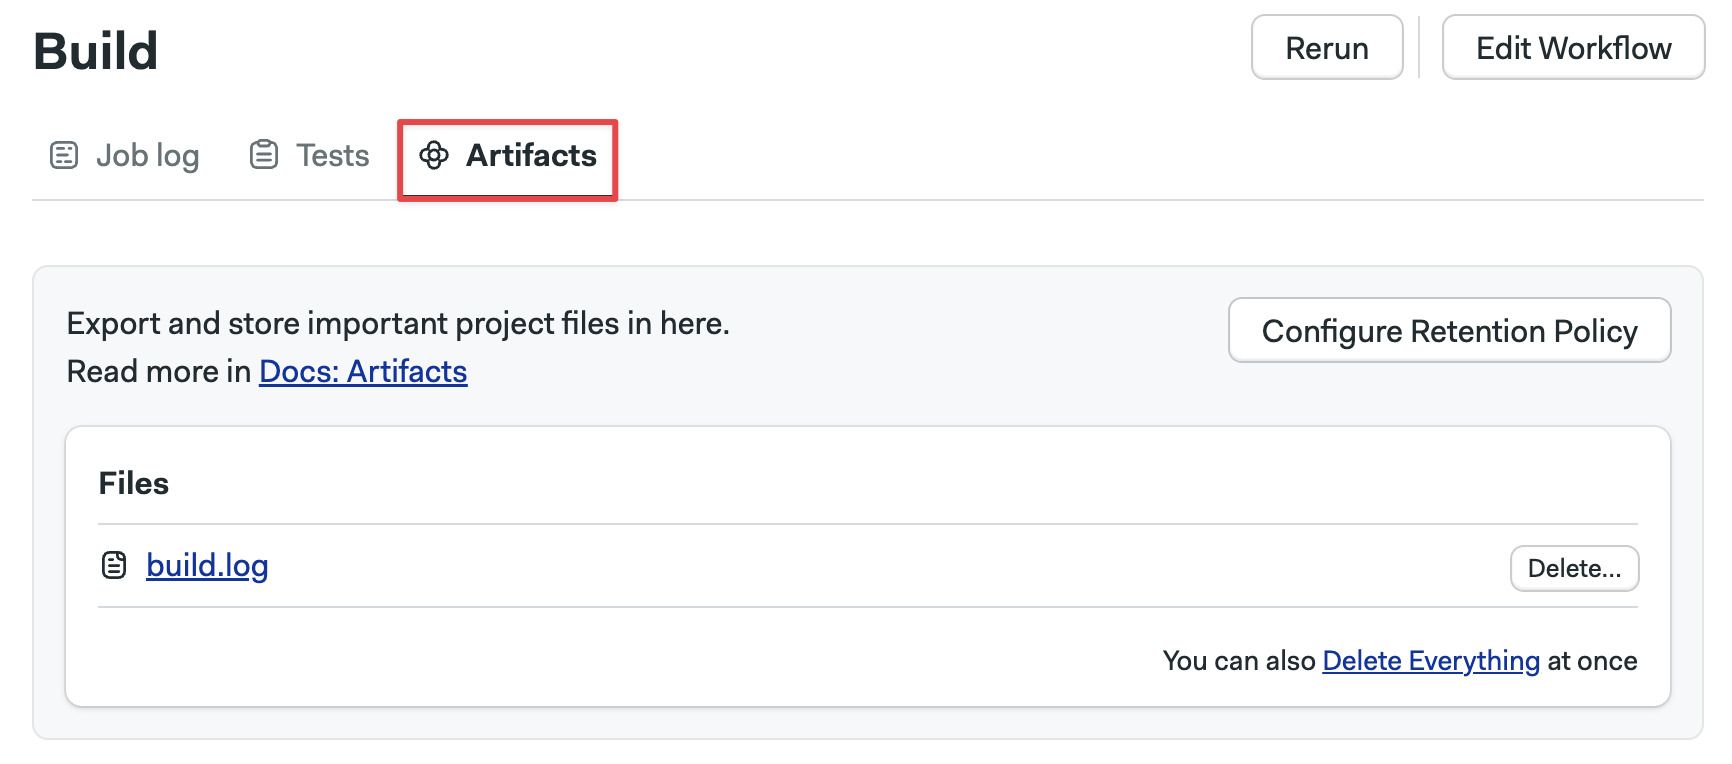
Here you can:
- Open folders and view their content
- Click on files to download them
- Press Delete to delete the artifact
- Press Delete Everything to delete all the files in the current folder
- Press the Configure retention policy to configure the artifact retention
Workflow artifacts
To view the workflow artifacts, open the workflow and go to Artifacts.
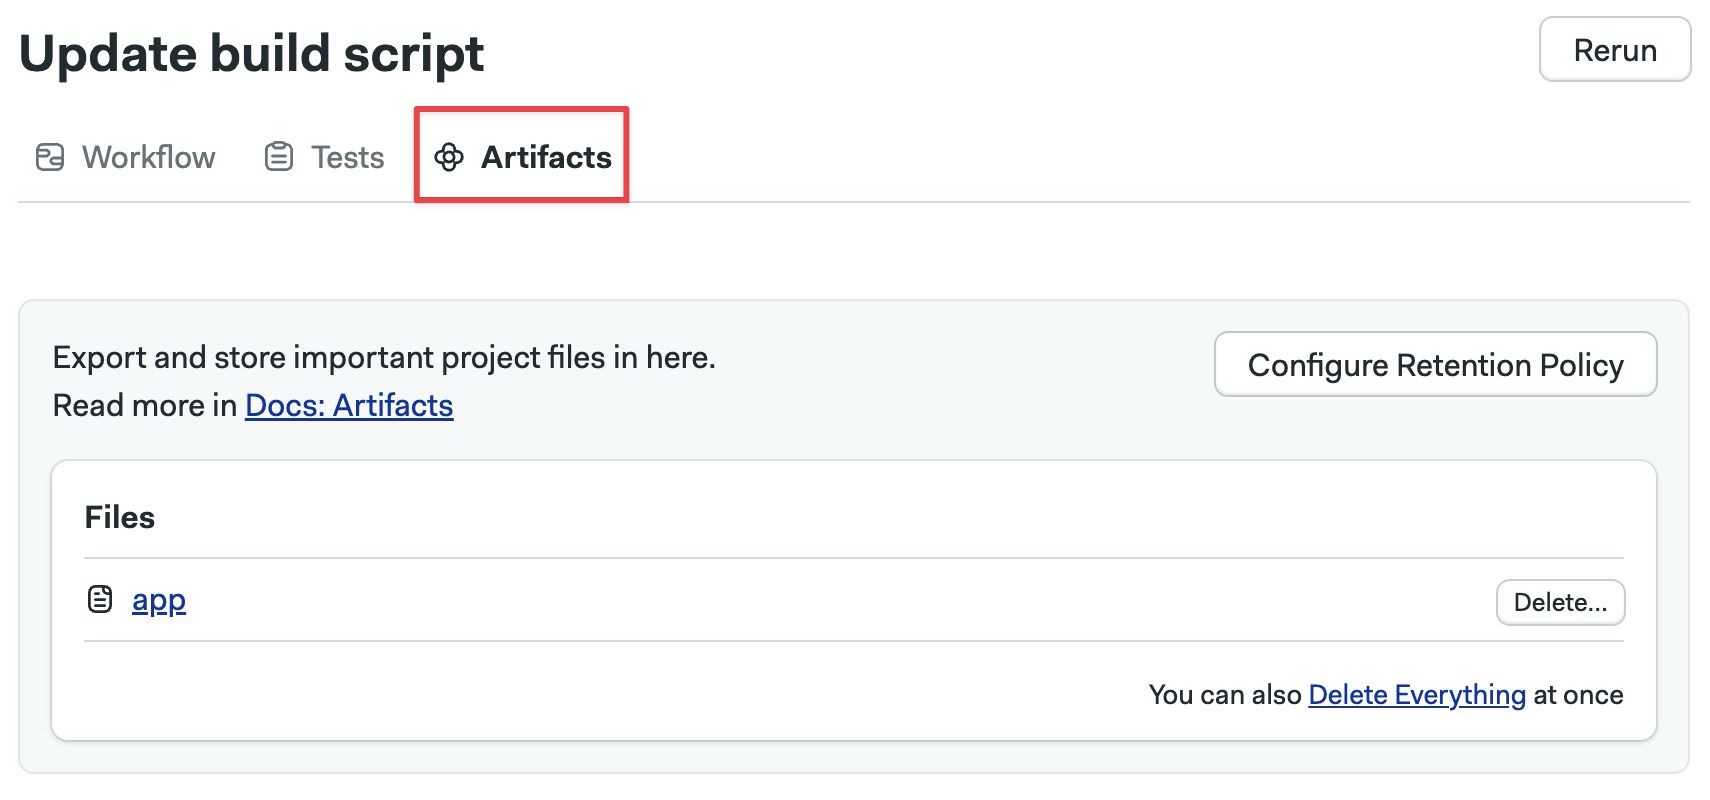
Here you can:
- Open folders and view their content
- Click on files to download them
- Press Delete to delete the artifact
- Press Delete Everything to delete all the files in the current folder
- Press the Configure retention policy to configure the artifact retention
Project artifacts
To view the project artifacts, open your project in Semaphore and select Artifacts.
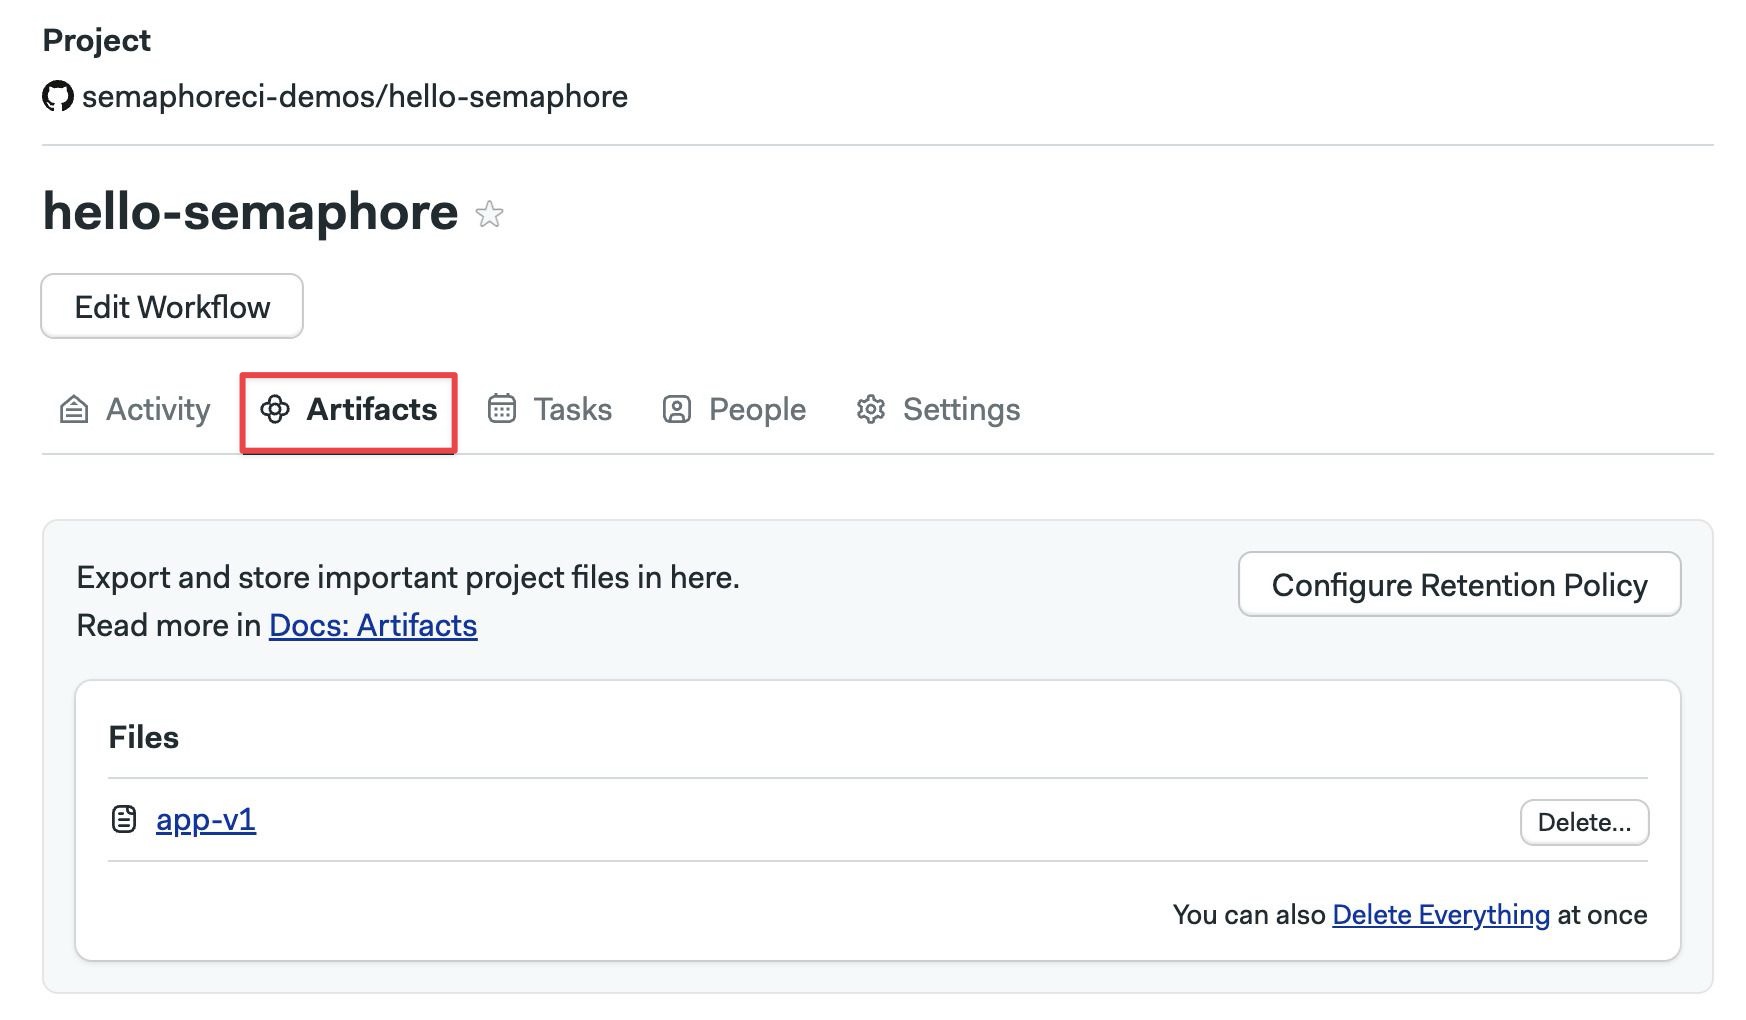
Here you can:
- Open folders and view their content
- Click on files to download them
- Press Delete to delete the artifact
- Press Delete Everything to delete all the files in the current folder
- Press the Configure retention policy to configure the artifact retention
Retention policies
Semaphore will never delete your artifacts automatically. To control usage and costs, it's recommended to set up retention policies to automatically delete old artifacts.
Retention policies are rule-based and scoped to namespaces. You must create one or more rules with file selectors and ages. Semaphore attempts to match each rule to existing files and delete them if they exceed the maximum age.
How to create retention policies
You can access the retention policy settings in the following ways:
- Pressing Configure Retention Policy in the job artifacts, workflow artifacts, or project artifacts
- Selecting the Artifacts section in your project settings
The retention policy menu lets you create rules for all the artifact namespaces.
To create a retention rule:
- Type the file selector
- Select the maximum age
- Click Add retention policy to add more rules
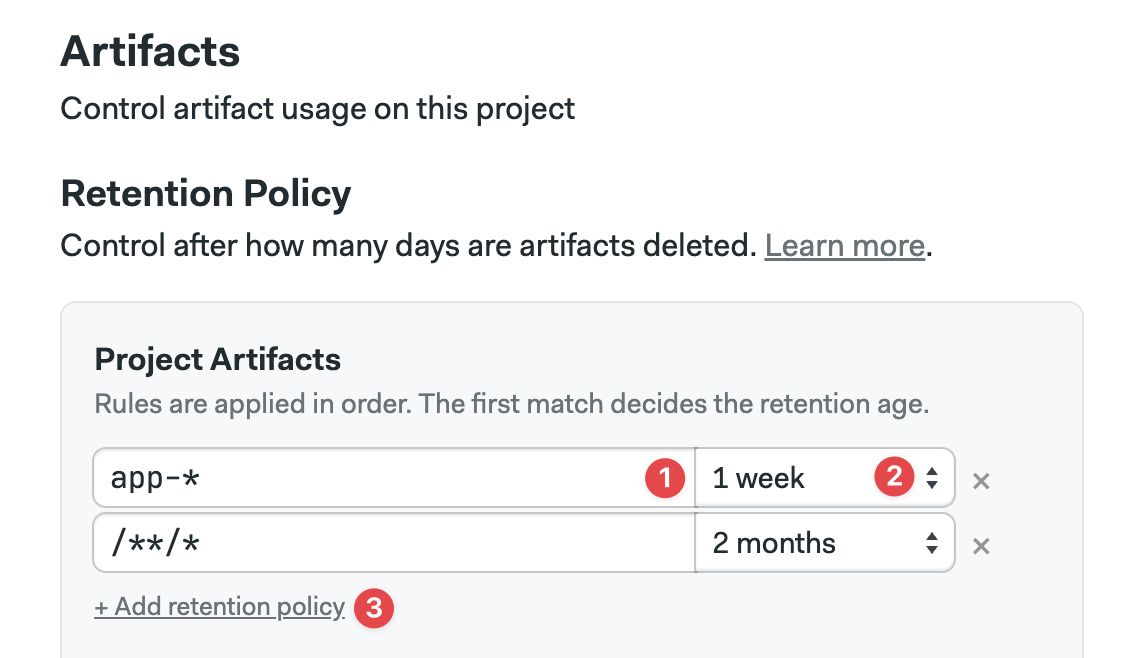
Repeat the process for the workflow artifacts:
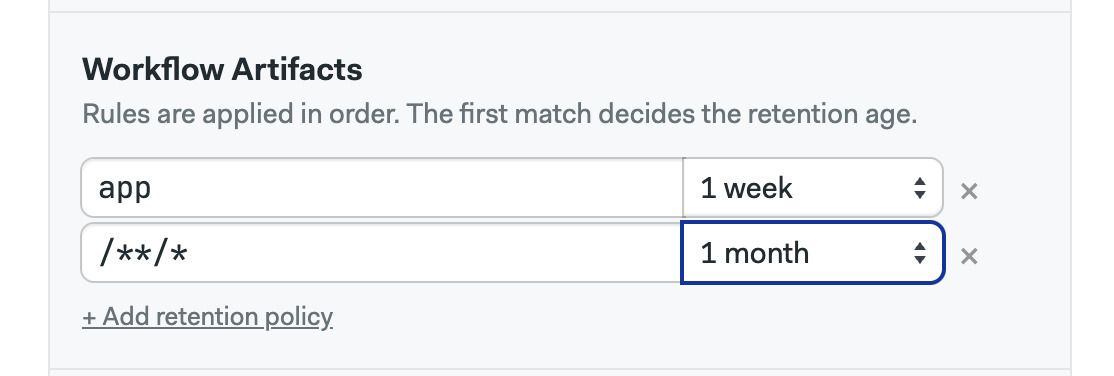
And finally, set up retention policies for job artifacts:
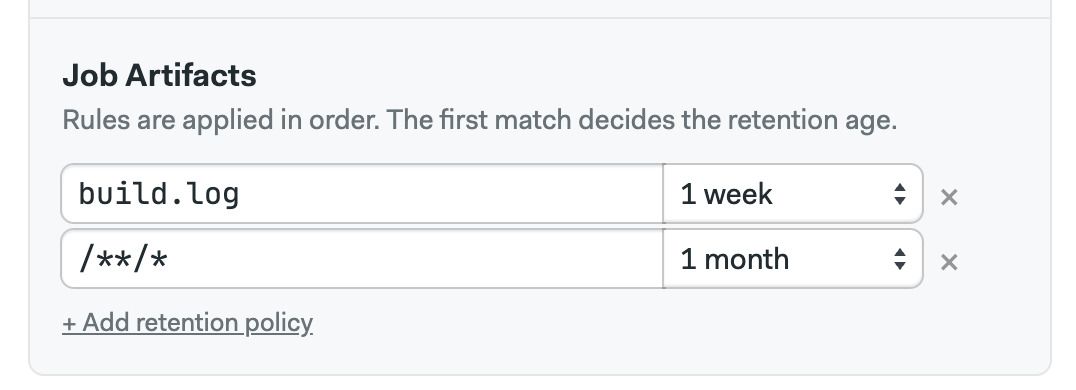
Semaphore checks and applies the retention policy rules in your project once every day.
Retention policies selectors
The file selector accepts star (*) and double-star (**) glob patterns. For example:
/**/*matches all files and folders in the namespace. We recommend setting this rule at the end of the list/logs/**/*.txtmatches all files with a.txtextension in the logs folder or any subfolders/screenshots/**/*.pngmatches all files with a.pngin the screenshots folder and subfoldersbuild.logmatches the file exactly
Usage pricing
Artifacts on Semaphore Cloud are charged based on:
- Storage: the amount of data stored, charged on a GB-per-month basis
- Traffic: download network traffic in jobs or from the website, charged by the total GB of data per month
For more information, see Plans and Pricing
When using self-hosted agents, you're responsible for setting up the artifact storage bucket. Storage and transfer costs are charged by your cloud provider and depend on your infrastructure setup.