OpenID Connect
OpenID Connect (OICD) allows you to establish a more secure trust relationship between Semaphore and cloud providers such as AWS or Google Cloud.
Overview
Semaphore users traditionally use secrets to inject credentials or API keys in jobs that need to interact with cloud providers. Every time the CI pipeline needs to deploy an application or fetch resources from a Docker registry or S3 bucket, we need to supply a secret to authorize Semaphore to access your cloud.
These long-lived credentials present a challenge to maintain security or face exposure to security threats. Access and usage of these secrets need to be carefully monitored. Secrets need to be regularly rotated and the provided access rights on the cloud should follow the principle of least privilege.
OpenID Connect (OIDC) provides an alternative way to interact with the cloud. Instead of secrets, OIDC uses short-lived access tokens that do not require secret maintenance.
How to configure OpenID Connect
This section explains how to connect OpenID to your cloud provider.
AWS
To connect to Amazon Web Services (AWS) from Semaphore using OpenID Connect, you will need to perform the following steps.
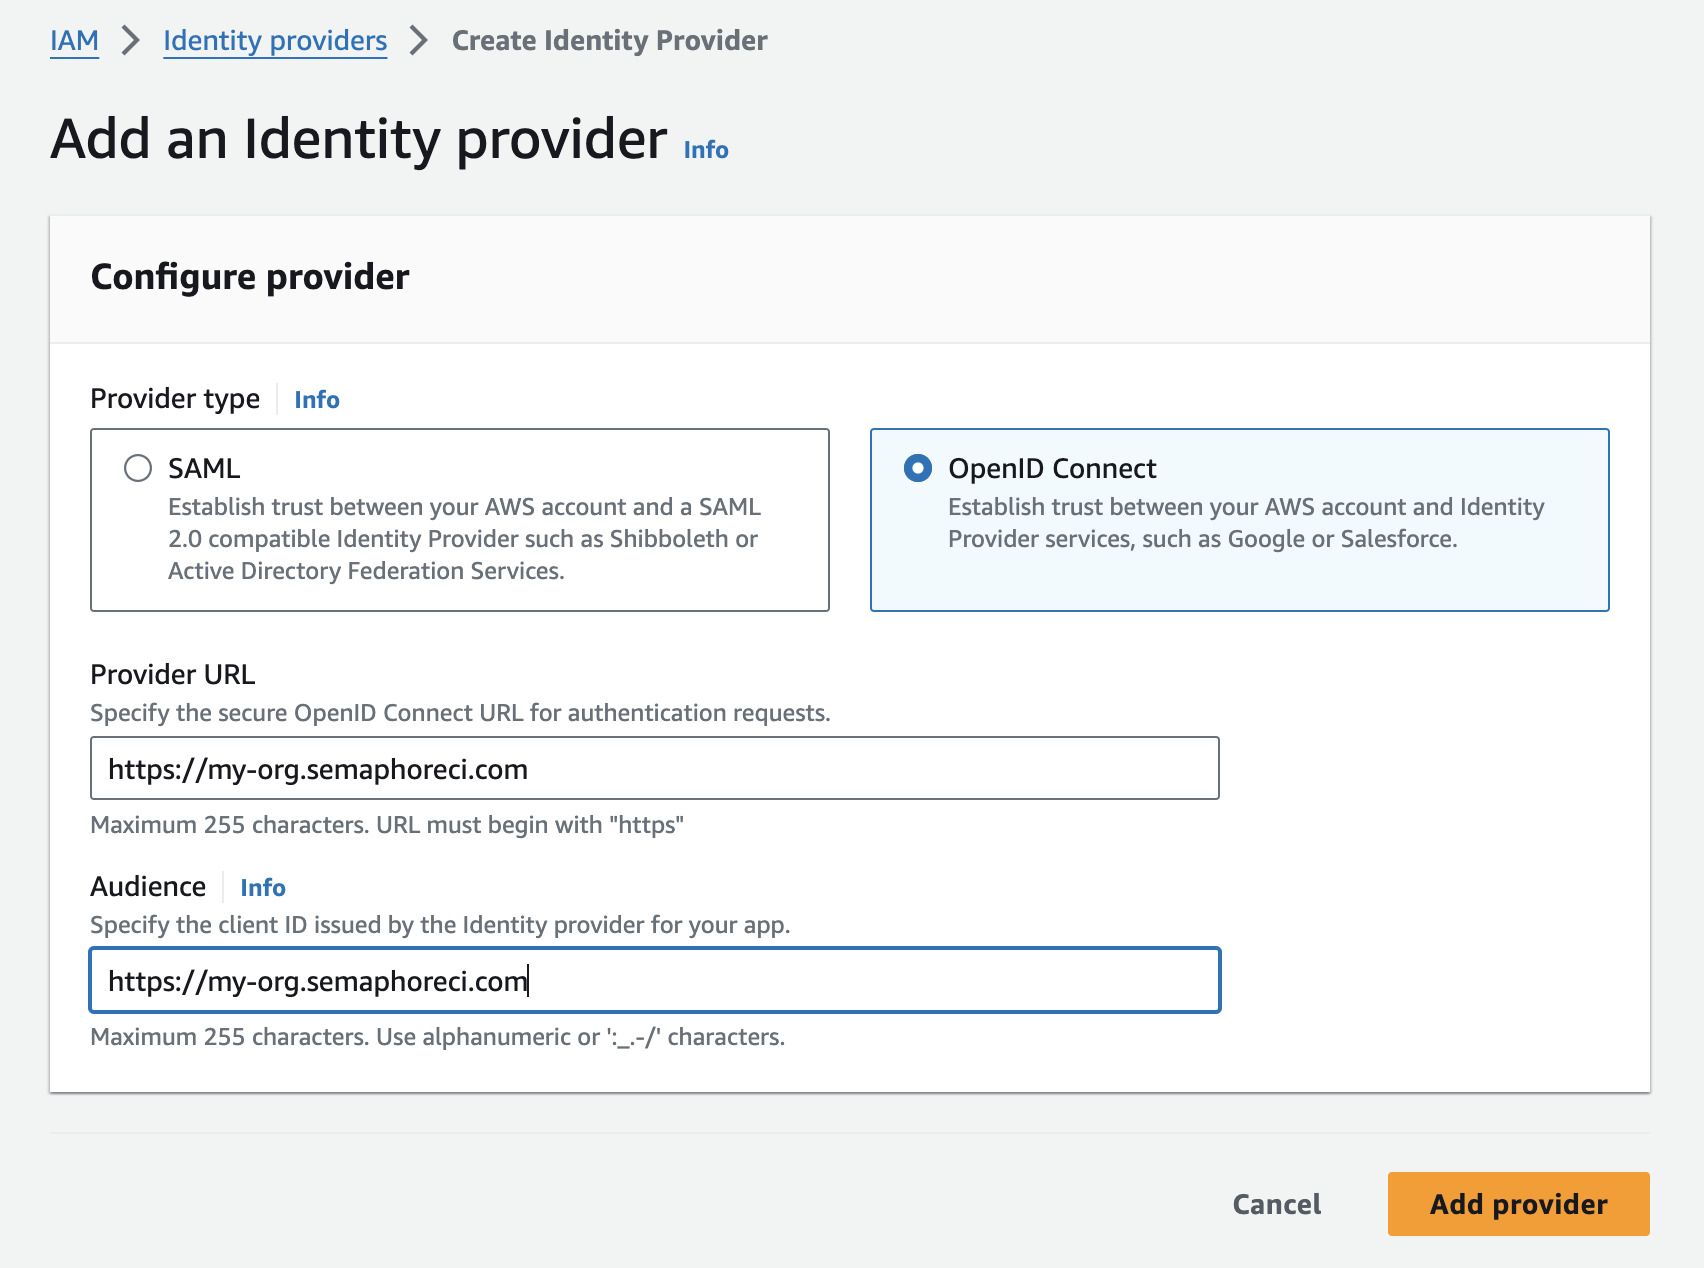
Step 1: Create identity provider
-
Log in to the AWS IAM Console
-
Under Access management, select Identity providers
-
Press Add provider
-
Select OpenID connect
-
In Provider URL and Audience type your organization URL, e.g.
https://my-org.semaphoreci.com -
Press Add provider
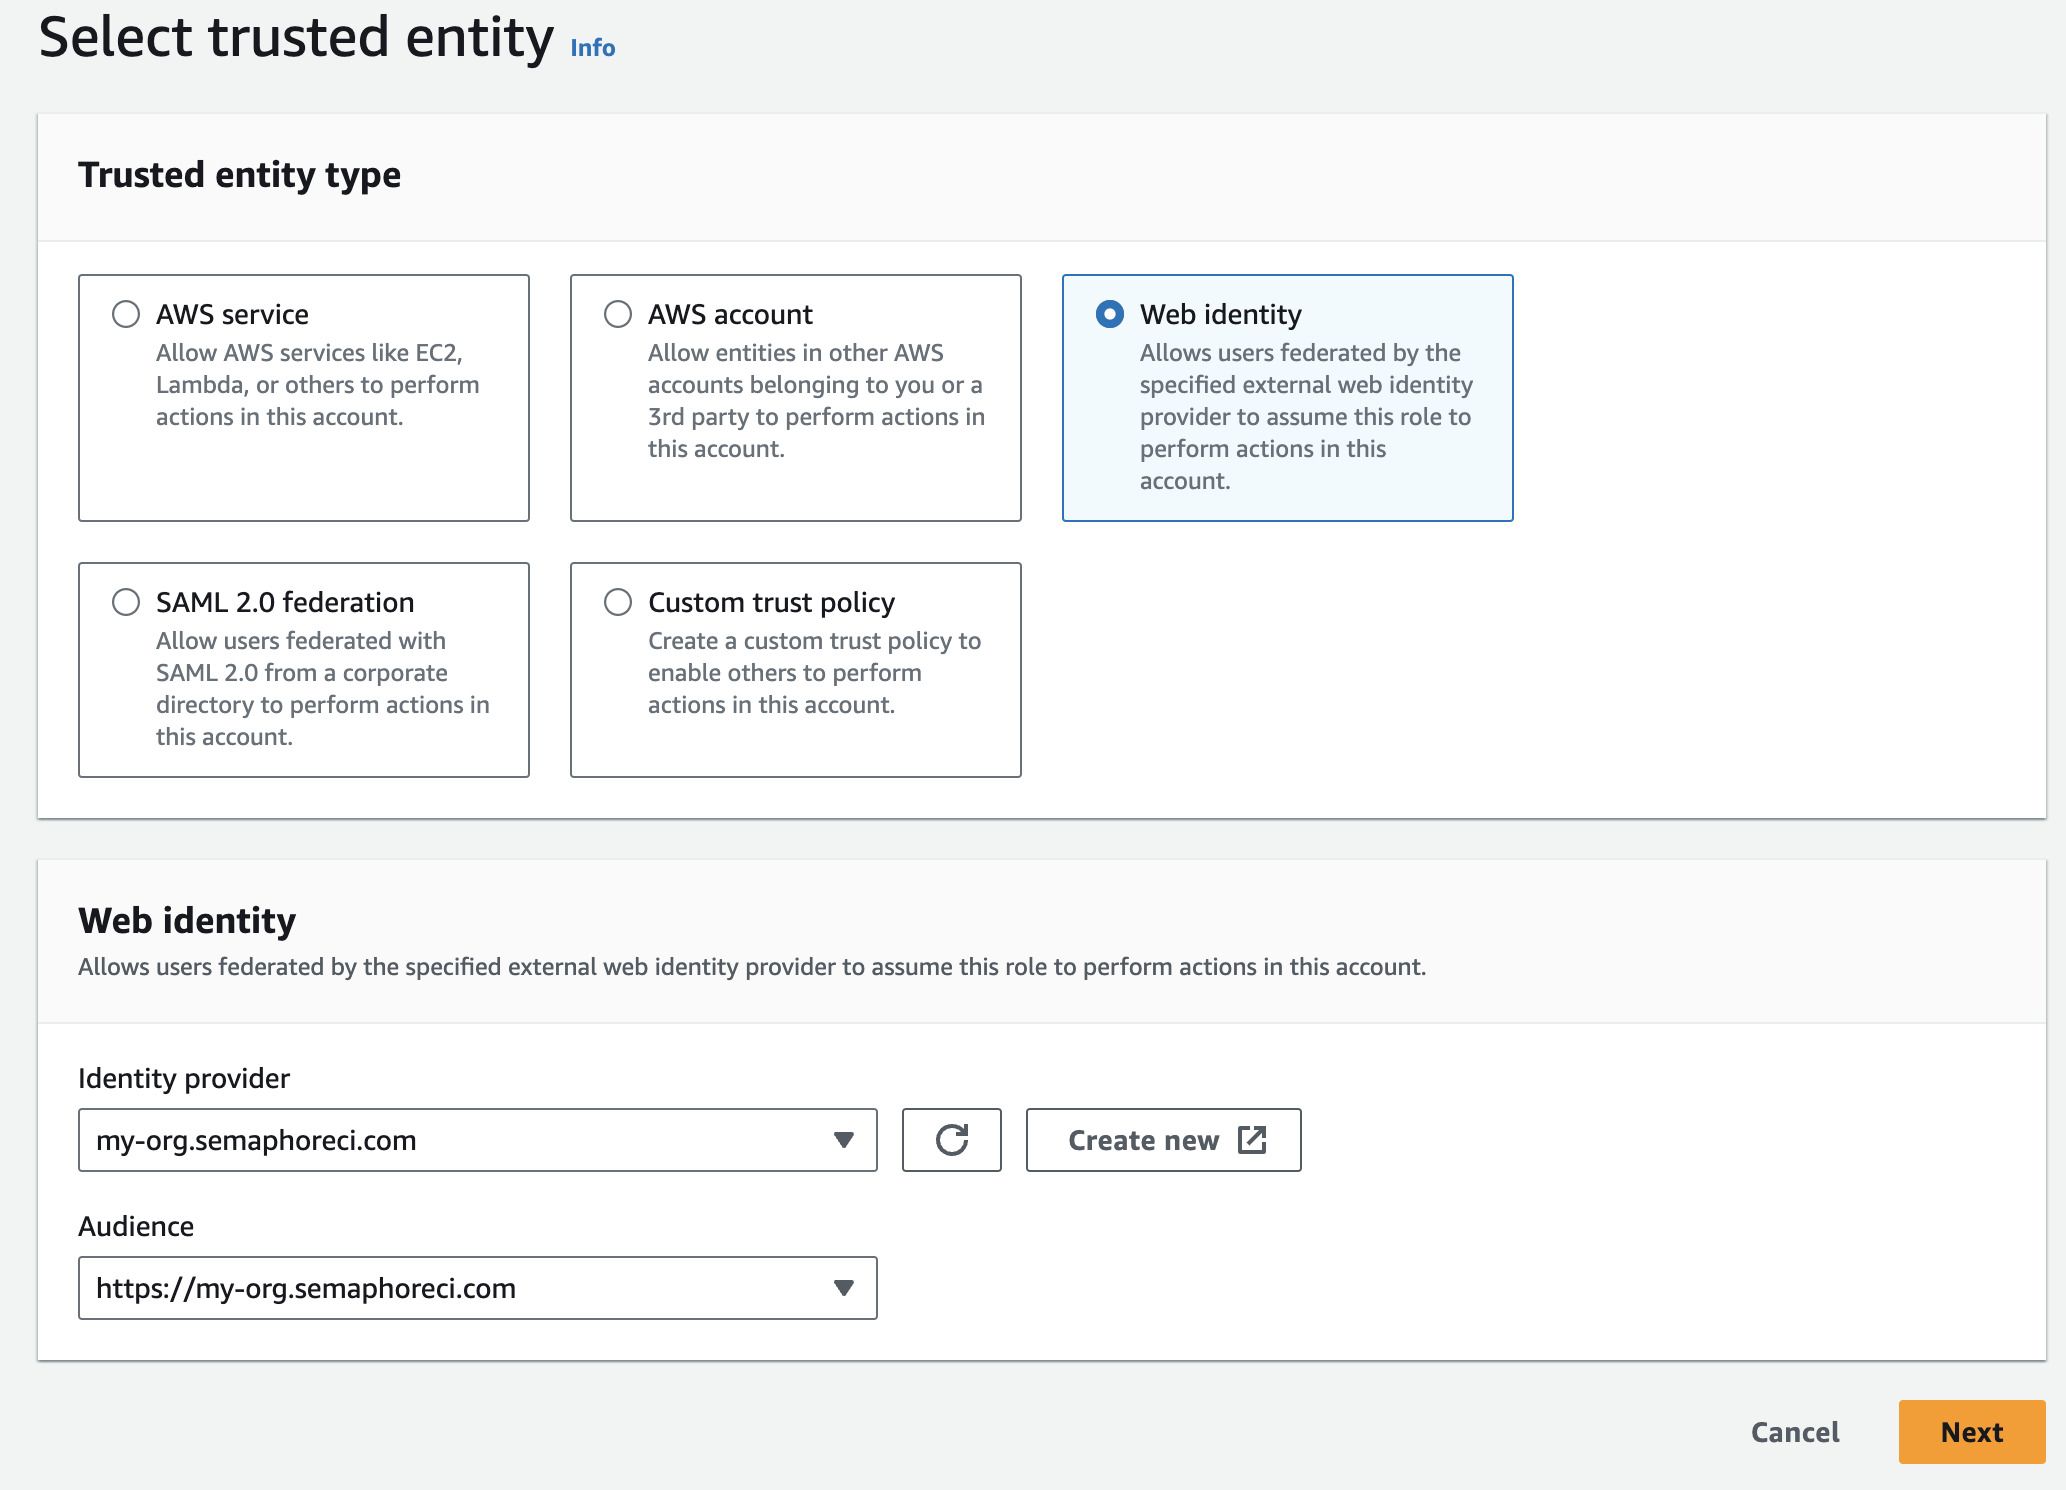
Step 2: Configure a role and trust policy
-
Log in to the AWS IAM Console
-
Under Access management, select Roles
-
Press Create role
-
Select Web identity
-
Under Identity provider and Audience, select the provider you created in Step 1
-
Press Next
-
Choose the permissions you want this role to have. This typically involves selecting a policy that allows access to the AWS resources your pipelines need. For example, if your pipelines need access to S3, you might choose the
AmazonS3FullAccesspolicy. -
Press Next
-
Type the Role name and an optional description
-
Press Create role
Next, edit the trust policy as follows:
- Select the newly created Role by name. You may need to use the search box to locate it
- Select the Trust relationships tab
- Press Edit trust policy
- Edit the
Conditionsection (see below for details) - Press Update policy
The trust policy uses JSON to configure what projects and branches can access the resources assigned to this role.
- Use
StringEqualsto define specific projects and branches - Use
StringLiketo match projects and branches using a pattern - You can combine
StringEqualsandStringLikein the sameCondition
The following example shows how to grant permissions to:
- organization:
my-org - project id:
936a5312-a3b8-4921-8b3f-2cec8baac574 - repository:
web - branch:
main
"Condition": {
    "StringEquals": {
        "my-org.semaphoreci.com:aud": "https://my-org.semaphoreci.com",
        "my-org.semaphoreci.com:sub": "org:my-org:project:936a5312-a3b8-4921-8b3f-2cec8baac574:repo:web:ref_type:branch:ref:refs/heads/main"
 }
}
The next example shows how to grant permissions to:
- organization
my-org - project id
936a5312-a3b8-4921-8b3f-2cec8baac574 - repository
web - all branches
"Condition": {
    "StringLike": {
        "<org-url>.semaphoreci.com:sub":
        "org:<org-url>:project:936a5312-a3b8-4921-8b3f-2cec8baac574:repo:web:ref_type:branch:ref:refs/heads/*",
 },
}
Step 3: Use OICD in your Semaphore pipelines
You can now use OICD to access your AWS resources from any of your pipelines.
In order authenticate with AWS add these commands to the Semaphore job that needs access.
export ROLE_ARN="YOUR_AWS_ROLE_NAME"
export SESSION_NAME="semaphore-job-${SEMAPHORE_JOB_ID}"
export CREDENTIALS=$(aws sts assume-role-with-web-identity --role-arn $ROLE_ARN --role-session-name $SESSION_NAME --web-identity-token $SEMAPHORE_OIDC_TOKEN)
export AWS_ACCESS_KEY_ID=$(echo $CREDENTIALS | jq -r '.Credentials.AccessKeyId')
export AWS_SESSION_TOKEN=$(echo $CREDENTIALS | jq -r '.Credentials.SessionToken')
export AWS_SECRET_ACCESS_KEY=$(echo $CREDENTIALS | jq -r '.Credentials.SecretAccessKey')
Replace YOUR_AWS_ROLE_NAME with the Role you created in Step 2
Google Cloud
You can use gcloud to set up and configure the connection between Google Cloud and Semaphore. See the Google Cloud Identity Federation documentation for more details.
To configure OIDC identity provider in GCP, you will perform the following actions.
Step 1: Create a new identity pool
-
Define a
POOL_IDname. This unique name served to identify a Google Cloud IAM pool. For example:semaphoreci-com-identity-pool -
Store the pool in an environment variable, e.g
semaphoreci-com-identity-poolDefine a name for the identity poolexport POOL_ID="<unique-pool-name>" -
Create the identify pool
Create identity poolgcloud iam workload-identity-pools create $POOL_ID \
--location="global" \
--description="Semaphore OIDC Pool" \
--display-name=$POOL_ID
Step 2: Configure the mapping and conditions
Next, we need to map fields from the Semaphore OIDC provider to Google Cloud attributes and set conditions where Semaphore can access the identity pool. See attribute mapping and condition mapping to learn more.
-
Define
PROVIDER_IDwith a unique name for the OIDC provider, for example:semaphoreci-com. The variableISSUER_URIshould contain your organization URL, e.g.https://my-org.semaphoreci.comDefine PROVIDER_ID and ISSUER_URIexport PROVIDER_ID="<unique-provider-name>"
export ISSUER_URI="https://my-org.semaphoreci.com" -
Use the following template to grant Google Cloud access to the identity pool created in Step 1.
Replace:
<REPOSITORY>with your repository name, e.g.web<BRANCH>with the branch that can access the cloud resources, e.g.refs/heads/main<PROJECT_NAME>with your project name on Semaphore
gcloud iam workload-identity-pools providers create-oidc $PROVIDER_ID \
--location="global" \
--workload-identity-pool=$POOL_ID \
--issuer-uri="$ISSUER_URI" \
--allowed-audiences="$ISSUER_URI" \
--attribute-mapping="google.subject="semaphore::<REPOSITORY>::<BRANCH>" \
--attribute-condition="'semaphore::<PROJECT_NAME>::<BRANCH>' == google.subject"
Step 3: Connect the pool with a Google Cloud service account
Connecting to the pool allows Semaphore to impersonate your Google Cloud service account. To create the connection follow these steps:
-
Define environment variables:
<REPOSITORY>is the repository name, e.g.web<BRANCH>is the branch, e.g.refs/heads/main
export SUBJECT="semaphore::<REPOSITORY>::<BRANCH"
export PROJECT_NUMBER=$(gcloud projects describe $(gcloud config get-value core/project) --format=value\(projectNumber\))
export MEMBER_ID="principal://iam.googleapis.com/projects/$PROJECT_NUMBER/locations/global/workloadIdentityPools/$POOL_ID/subject/$SUBJECT" -
Bind the workload identity user to the service account
# ID of the service account who you want to impersonate in the pipelines
export SERVICE_ACCOUNT_EMAIL="myemail@example.com"

gcloud iam service-accounts add-iam-policy-binding $SERVICE_ACCOUNT_EMAIL \
    --role=roles/iam.workloadIdentityUser \
 --member="MEMBER_ID"
See Granting external identities impersonation permissions to learn more about service accounts.
Step 4: Use OIDC connection in Semaphore jobs
Add the following commands to the Semaphore job that needs to access your Google Cloud resources
export POOL_ID="<YOUR_POOL_ID>"
export PROVIDER_ID="<YOUR_PROVIDER_ID_NAME>"
export PROJECT_ID="<YOUR_GOOGLE_CLOUD_PROJECT_ID>"
export SERVICE_ACCOUNT_EMAIL="<YOUR_SERVICE_ACCOUNT_EMAIL>"
export POOL_URI="projects/$PROJECT_ID/locations/global/workloadIdentityPools/$POOL_ID/providers/$PROVIDER_ID"
echo $SEMAPHORE_OIDC_TOKEN > /tmp/oidc_token
gcloud iam workload-identity-pools create-cred-config $POOL_URI --service-account="$SERVICE_ACCOUNT_EMAIL" --service-account-token-lifetime-seconds=600 --output-file=/home/semaphore/creds.json --credential-source-file=/tmp/oidc_token --credential-source-type="text"
export GOOGLE_APPLICATION_CREDENTIALS=/home/semaphore/creds.json
gcloud auth login --cred-file=/home/semaphore/creds.json
gcloud projects list
HashiCorp Vault
To use OIDC to access [HashiCorp Vault], you need to set up a trust relationship with Semaphore. This configuration uses JWT tokens as the authentication method. See HashiCorp's JWT/OIDC documentation to learn more.
Step 1: Enable JWT Support on HashiCorp Vault
The first step is to enable JWT authentication support on the Vault:
-
Execute the following command to enable JWT on your vault
vault auth enable jwt -
Define a variable with your organization URL, e.g.
https://my-org.semaphoreci.comexport PROVIDER_URL="https://my-org.semaphoreci.com" -
Enable JWT for your Semaphore organization
vault write auth/jwt/config bound_issuer="$PROVIDER_URL" oidc_discovery_url="$PROVIDER_URL"
Step 2: Configure roles and policies for accessing secrets
Configure a policy that grants access to specific paths that will be accessed by your Semaphore pipelines. For more details, read Vault's Policies documentation.
-
Create a policy granting access to paths in your Vault. See Vault policies to learn more about this feature
Setting read-only permissions to secret/data/production foldervault policy write example-policy - <<EOF
path "secret/data/production/*" {
capabilities = [ "read" ]
}
EOF -
Create a role to access the Vault resources
- Replace
<REPOSITORY>with your repository - Replace
<BRANCH>with the branch that can access the Vault
Creating a rolevault write auth/jwt/role/example-role -<<EOF
{
"role_type": "jwt",
"user_claim": "actor",
"bound_claims": {
"repo": "<REPOSITORY>",
"branch": "<BRANCH>"
},
"policies": ["example-policy"],
"ttl": "5m"
}
EOF - Replace
Step 3: Access Vault secrets from your Semaphore jobs
To access the Vault from a Semaphore job, add the following commands at the beginning:
export VAULT_TOKEN=$(vault write -field=token auth/jwt/login role=example-role jwt=$SEMAPHORE_OIDC_TOKEN)
vault kv get -field=value secret/data/production/my-secret
Implementation details
See the OIDC token reference page to learn how the OIDC tokens are created and what fields are available.