Install Agents
Overview
Before you can run jobs in your hardware, you need to install and register the self-hosted agent stack. This page explains how to install the stack on several platforms.
How to register agent type
The agent type is the name assigned to agents running on the same hardware or platform. Semaphore expects all self-hosted agents to belong to one agent type.
To register a self-hosted agent type, follow these steps:
-
Open the organization menu on the top-right corner
-
Select Self-hosted agents
-
Press Add self-hosted agent type
-
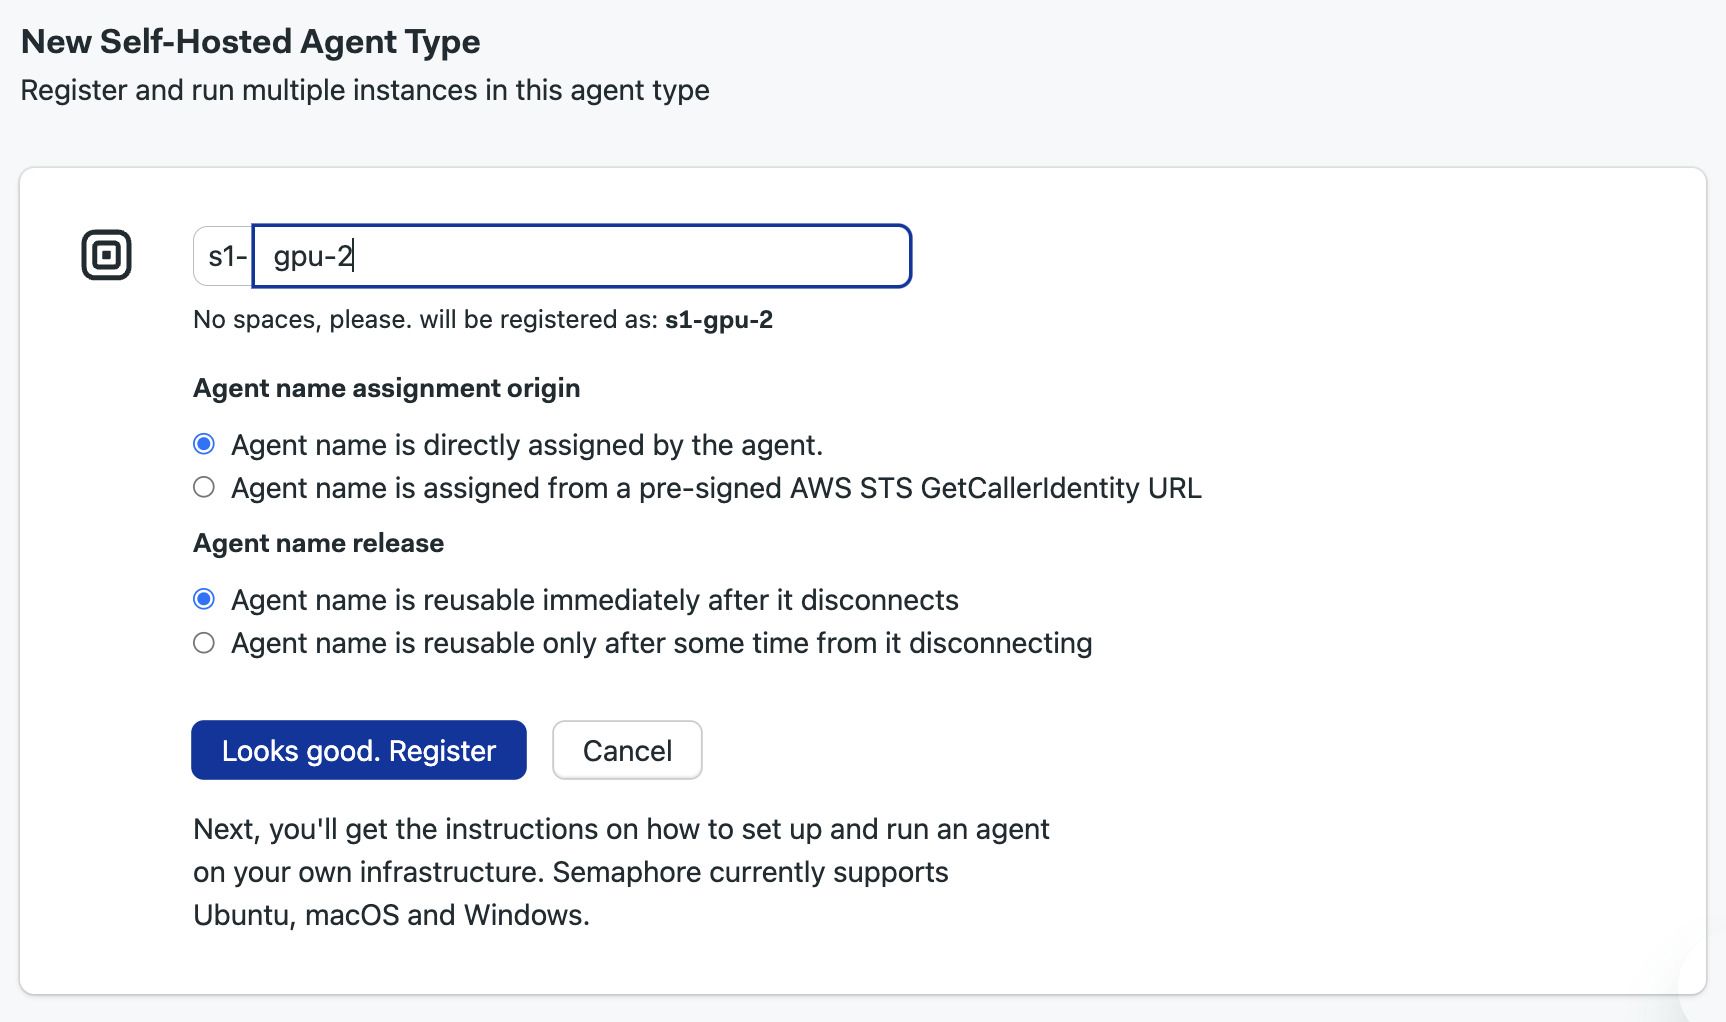
Type the name of the agent type. Self hosted agents all begin with
s1-
, e.g.s1-gpu-2
-
Select the how the agent name is assigned
-
Press Register
The next page shows detailed instructions to install and register the self-hosted. Select the platform you're using and press Reveal to view the registration token. Save it in a safe place for the next step.
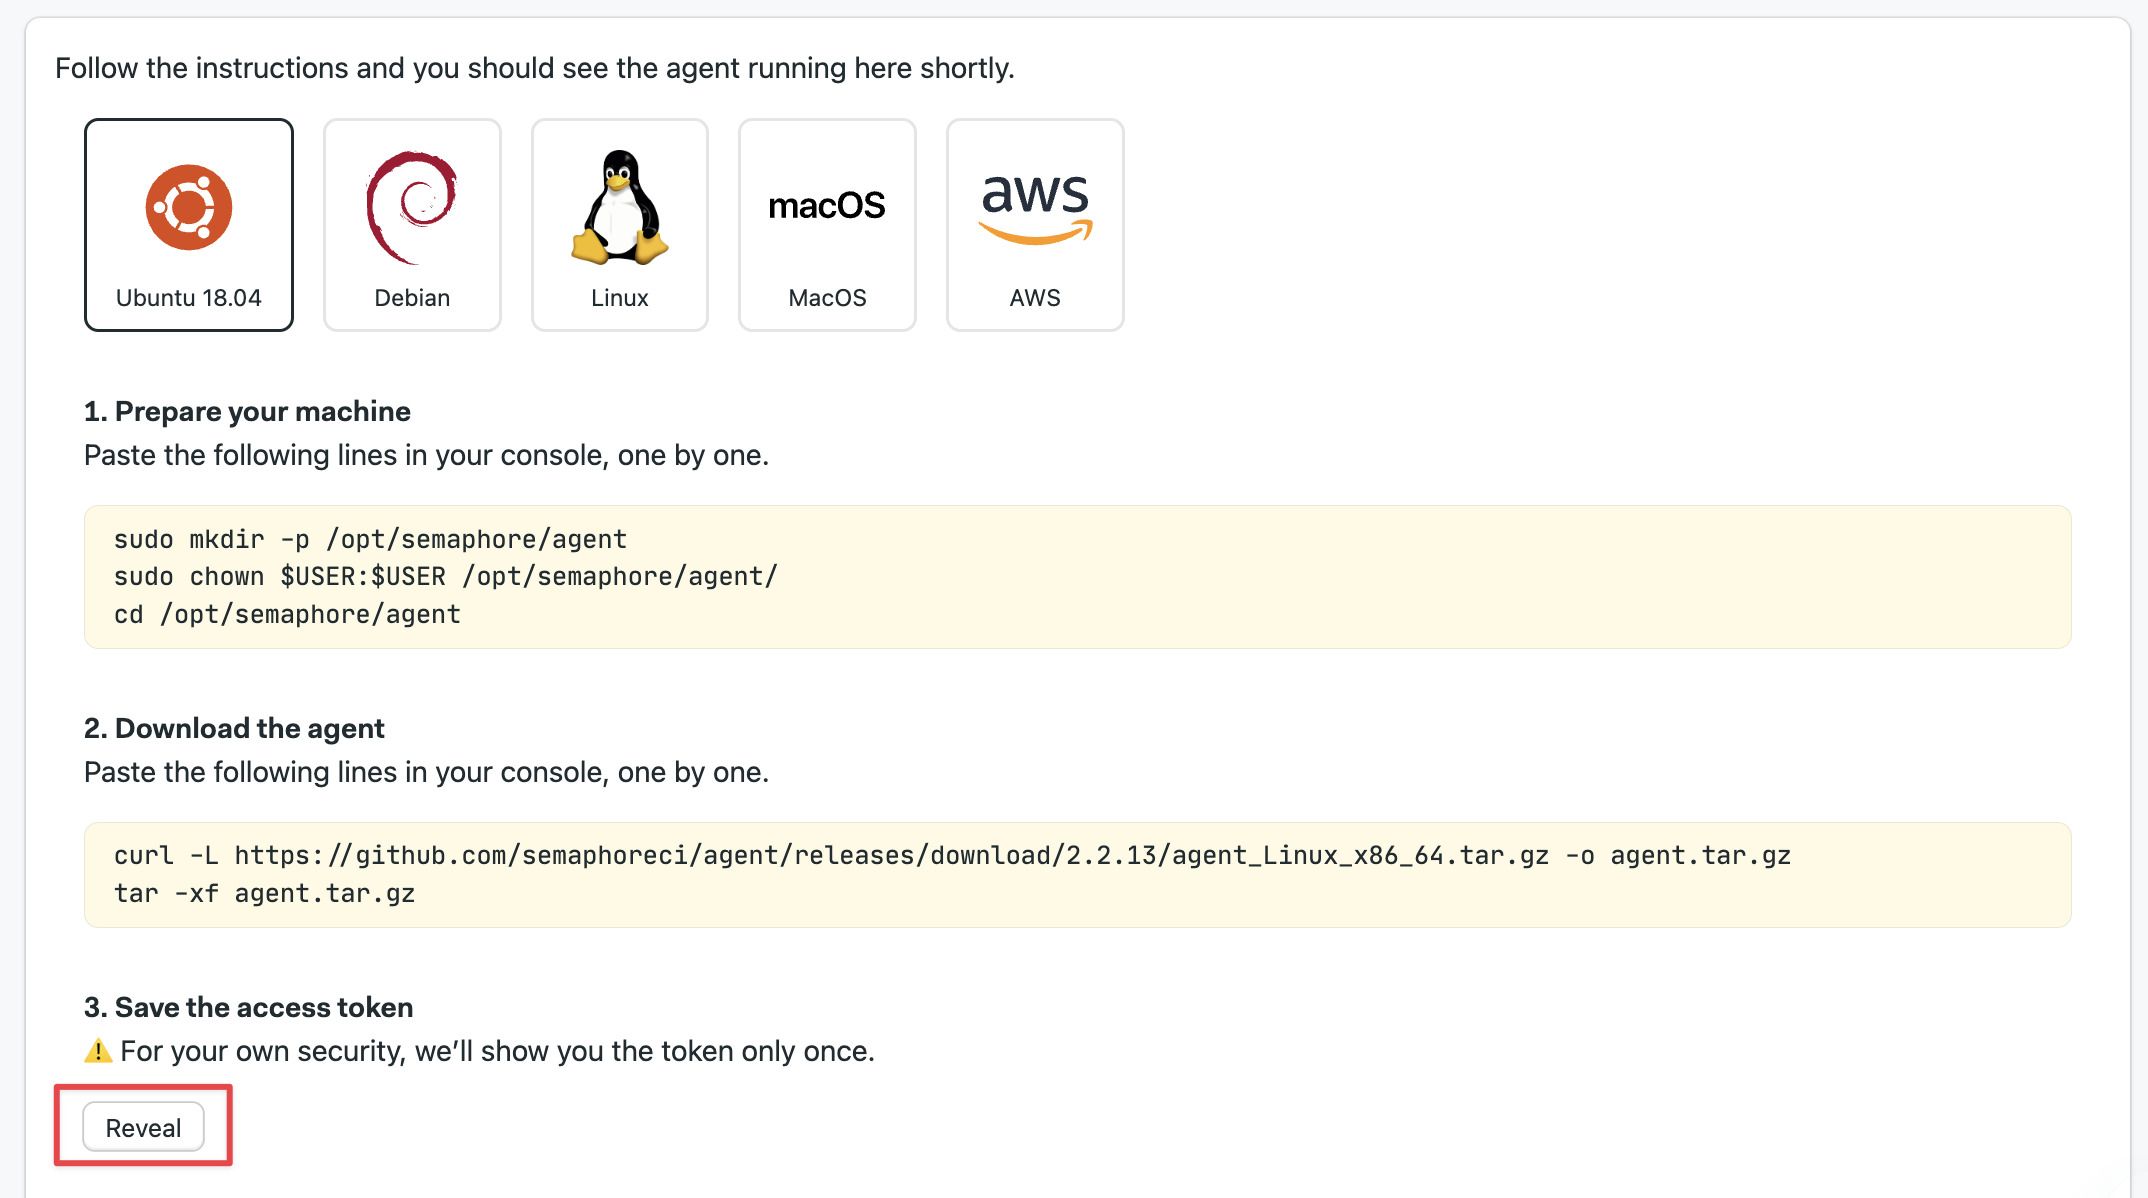
Follow the on-screen instructions. See how to install agent stack for more options.
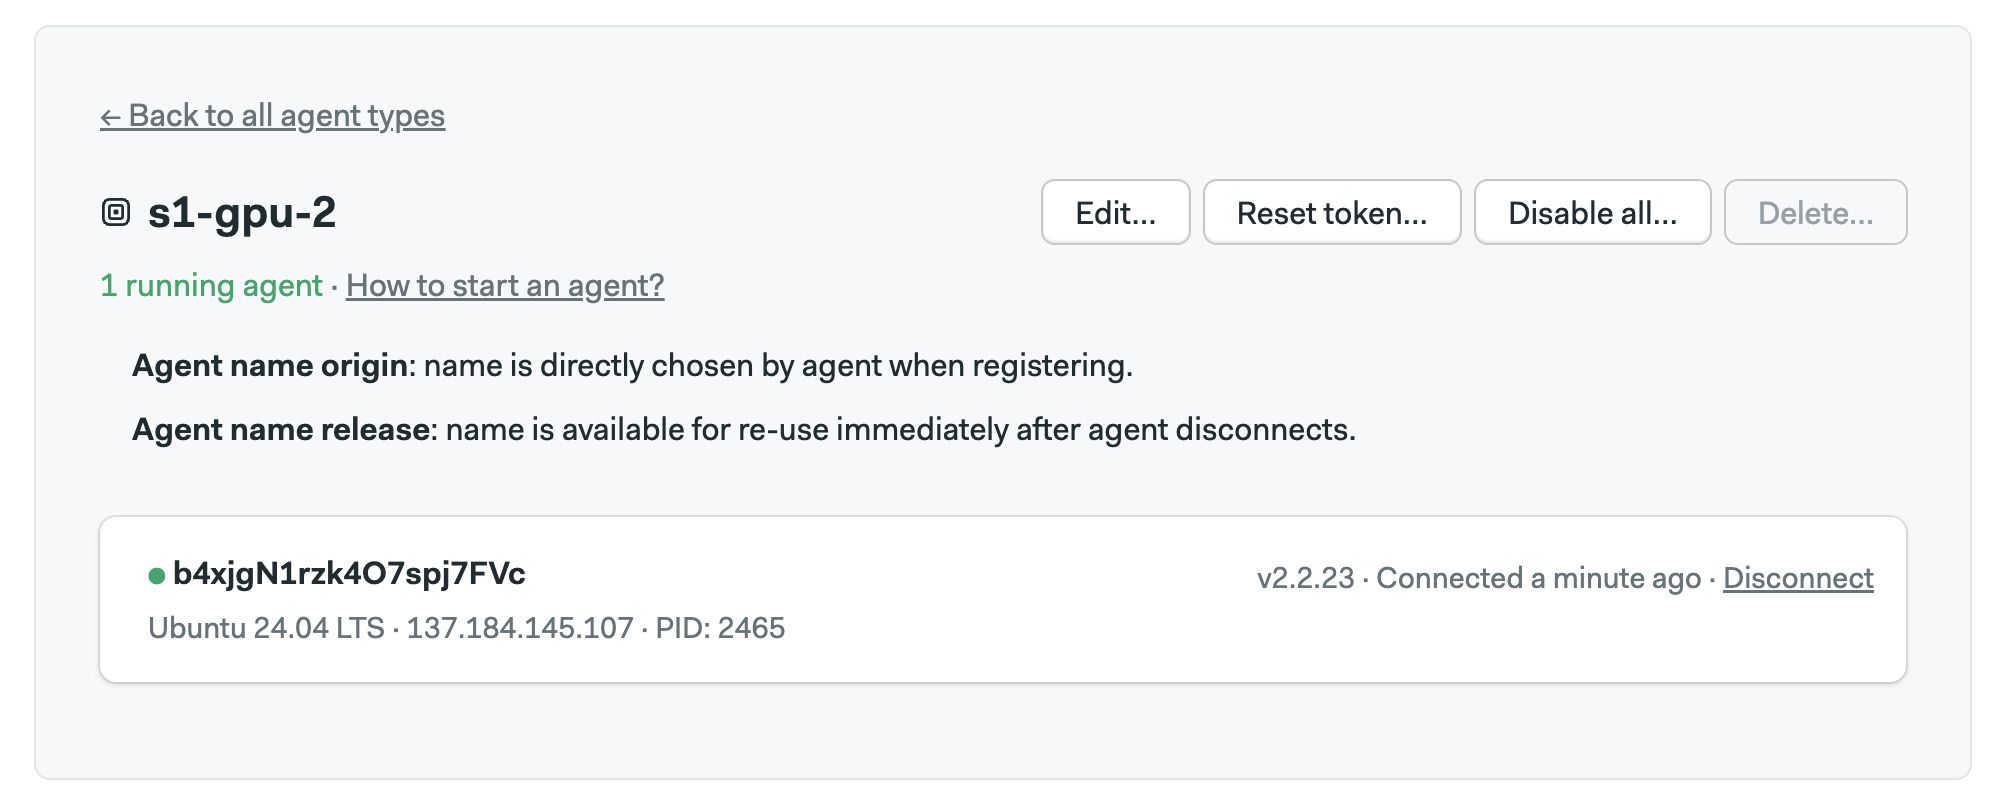
When the agent connects you should be able to see it on the self-hosted agents page.
Agent name assignment
Every agent must have a unique name. There are two ways in which the name can be assigned:
- Name assigned by agent: the agent provides its own name
- Name assigned by AWS STS: agents running on AWS can get an additional level of security by validating their name with AWS Security Token Service
Name assigned by the agent
In this mode, the agent selects its own name and sends it during registration.
The agent picks a random name by default. You can override the name by specifying it during service start. For example:
agent start --name my-agent-name
You may need to edit the configuration file of the service manager to change the name. For example, to change the agent name when using systemd, follow these steps:
-
Edit the service file
sudo systemctl edit semaphore-agent.service
-
Override
ExecStart
to add the--name
argument and save the fileAdd an override to the systemd service file[Service]
ExecStart=
ExecStart=/opt/semaphore/agent/agent start --config-file /opt/semaphore/agent/config.yaml --name my-agent-name -
Restart the service and confirm it has successfully registered
sudo systemctl restart semaphore-agent
Agent names should have between 8 and 80 characters.
Name assigned by AWS STS
AWS Security Token Service provides a second layer of security that ensures only allowed agents can connect with Semaphore.
To use this option, you must run your agent in AWS EC2 instances. The Autoscaling AWS Stack uses this feature by default.
When AWS STS is enabled, the agent sends a name request to Semaphore during registration, which in turn validates the access with the AWS-secured endpoint. This mechanism thwarts attempts to register rogue agents even if the attacked has secured access to a valid registration token.
To use AWS STS name assignments, follow these steps:
-
Create an IAM user on AWS with permissions to create and delete EC2 instances
-
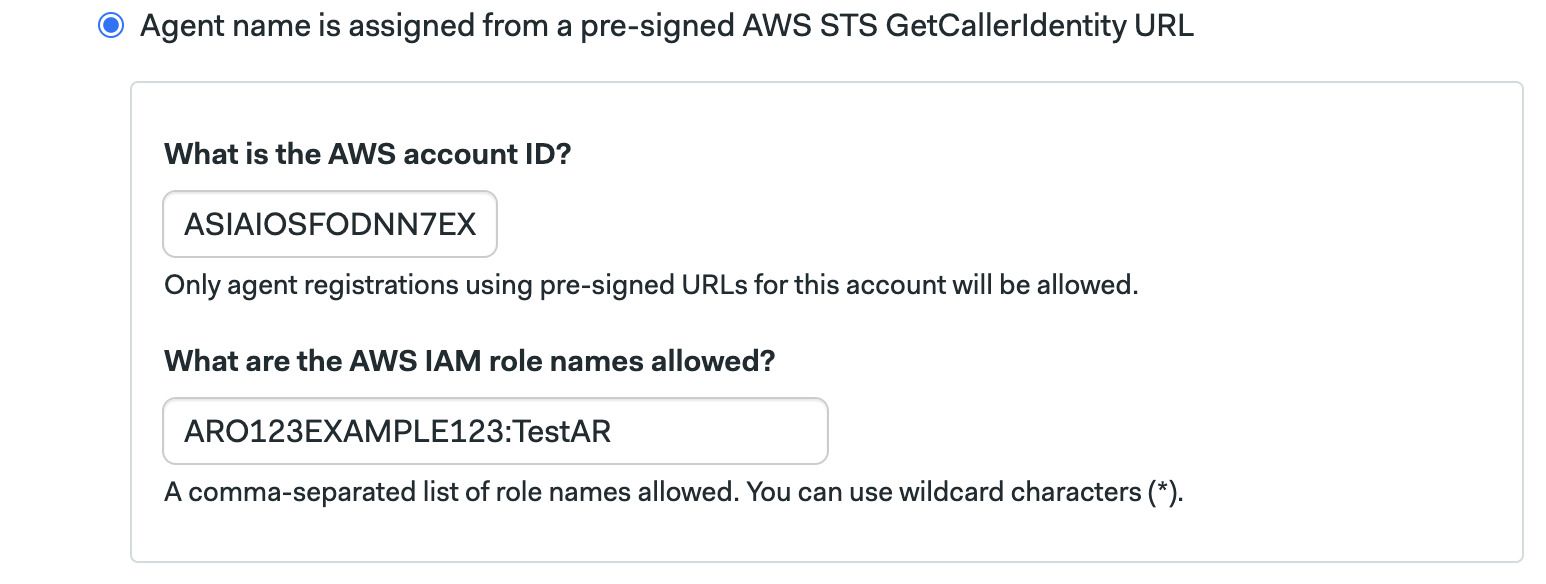
Select the option Agent name is assigned from a pre-signed AWS STS GetCallerIdentity URL during agent registration
-
Type your AWS account ID
-
Type the list of roles the IAM user is allowed to assume
-
Press Save
Name release
You can select what happens when the agent name when it disconnects. The default behavior is to release for reuse the name immediately after disconnection.
On some cases, however, you may want to keep the name reserved, for example:
- If you want to connect to self-hosted agent machine to troubleshoot some issue
- If you're using AWS STS endpoints, you may want to reserve the name for the duration of the EC2 instance
You can select how long to reserve the agent name during agent registration.
How to install agent stack
The Semaphore self-hosted agent is open source. The prerequisites to install the self-hosted agent stack are:
- Git
- Bash (Linux and macOS) or PowerShell (Windows)
- A local user with sudo powers and Docker management permissions (Linux or macOS)
- A user with sudo powers (Linux and macOS)
- Docker running as non-root (Linux and macOS)
- Docker Compose (Linux and macOS)
Scroll down to learn how to install the stack in your hardware.
Kubernetes
Semaphore provides Helm charts to run agents in a Kubernete cluster.
To install the Semaphore custom controller, follow these steps:
-
Install Helm
-
Add the Semaphore Helm chart
Add Helm repositoryhelm repo add renderedtext https://renderedtext.github.io/helm-charts
-
Install the agent-k8s-controller with Helm
Install agent-k8s-controllerhelm upgrade --install semaphore-controller renderedtext/controller \
--namespace semaphore \
--create-namespace \
--set endpoint=my-org.semaphoreci.com \
--set apiToken=<token>Replace:
<my-org.semaphoreci.com>
with your organization URL<token>
with a valid Semaphore API token
-
Create a secret to register the agent type in the Kubernetes cluster. Create a new YAML resource file.
semaphore-secret.ymlapiVersion: v1
kind: Secret
metadata:
name: my-semaphore-agent-type
namespace: semaphore
labels:
semaphoreci.com/resource-type: agent-type-configuration
stringData:
agentTypeName: <AGENT_TYPE>
registrationToken: <AGENT_TYPE_REGISTRATION_TOKEN>Replace:
<AGENT_TYPE>
with the type you created during registration<AGENT_TYPE_REGISTRATION_TOKEN>
with the token you received during registration- The custom controllers looks for the
label
shown below to know what secret is relevant to this connection
-
Create the secret in Kubernetes
kubectl apply -f semaphore-secret.yml
The Helm chart provides a few additional configuration options so you can tweak your installation to best suit your needs. Run helm show values renderedtext/controller
to view all available settings.
See the Helm chart repo to learn more.
Ubuntu/Debian
Follow these steps to install self-hosted agent in Ubuntu or Debian:
-
Create a user with sudo permissions to run the agent service, e.g.
semaphore
sudo adduser semaphore
sudo adduser semaphore sudo -
Log in or switch to the agent service user
su - semaphore
-
Prepare the machine
Prepare machinesudo mkdir -p /opt/semaphore/agent
sudo chown $USER:$USER /opt/semaphore/agent/
cd /opt/semaphore/agent -
Download the agent package. Find the latest release for your platform and architecture
Download agent packagecurl -L https://github.com/semaphoreci/agent/releases/download/v2.2.23/agent_Linux_x86_64.tar.gz -o agent.tar.gz
tar -xf agent.tar.gz -
Install the agent and follow the prompts. Type the organization name, the registration token and the name of the local service user, e.g.
semaphore
. The registration token is the one revealed during agent registrationInstall agent$ sudo ./install.sh
Enter organization: my-org
Enter registration token: <access token>
Enter user [root]: <local-service-user>
Downloading toolbox from https://github.com/semaphoreci/toolbox/releases/latest/download/self-hosted-linux.tar...
[sudo] password for semaphore:
Creating agent config file at /opt/semaphore/agent/config.yaml...
Creating /etc/systemd/system/semaphore-agent.service...
Starting semaphore-agent service... -
Add GitHub and BitBucket SSH fingerprints
sudo mkdir -p /home/$USER/.ssh
sudo chown -R $USER:$USER /home/$USER/.ssh
curl -sL https://api.github.com/meta | jq -r ".ssh_keys[]" | sed 's/^/github.com /' | tee -a /home/$USER/.ssh/known_hosts
curl -sL https://bitbucket.org/site/ssh | tee -a /home/$USER/.ssh/known_hosts
chmod 700 /home/$USER/.ssh
chmod 600 /home/$USER/.ssh/known_hosts -
Add your SSH private keys into the
~/.ssh/
folder -
Test SSH connection to GitHub or BitBucket
Testing SSH connectionssh -T git@bitbucket.org
ssh -T git@github.com -
Restart the agent service
Restart agent servicesudo systemctl restart semaphore-agent
-
Check that the agent is working and is connected
Checking self-hosted agent status$ sudo systemctl status semaphore-agent
● semaphore-agent.service - Semaphore agent
Loaded: loaded (/etc/systemd/system/semaphore-agent.service; disabled; preset: enabled)
Active: active (running) since Fri 2024-07-12 14:09:28 UTC; 10s ago
Main PID: 5154 (agent)
Tasks: 11 (limit: 509)
Memory: 13.0M (peak: 13.8M)
CPU: 77ms
CGroup: /system.slice/semaphore-agent.service
├─5154 /opt/semaphore/agent/agent start --config-file /opt/semaphore/agent/config.yaml
└─5157 /opt/semaphore/agent/agent start --config-file /opt/semaphore/agent/config.yaml
Jul 12 14:09:28 selfhosted agent[5157]: Jul 12 14:09:28.345 sywinVS8IgIkZzgIgk2D : Starting to poll for jobs
Jul 12 14:09:28 selfhosted agent[5157]: Jul 12 14:09:28.345 sywinVS8IgIkZzgIgk2D : SYNC request (state: waiting-for-jobs)
Jul 12 14:09:28 selfhosted agent[5157]: Jul 12 14:09:28.442 sywinVS8IgIkZzgIgk2D : SYNC response (action: continue)
Jul 12 14:09:28 selfhosted agent[5157]: Jul 12 14:09:28.442 sywinVS8IgIkZzgIgk2D : Waiting 4.888s for next sync...
Jul 12 14:09:33 selfhosted agent[5157]: Jul 12 14:09:33.331 sywinVS8IgIkZzgIgk2D : SYNC request (state: waiting-for-jobs)
See self-hosted agent configuration to see the next steps in the setup. If the installation fails, try the Generic Linux installation or installing from source.
Generic Linux
Follow these steps to install self-hosted agent in any Linux distribution:
-
Create a user to run the agent service with sudo permissions, e.g.
semaphore
-
Log in or switch to the agent service user
su - semaphore
-
Prepare the machine
Prepare machinesudo mkdir -p /opt/semaphore/agent
sudo chown $USER:$USER /opt/semaphore/agent/
cd /opt/semaphore/agent -
Create the configuration file for the agent. Replace the endpoint with your organization URL (without HTTPS), and the registration token revealed during agent registration
Create config filecat > config.yaml <<EOF
endpoint: "my-org.semaphoreci.com"
token: "[token]"
EOF -
Download and install the Semaphore toolbox. Selec the correct platform and architecture
Install Semaphore toolboxcurl -L "https://github.com/semaphoreci/toolbox/releases/latest/download/self-hosted-linux.tar" -o toolbox.tar
tar -xf toolbox.tar
mv toolbox ~/.toolbox
bash ~/.toolbox/install-toolbox
source ~/.toolbox/toolbox
echo "source ~/.toolbox/toolbox" >> ~/.bash_profile -
Download the agent package. Find the latest release for your platform and architecture
Download agent packagecurl -L https://github.com/semaphoreci/agent/releases/download/v2.2.23/agent_Linux_x86_64.tar.gz -o agent.tar.gz
tar -xf agent.tar.gz -
Add GitHub and BitBucket SSH fingerprints
sudo mkdir -p /home/$USER/.ssh
sudo chown -R $USER:$USER /home/$USER/.ssh
curl -sL https://api.github.com/meta | jq -r ".ssh_keys[]" | sed 's/^/github.com /' | tee -a /home/$USER/.ssh/known_hosts
curl -sL https://bitbucket.org/site/ssh | tee -a /home/$USER/.ssh/known_hosts
chmod 700 /home/$USER/.ssh
chmod 600 /home/$USER/.ssh/known_hosts -
Add your SSH private keys into the
~/.ssh/
folder -
Test SSH connection to GitHub or BitBucket
Testing SSH connectionssh -T git@bitbucket.org
ssh -T git@github.com -
Start the agent
Start the agentagent start --config-file config.yaml
See self-hosted agent configuration to see the next steps in the setup.
Red Hat Enterprise Linux (RHEL)
In order to run the self-hosted agent in FIPS-enabled Red Hat Enterprise Linux (RHEL), you must compile the binary from source.
To compile the agent, follow these steps:
-
Verify the host has FIPS mode enabled
sudo fips-mode-setup --check
-
Install the go-toolset
sudo yum install go-toolset
-
Create a user for the Semaphore service with
sudo
permissionsadduser semaphore
passwd semaphore
usermod -aG wheel semaphore
su - semaphore -
Download the source and compile it. Find the latest release and download the source package
curl -L https://github.com/semaphoreci/agent/archive/refs/tags/v2.2.23.tar.gz -o agent.tar.gz
tar -xf agent.tar.gz
cd agent-2.2.23
make build -
Verify that the binary is FIPS compatible
go tool nm ./build/agent | grep FIPS
-
Install and follow the prompts
make install
$ sudo ./install
Enter organization: my-org
Enter registration token: <access token>
Enter user [root]: <local-service-user>
Downloading toolbox from https://github.com/semaphoreci/toolbox/releases/latest/download/self-hosted-linux.tar...
[sudo] password for semaphore:
Creating agent config file at /opt/semaphore/agent/config.yaml...
Creating /etc/systemd/system/semaphore-agent.service...
Starting semaphore-agent service... -
Add GitHub and BitBucket SSH fingerprints
sudo mkdir -p /home/$USER/.ssh
sudo chown -R $USER:$USER /home/$USER/.ssh
curl -sL https://api.github.com/meta | jq -r ".ssh_keys[]" | sed 's/^/github.com /' | tee -a /home/$USER/.ssh/known_hosts
curl -sL https://bitbucket.org/site/ssh | tee -a /home/$USER/.ssh/known_hosts
chmod 700 /home/$USER/.ssh
chmod 600 /home/$USER/.ssh/known_hosts -
Add your SSH private keys into the
~/.ssh/
folder -
Test SSH connection to GitHub or BitBucket
Testing SSH connectionssh -T git@bitbucket.org
ssh -T git@github.com
macOS
To install the Semaphore self-hosted agent in macOS
-
Create a user to run the agent service with sudo permissions, e.g.
semaphore
-
Log in or switch to the agent service user
su - semaphore
-
Prepare the machine
Prepare machinesudo mkdir -p /opt/semaphore/agent
sudo chown $USER:$USER /opt/semaphore/agent/
cd /opt/semaphore/agent -
Download the agent package. Find the latest release for your platform and architecture (x86_64 or arm64)
Download agent packagecurl -L https://github.com/semaphoreci/agent/releases/download/v2.2.23/agent_Darwin_arm64.tar.gz -o agent.tar.gz
tar -xf agent.tar.gz -
Install the agent and follow the prompts. Type the organization URL, the registration token and the name of the local service user. The registration token is the one revealed during agent registration
Install agent$ sudo ./install.sh
Enter organization: my-org.semaphoreci.com
Enter registration token: <access token>
Enter user [root]: <local-service-user>
Downloading toolbox from https://github.com/semaphoreci/toolbox/releases/latest/download/darwin.tar...
[sudo] password for semaphore:
Creating agent config file at /opt/semaphore/agent/config.yaml...
Creating /etc/systemd/system/semaphore-agent.service...
Starting semaphore-agent service... -
Add GitHub and BitBucket SSH fingerprints
sudo mkdir -p /home/$USER/.ssh
sudo chown -R $USER:$USER /home/$USER/.ssh
curl -sL https://api.github.com/meta | jq -r ".ssh_keys[]" | sed 's/^/github.com /' | tee -a /home/$USER/.ssh/known_hosts
curl -sL https://bitbucket.org/site/ssh | tee -a /home/$USER/.ssh/known_hosts
chmod 700 /home/$USER/.ssh
chmod 600 /home/$USER/.ssh/known_hosts -
Add your SSH private keys into the
~/.ssh/
folder -
Test SSH connection to GitHub or BitBucket
Testing SSH connectionssh -T git@bitbucket.org
ssh -T git@github.com
macOS (Homebrew)
You can install the macOS agent using Homebrew. Follow these steps:
-
Install Homebrew
-
Install the Semaphore self-hosted agent
brew install semaphoreci/tap/agent
-
Download and install the Semaphore toolbox. Select the correct platform and architecture
Install Semaphore toolboxcurl -L "https://github.com/semaphoreci/toolbox/releases/download/v1.21.19/darwin-arm.tar" -o toolbox.tar
tar -xf toolbox.tar
mv toolbox ~/.toolbox
bash ~/.toolbox/install-toolbox
source ~/.toolbox/toolbox
echo "source ~/.toolbox/toolbox" >> ~/.bash_profile -
Add GitHub and BitBucket SSH fingerprints
sudo mkdir -p /home/$USER/.ssh
sudo chown -R $USER:$USER /home/$USER/.ssh
curl -sL https://api.github.com/meta | jq -r ".ssh_keys[]" | sed 's/^/github.com /' | tee -a /home/$USER/.ssh/known_hosts
curl -sL https://bitbucket.org/site/ssh | tee -a /home/$USER/.ssh/known_hosts
chmod 700 /home/$USER/.ssh
chmod 600 /home/$USER/.ssh/known_hosts -
Add your SSH private keys into the
~/.ssh/
folder -
Test SSH connection to GitHub or BitBucket
Testing SSH connectionssh -T git@bitbucket.org
ssh -T git@github.com -
Start the agent. Replace the endpoint with your organization URL. Type the registration token you received earlier
Start the agentagent start --endpoint my-org.semaphoreci.com --token <TOKEN>
Windows
To install the self-hosted agent in Windows, follow these steps:
-
Prepare your machine
New-Item -ItemType Directory -Path C:\semaphore-agent
Set-Location C:\semaphore-agent -
Download the agent. Find the latest release for your platform and architecture
Invoke-WebRequest "https://github.com/semaphoreci/agent/releases/download/v2.2.23/agent_Windows_x86_64.tar.gz" -OutFile agent.tar.gz
tar.exe xvf agent.tar.gz -
Install the agent and follow the prompts
$env:SemaphoreEndpoint = "<your-organization>.semaphoreci.com"
$env:SemaphoreRegistrationToken = "<your-agent-type-registration-token>"
.\install.ps1
AWS Autoscaler
With AWS (or any other cloud), you can spin up an EC2 instance and install the Ubuntu, Linux, macOS, or Windows agents.
Semaphore, however, also provides an AWS stack to run an auto-scaling fleet of agents. To learn how this feature works, see the Autoscaling agents in AWS page.