Notifications
Get notified via Slack or any other webhook-based service when important things happen.
Slack and webhook notifications
Send notifications to Slack and other webhook-based services. Notifications are sent when a pipeline finishes running so your team get instant feedback on the result.
To set up a Slack notification, first you need to configure an incoming webhook in your Slack workspace.
Always use Incoming Webhooks app instead of creating your own Endpoint on Slack. If you set up a notification with an endpoint from your custom Slack app, you won't be able to use the channel override feature.
- UI
- CLI
To create a notification, navigate to Notifications and press New Notification
-
Type the name of the notification
-
Type the name of the rule to fires the notification
-
You can supply optional filters for this rule:
- Projects: comma-separated list of projects where it applies
- Branches: comma-separated list of Git branches
- Pipelines: comma-separated list pipeline YAML files that need to run in order to fire the notification
- Results: comma-separated list of results. Valid values are: "passed", "failed", "stopped", or "canceled"
Show me
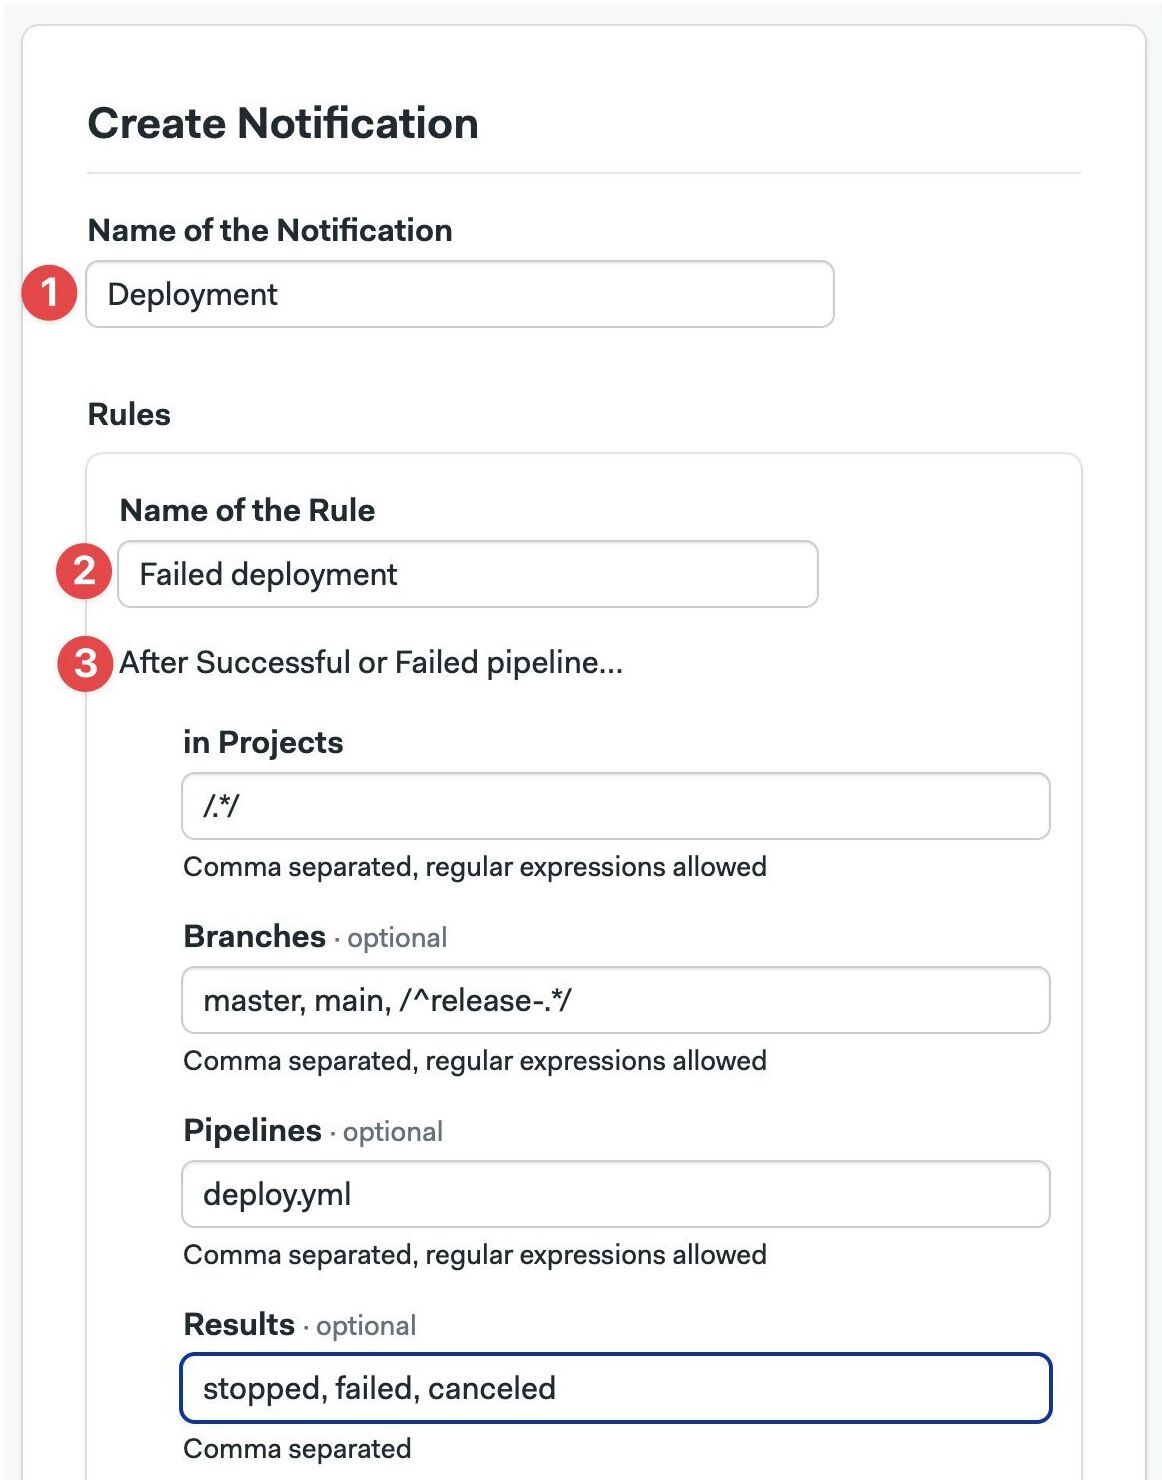
Regular expressions must wrapped in forward slashes, e.g. /.*/ matches all values. You can use regular expressions in Projects, Branches, and Pipelines.
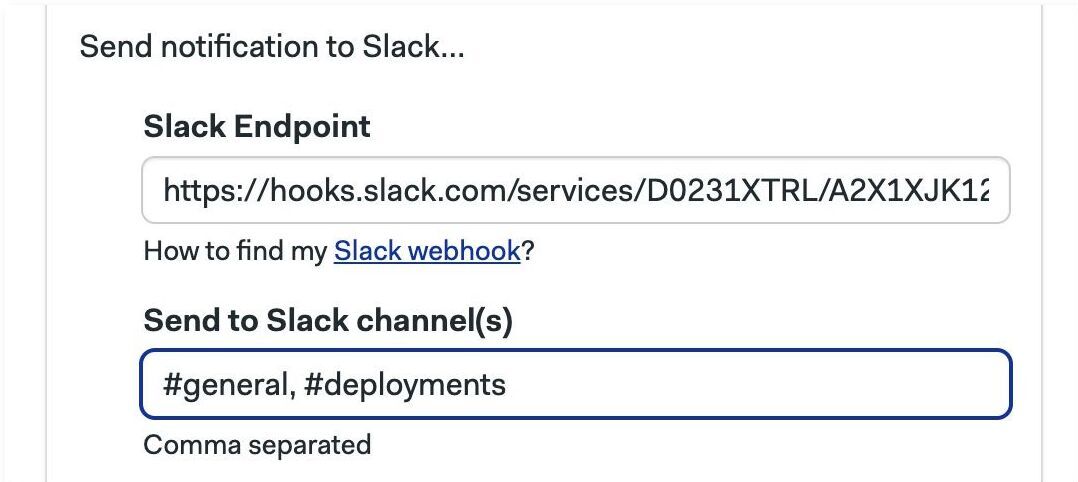
To send Slack notifications:
-
Copy the Slack webhook for your Slack Workspace
-
Type the comma-separated list of channels to receive the message
Show me
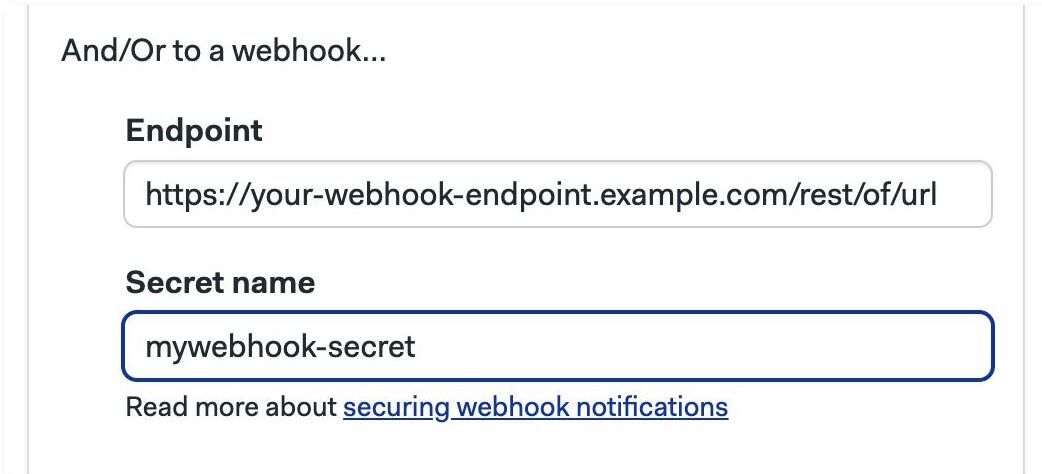
To send notifications to other webhook-based services:
-
Create a organization secret containing the environment variable
WEBHOOK_SECRETand a secret value. Remember the name of this secret, e.g. "mywebhook-secret" -
Copy the URL of the webhook that receives the notification
-
Type the name of the secret created on step 1, e.g. "mywebhook-secret"
Show me
The value contained in the secret is sent along with the payload on notification to help secure the message. You can should validate that the secret value matches before accepting the message on the receiving end.
At this point, you can create additional rules or save the changes by pressing Save Notification.
To create a Slack notification, install and connect the Semaphore command line and execute:
sem create notification <name> \
    --projects <project_name> \
    --slack-endpoint <slack-webhook-endpoint>
Use the Slack webhook for your Slack Workspace
For example, to create a notification on the "web", "cli", and "api" projects on the "master" branch:
sem create notification master-pipelines \
    --projects "web,cli,api" \
    --branches master \
    --slack-endpoint <slack-webhook-endpoint>
You can enable notifications only for a subset of the pipelines:
sem create notifications example \
    --projects "web" \
    --branches "master" \
    --pipelines "prod.yml" \
    --slack-endpoint <slack-webhook-endpoint>
To send notifications on multiple Slack channels add --slack-channels:
sem create notifications new-releases \
    --projects "web,cli,api" \
    --branches "master" \
    --slack-endpoint <slack-webhook-endpoint> \
    --slack-channels "#dev-team,#qa-team"
The --branches, --projects and --pipelines options accept regular expressions. For example:
sem create notifications example \
    --projects "/.*api$/" \
    --branches "master,/hotfix\/.*/" \
    --pipelines "/prod-.*/" \
    --slack-endpoint <slack-webhook-endpoint>
Regex matches must be wrapped in forward slashes (e.g. /.*/). Specifying a branch name without slashes (e.g. .*) will execute a direct equality match.
The sem create notification command can be used to set up custom webhook-based notifications. The same options in Slack notification apply, simply replace --slack-endpoint with --webhook-endpoint
sem create notification <name> \
    --projects <project_name> \
    --webhook-endpoint <webhook-endpoint>
You can secure the notification by adding a secret. That way, the receiving endpoint can validate the payload.
To add a password to your notification:
- Create a organization secret containing the environment variable
WEBHOOK_SECRETand a secret value. Remember the name of this secret, e.g. "mywebhook-secret" - Add
--webhook-secretto the command:Securing a webhook-based notificationsem create notifications <name> \
--webhook-endpoint <webhook-endpoint> \
--webhook-secret <semaphore-secret-name>
Semaphore includes the signature in the X-Semaphore-Signature-256 header when the webhook secret is present. Semaphore uses an HMAC-SHA256 to compute the signature of the request body.
Manage notifications from the CLI
You can use the Semaphore command line tool to view, delete and edit notifications:
- List notifications with:
sem get notifications - Describe a notification with:
sem get notifications <name> - Edit a notification with:
sem edit notification <name> - Delete a notification with:
sem delete notification <name>
Notification payload
The payload contains all the information related to a pipeline.
{
    "version": "1.0.0",
    "organization": {
        "name": "semaphore",
        "id": "36360e31-fee6-42b2-9f6c-999d4c06ce81"
    },
    "project": {
        "name": "notifications",
        "id": "91e34570-bebe-42b6-b47a-ca710b2b8927"
    },
    "repository": {
        "url": "https://github.com/semaphoreci/myproject",
        "slug": "semaphoreci/notifications"
    },
    "revision": {
        "tag": null,
        "sender": {
            "login": "radwo",
            "email": "184065+radwo@users.noreply.github.com",
            "avatar_url": "https://avatars2.githubusercontent.com/u/184065?v=4"
        },
        "reference_type": "branch",
        "reference": "refs/heads/rw/webhook_impl",
        "pull_request": null,
        "commit_sha": "2d9f5fcec1ca7c68fa7bd44dd58ec4ff65814563",
        "commit_message": "empty",
        "branch": {
            "name": "rw/webhook_impl",
            "commit_range": "36ebdf6e906cf3491391442d2f779b512ca49485...2d9f5fcec1ca7c68fa7bd44dd58ec4ff65814563"
        }
    },
    "workflow": {
        "initial_pipeline_id": "fa02c7bd-7a8b-42e0-8d6e-aa0d8a194e19",
        "id": "acabe58e-4bcc-4d39-be06-e98d71917703",
        "created_at": "2019-12-10T13:09:54Z"
    },
    "pipeline": {
        "yaml_file_name": "semaphore.yml",
        "working_directory": ".semaphore",
        "stopping_at": "2019-12-10T13:10:22Z",
        "state": "done",
        "running_at": "2019-12-10T13:09:58Z",
        "result_reason": "user",
        "result": "stopped",
        "queuing_at": "2019-12-10T13:09:55Z",
        "pending_at": "2019-12-10T13:09:55Z",
        "name": "Notificaitons",
        "id": "fa02c7bd-7a8b-42e0-8d6e-aa0d8a194e19",
        "error_description": "",
        "done_at": "2019-12-10T13:10:28Z",
        "created_at": "2019-12-10T13:09:54Z"
    },
    "blocks": [
        {
            "state": "done",
            "result_reason": "user",
            "result": "stopped",
            "name": "List & Test & Build",
            "jobs": [
                {
                    "status": "finished",
                    "result": "stopped",
                    "name": "Test",
                    "index": 1,
                    "id": "21df03d2-c4e0-4e0a-acd7-5ff60dc0727e"
                },
                {
                    "status": "finished",
                    "result": "stopped",
                    "name": "Build",
                    "index": 2,
                    "id": "84190263-362c-4051-8260-e43637f148de"
                },
                {
                    "status": "finished",
                    "result": "passed",
                    "name": "Lint",
                    "index": 0,
                    "id": "d4b93a5b-69a5-43e6-ab24-06b095fc49bf"
                }
            ]
        }
    ]
}
In this example, revision.pull_request and revision.tag are null because the payload is related to a pipeline run started via a push to the branch. Information about this is kept in the revision.reference_type file.
Sample pull_request object:
"pull_request": {
  "head_repo_slug": "semaphoreci/notifications",
  "number": 2,
  "name": "Add docs for webhook notifications",
  "head_sha": "9872252e00ac5a6b5870cdf94efe0e04770ad104",
  "branch_name": "webhook_notifications",
  "commit_range": "9872252e00ac5a6b5870cdf94efe0e04770ad104^..9872252e00ac5a6b5870cdf94efe0e04770ad104"
}
Sample tag object:
"tag": {
  "name": "v1.0.1",
}